Last Updated on November 20, 2025
There are various reasons you might see QuickBooks access denied error, such as damaged company files, inadequate permissions, or incorrect internet settings.
This locks the user from accessing the company or carrying out crucial operations. This could be because of inadequate user permissions, damaged company files, or outdated QuickBooks Desktop. However, the reasons aren’t restricted to that.
Let us see how to address the situation of QuickBooks User has Denied Access and errors like HTTP 502 or 350. In this guide, we will explore in-depth solutions to help you fix them.
Section A: QuickBooks Access Denied to Various Features Such as Advanced Reports
Sometimes, you may find that you can’t access certain features, such as QuickBooks reports or other online services.
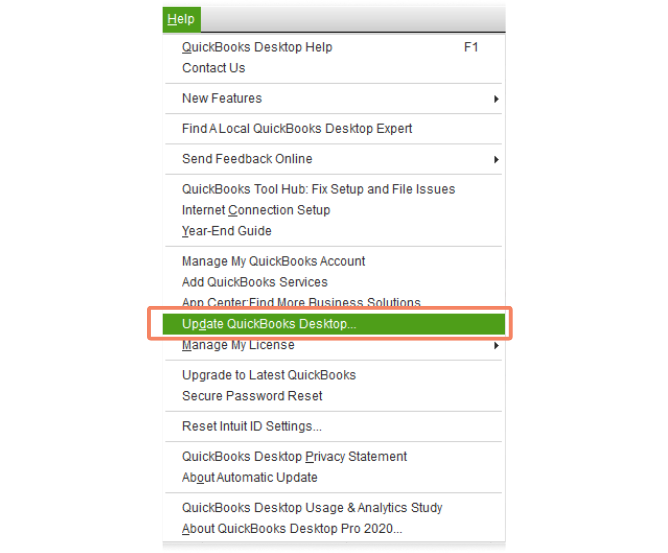
1. Update QB Desktop
To begin with, we advise you to update your QuickBooks Desktop to the latest release available. This ensures if there was a bug fix or product enhancement released by the developers, you’ll install it.
2. Check User Permissions
Let us check the users and roles to ensure the user you are trying to log in with has adequate permission to access QuickBooks features.
- Open QB Desktop and go to the Company menu.
- Choose Users followed by Set Up Users and Roles.
- Type in the admin password and select OK.
- Go to the Role List tab and choose New.
- Assign a name and description to the role, something that highlights its permission level.
- Go to the Area and Activities field and choose an area of your accounts.
- Check each area and choose either None, Full, or Partial to allow specific permission to the user.
- Finally, when you are done, select OK.
Now, restart QuickBooks Desktop and check if you can resume the operations you found an issue with earlier.
3. Resolve Data Damage in Company File
Access to Path is Denied QuickBooks error is often a result of damage to the company file. Verify and Rebuild Utility available in QuickBooks Desktop is beneficial for finding out damages and issues with the company file and resolving them.
Therefore, verify and rebuild company data and retry.
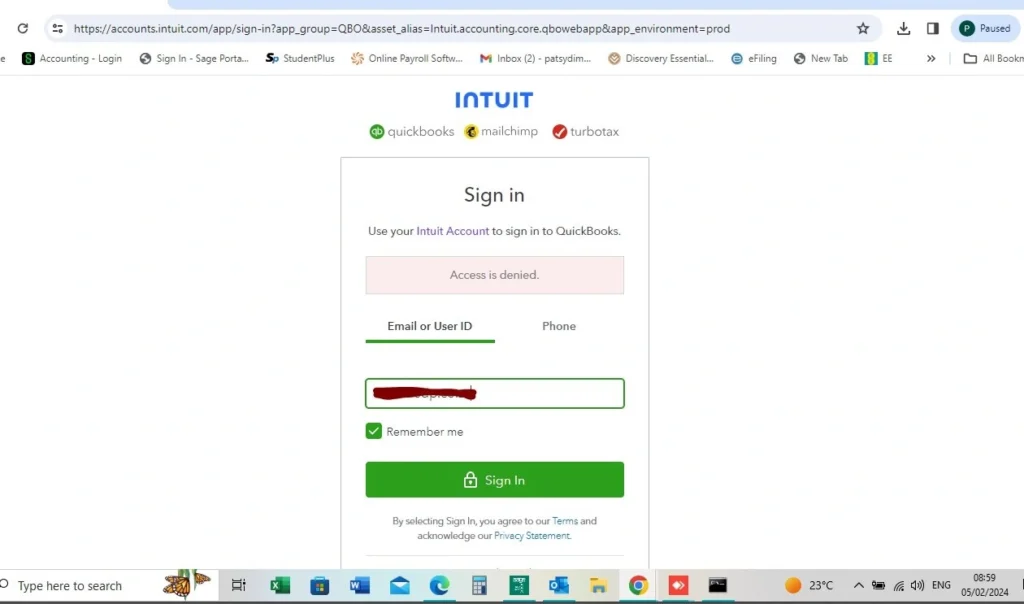
Section B: QuickBooks Access Denied, HTTP 502 or 350 Error (QBO)
QuickBooks Access Denied, 350, or HTTP 502 error message might show up when trying to reauthenticate. Let us see how to resolve this error in QuickBooks Online.
Your browser uses cache and cookies to run faster. However, cache and cookies often give way to issues like:
- You can’t export data such as exporting a report to Excel or transactions to another accounting program).
- Certain pages in QuickBooks don’t load
- The QB asks you to sign in, and you sign in, but even after multiple times, you get the sign-in screen.
- You can’t access forms such as annual payroll forms or previews or it is taking very long to download them.
If you come across such issues, clear the browser’s cache and cookies.
1. Open QuickBooks in an Incognito Window
To check whether the issue is because of the browser’s cache and cookies, let us open QuickBooks Online in an incognito or in-private window. To open the incognito or private window in your browser, use these shortcuts:
- Google Chrome: Ctrl + Shift + N
- Microsoft Edge: Ctrl + Shift + N
- Safari: Command + Shift + N
- Mozilla Firefox: Ctrl + Shift + P
Now, log in to QBO and check if the issue you faced earlier is resolved. Next, whichever browser you use, such as Firefox, Chrome, Safari or Microsoft Edge, clear its cache.
2. Clear Intuit-Specific Cookies
To resolve QuickBooks access denied, HTTP 502 or 350 error, let’s clear cookies on your browser. Depending on the browser you use, such as Chrome, Firefox, or Safari, follow the steps below to delete Intuit-specific cookies on your browser.
a.) Google Chrome
Open Google Chrome and follow the steps below.
- Tap on the three-dot menu ( ⋮ icon) at the top right corner of the window.
- Go to Settings, followed by Privacy and Security.
- Choose Cookies and other site data.
- Now, click on the option to See all cookies and site data.
- In the search bar, type in Intuit and hit the Enter key. This will allow you to find Intuit cookies.
- Now, choose Remove all shown or the trash can icon.
Close Google Chrome and launch it again.
b.) Mozilla Firefox
Open Mozilla Firefox and follow the steps given below:
- Click on the Menu ☰ icon at the top right corner of the browser window.
- Go to Settings, followed by Privacy & Security.
- Go to Cookies and Site Data and click on Manage Data.
- In the search bar, type in intuit and hit the Enter key. This will allow you to find Intuit cookies.
- Choose Remove All Shown.
- Click on Save Changes.
Close Mozilla Firefox and relaunch it so the changes take effect.
c.) Safari
Open the Safari browser on your Mac and then follow the steps below.
- Click on Safari beside the Apple icon at the top left.
- Go to Preferences and Privacy.
- Choose Manage Website Data.
- Type in Intuit in the search bar and hit Enter. This will find Intuit cookies.
- Go to Remove All and then select Remove Now.
- Finally, click on Done.
Close Safari and relaunch it so the changes take effect. Now, check that the issue you faced earlier is resolved.
3. Disconnect an Account Connected to Online Banking
When you disconnect a bank account, you won’t lose or delete any data that has already been added to the QuickBooks Online account. Thus, you can go ahead and disconnect the account and re-connect a new one. Open QBO, sign into your company, and then follow the steps below:
- Go to Bookkeeping and choose Transactions.
- Select Banking and choose the tile for the bank account.
- Click on the edit ( ✎ icon) and choose Edit account info.
- Click on the checkbox to Disconnect this account on the save.
Important Note: In case QB is downloading new transactions, you might not be able to see this option. Therefore you will need to wait some minutes for the update to take place and then try again.
- Choose Save and Close.
Now, check if the access denied error in the QuickBooks Desktop you faced earlier is resolved.
Section C: QuickBooks Error 403 – Access Denied
Do you see the following error message on your screen:
“Error 403: Access Forbidden or Access Denied”
This might be because QuickBooks can’t connect to Intuit services online. Let us see how to fix QuickBooks access denied error in this scenario.
1. Change Proxy Server in Internet Settings
QuickBooks Desktop needs an internet connection to access Intuit services online. When it does so, it does it through the default internet settings on your Windows computer.
Therefore, let’s check the internet settings and make the required changes in the proxy server.
- Launch the Start menu and type in Internet Options.
- Hit Enter.
- Now, choose Internet Options from the list of search results.
- Go to the Connections tab.
- Click on the LAN settings button.
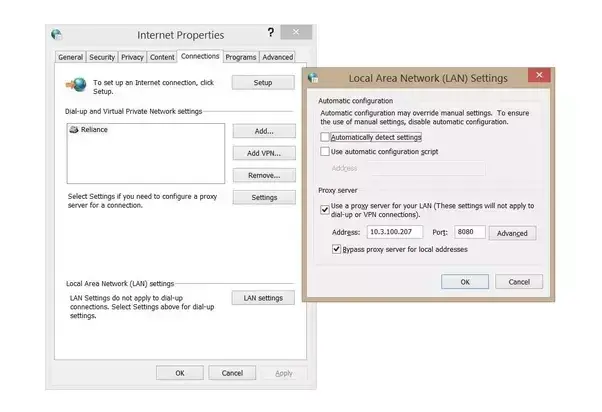
- Unmark the box to Use a proxy server for your LAN.
- Choose OK and close the LAN settings window.
- Finally, tap on OK and close the Internet Options screen.
Now, restart the computer and open QuickBooks Desktop. This should resolve the QuickBooks error 403.
Section D: QuickBooks Access Denied to Bill Pay
Sometimes, users sign up for QuickBooks Bill Pay and get this message:
“We reviewed your info and QuickBooks Bill Pay isn’t available for your business. This may change in the future.”
This means that Intuit hasn’t rolled out the Bill Pay service for your business. You would need to try alternative services for the time being.
Conclusion
This was all about how to resolve the QuickBooks access denied error. In this blog, we saw different instances when you might encounter an error message, access to QuickBooks is denied, HTTP 502 or 350, etc.
However, if after carrying out the solutions given above, you find the issue persists, speak to an expert. A QuickBooks consultant can help you get rid of such errors and get back on track in no time.
Frequently Asked Questions
How to resolve the QuickBooks access denied problem?
While working in QuickBooks, the Access Denied problem pops up on your screen, and you have no clue why this is happening or what this problem is. Below are the reasons why this happens.
1. Breach or unauthorized access by a user lacking permissions.
2. Corruption in the file.
3. Using an outdated version of QuickBooks.
Listed below are some things you need to do to troubleshoot this issue.
1. Update the QuickBooks Desktop.
2. Verify the user permissions.
3. Check the damaged data files.
4. Clear cache and cookies.

Kate is a certified public accountant (CPA) with expertise in various accounting software. She is technically inclined and finds passion in helping businesses and self-employed people carry out bookkeeping, payroll, and taxation without worrying about errors. Every once in a while, Kate loves to travel to far-off places and relax in the lap of nature.