Last Updated on November 20, 2025
The Write Check column in QuickBooks is a crucial feature that enables you to record payments via checks, maintaining precise financial records. Customers sometimes experience issues with columns and can’t see the Write Check section on screen. In this case, missing columns can be confusing when entering transactions.
The QuickBooks Write Check columns missing issue will prevent you from entering payment information. This issue could create an interference with the workflow. It delays your work process and blocks you from making accurate payment records. Therefore, it becomes essential to resolve this problem with your QuickBooks software.
This comprehensive guide will provide you with the working approaches to resolve it if the QuickBooks Write Check columns go missing.
Root Causes behind QuickBooks Write Check Columns Missing
There is no one thing that can be solely said to be responsible for the problem of the missing Write Checks column in QB. We will let you walk through some of the most common causes behind the QuickBooks Write Check columns missing. Let’s delve into the list of potential triggers.
- File loss, corrupted data, and incorrect user profiles can be the reason why some particular panels and columns are unable to be found.
- Another possible cause can be a customization of the form columns. If you manually hide or rearrange the columns, this might also make the QuickBooks Write Check columns missing.
- QuickBooks Updates that are incomplete or malfunctioning may trigger this problem in your QuickBooks.
- Incorrect window size and resolution settings can be the reason why columns are visually hidden, even though they are not deleted.
- Sometimes, integration add-ons make changes in layouts or interfaces that can lead to this issue.
- Specific data preferences or the permissions you granted, and sometimes the geographical settings, cause some columns to be missing.
As you now know, all the possible causes behind the QuickBooks Write Check columns missing problem. Now, let’s learn how to resolve it using effective troubleshooting methods.
Practical Fixes That Work When the Write Check Column is Missing
These are some of the best ways to troubleshoot the QuickBooks Write Check columns missing issue. Let’s get into these methods one by one and learn how to attempt them.
Method 1: Adjust the Display Resolution Settings
Sometimes, customized visual display settings can cause columns to be clipped or concealed. This mostly happens when you lower the resolution to a level that QuickBooks requires as a minimum. This change adjusts the content to fit the screen. Go through these steps to correct the display resolution.
- Start by manually horizontally stretching the QuickBooks window or maximizing it to see the clipped columns
- Now, make sure the scaling is 100% and adjust the system’s display resolution to the advised settings, like 1920×1080
- Lastly, relaunch QuickBooks
Even after trying the above steps, you are still facing the issue of QuickBooks Write Check columns missing, so you need to restore the default layout of the Write Check form.
Method 2: Reset the Default Layout of the Write Check
Some particular sections may get inadvertently hidden because QuickBooks allows you to make personalized changes to the Write Check interface. Fortunately, you can resolve this by resetting the form to its original configuration. Follow the steps given below to follow this method:
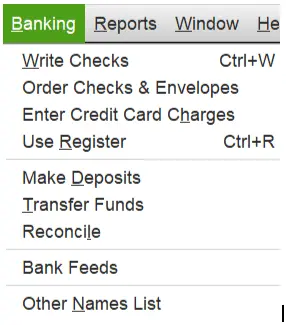
- Start by launching QuickBooks
- Then, choose Banking > Write Check
- Next, find the Customize button that you can find on the toolbar
- Now, choose Customize columns or an analogous option
- Select Reset to Default and re-enable the missing columns in the window
- After that, check and implement the modifications, and verify whether the disappeared columns have been restored
If the problems still exist even after following the process, and you are unable to find the missing columns, you need to fix the issues with the company file.
Method 3. Find and Resolve the Issues in the Company File
To resolve the problems with the company file, first, check and rebuild the utility. To do so, find the issue in the company data, and then reset the utility to resolve it.
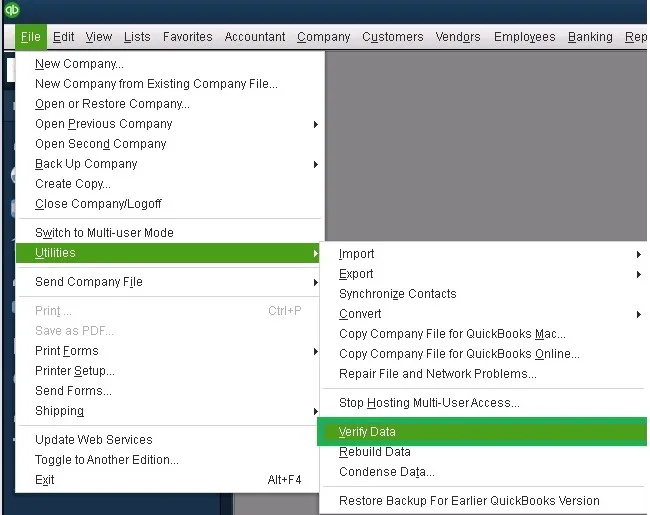
- Check the integrity of your company file by choosing File > Utilities > Verify Data. After, you will receive a message showing that:
- If QuickBooks found no issues with the company data, that means your data is clean. In that case, you don’t need to follow any other steps
- You need to rebuild the data if you have found damaged data in your company file. It is essential to do so because it can cause your data to lose its integrity
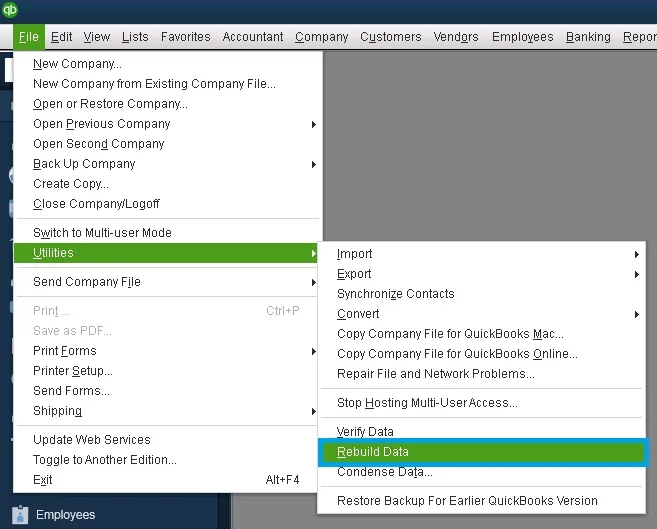
- Now, to address the problems in the company file, you need to select File > Utilities > Rebuild Data
- After that, your QuickBooks will ask to create a backup before it re-establishes your company file
- Next, click OK
- Then choose the backup destination and select OK. Don’t let it take the place of another backup file
- Now, enter a new name in the File name field and tap on Save
- After that, when you get the notification that the rebuild is complete, tap OK
- Lastly, relaunch QuickBooks and verify if the columns are restored
Suppose you are still experiencing the same issue even after following the above-given methods. In that case, you need to move on to another method of resolving the QuickBooks Write Check columns missing.
Method 4: Update the QuickBooks Desktop to the Latest Version
The QuickBooks Write Check columns missing issue might arise due to an old version of the QB application. Update your software by following the steps given below:
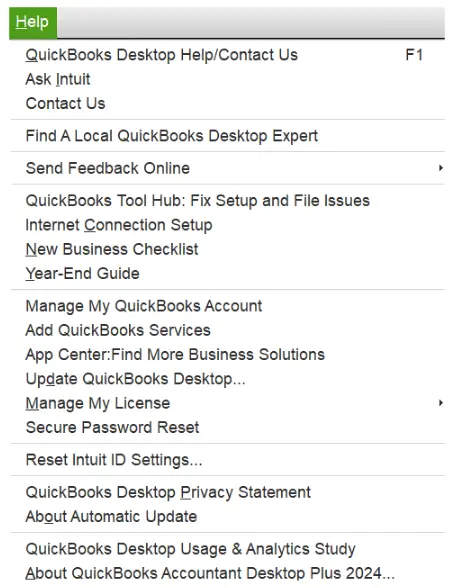
- Navigate to the Help menu
- Choose the Update QuickBooks Desktop option
- Then, click Update Now to download all the pending updates
- Lastly, to finish the process, restart the QuickBooks software
You should try using the QB as a different user if the above-given method is not able to resolve the issue of missing columns.
Method 5: Use QuickBooks as a Different User
Occasionally, this issue can arise due to a problem with the user profile. Now, to resolve the issue, you can use QuickBooks as a different user. To do so, follow the steps given below:
- Log in to the company file as a different user
- Then, head to the Write Check window
- If you are still facing the same problem with the new profile, there might be an issue with the QB program/installation
Now, try to log in to QuickBooks on a different user and try to use the Write Check function.
Method 6: Temporary Turn-off Third-Party Add-ons
Occasionally, installing a third-party template or integrations can enhance your experience by connecting with other features. This can turn into security flaws or incompatibility. To resolve it, you must take the following actions, as given below:
- Firstly, turn off these add-ons temporarily
- Secondly, look for missing columns if resurfacing
- Lastly, if you found that these add-ons are the source of the issue, contact the suppliers for updates or compatibility solutions
Now, you resume your operations in QB after disabling your third-party add-ons.
Conclusion
Various problems can interfere with your record-keeping, and the issue of QuickBooks Write Check columns missing is one of them. However, some solutions can fix it with easy and instant techniques. Therefore, we have provided comprehensive ways above to overcome this problem. Remember, resolving the issue can be hectic and time-consuming. So, if you ever feel less confident or encounter technical difficulties, call us at +1(855)-510-6487. Our QB experts will provide you with further assistance.
Frequently Asked Questions
Why are my QuickBooks Write Check columns missing in Windows?
Here are various reasons why you may find the QuickBooks Write Check columns missing. These reasons include a software incompatibility, corrupted company file data, changes in screen resolution settings, or an incomplete update. Ensure that you check the settings and that your QuickBooks is up to date. Manually rearranged and hidden files can also make some columns concealed.
How can one add columns in QuickBooks?
QuickBooks helps you add sections to invoices, sales receipts, and records or reports. Select the Gear icon for settings. Head to the Account and Settings to select the Sales option to grant Custom fields for invoices. Next, to add the desired sections to a record, click on Customize after opening the report and modifying the Column settings.
How can I restore the missing columns in QuickBooks Write Check?
Firstly, you can recover the missing Write Check columns by restarting the program, which often resolves technical glitches. Then, you will need to make changes if you find the columns that are missing. Now, for that, go to the Write Check section’s options. You can also try to reset the display resolution settings.

Kate is a certified public accountant (CPA) with expertise in various accounting software. She is technically inclined and finds passion in helping businesses and self-employed people carry out bookkeeping, payroll, and taxation without worrying about errors. Every once in a while, Kate loves to travel to far-off places and relax in the lap of nature.