Last Updated on September 20, 2024
Updating your older company file to a newer QuickBooks Desktop version ensures access to enhanced features, security patches, and bug fixes. It optimizes software performance compatibility with newer operating systems and provides ongoing support, safeguarding your financial data and ensuring compliance with evolving accounting standards.
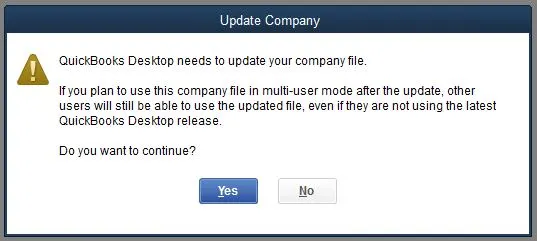
QuickBooks is an excellent accounting application that helps you manage and maintain accurate financial records. To keep a record of your finances and account info in one place, QuickBooks creates a file with a qbw extension. This main data file contains all your financial data, templates, letters, logos, and images. So, to ensure the accuracy and integrity of your data, it is essential to update QuickBooks company files regularly. Though the steps to update the QuickBooks company file are pretty simple, this blog will guide you through the process step-by-step.
Know The Reasons For Updating The Company File In QuickBooks
There are different scenarios under which you have to update your company file. Some of the instances are given below:
- You were using an older version of QB, such as QuickBooks Desktop 2021, which has been discontinued, and you had to upgrade to a recent one.
- You need to update your company file if you switch to a different QB version, for example, QuickBooks Pro, Premier, or Enterprise.
- If you update to a newer version (year) of QB Desktop, you must also update your company files. For example, if you are using QB 2022 and now have updated QB 2024, then you are required to update the company file.
- However, you do not need to update your QB company file if you have just updated your QB Desktop application to a recent release.
Let’s go ahead and discuss the various factors that you must take into consideration while updating your company file.
What Factors Must You Consider Before Updating QuickBooks Company File?
Before you go ahead and update your company file as per the updated QuickBooks Desktop software, there are 5 factors that you must take into consideration:
- If you are using QuickBooks Desktop Enterprise, then you won’t be able to convert your company file to other QuickBooks versions like QuickBooks Pro and Premier.
- No user in the network should be allowed to access the file when it is under update. However, the update may take some time, depending on the file size.
- If the company file is saved on a different workstation or hosting server, you first need to move it to the local computer and then update it.
- Before you update the QuickBooks company file, make sure you are logged in as an admin user in QuickBooks. If, in case, you have no idea of the user account access, then get in touch with your QuickBooks administrator to update the company file. You may also ask us to provide you with the user account with admin rights.
- If you are using an older version of QuickBooks on a different computer, then you have to create a backup copy of the company file on that particular computer. This is because you won’t be able to access the company file on an older version of QuickBooks Desktop after updating it.
- After you update your QB company file to QuickBooks 2024 or Enterprise 24.0, you need to reset the passwords for all non-admin users to a temporary password. After this, when the non-admin users sign in, they will be asked to set a permanent password first.
Note: Once you update your company file, you cannot open it in older versions of QuickBooks. Moreover, you can also not perform the upgrade process in older versions of QuickBooks. You are first required to install the updated version of QuickBooks.
Preparation Steps to Consider For Smooth Updating Of Company File
Before you try to update the QuickBooks company file, you must check the data for errors to avoid any issues during the update process. Here, we have listed some of the factors that you must consider before updating the company file.
- You have to create a portable company file.
- Don’t use alphanumeric characters while naming your company file.
- To avoid any issue related to data security, you have to reset the admin password & password hint.
- Besides, you also have to rebuild & verify your company data for a smooth update.
Also, You must sort these lists for an error-free file updation:
- Vendors, Employees & Customers: Click on the icon on the top to go to their respective lists. Then, go to view, followed by a re-sort list.
- Other names: Go to List> Other names list>View >Re-sort list
- Items: Click on list> item list> account> Re-sort list
- The chart of accounts: Firstly, go to the chart of accounts followed by the account and re-sort the list.
How To Update A Company File In QuickBooks?
Below we have listed all the steps that would help you to update the QuickBooks company file so that you can access it in the latest version of QuickBooks Desktop (Pro, Premier, or Enterprise). However, while upgrading to the latest version of the QB desktop, it’s essential to update the company file as well. Moreover, follow the below-given steps to make your older company file work in the latest desktop version:
Note: There is no need to upgrade your company file if you are switching QuickBooks to a different edition (Pro, Premier, Enterprise).
1. Run the Rebuild and Verify Utility to Resolve Potential Data Issues
Rebuild and Verify Utility is an outstanding addition to QuickBooks. It checks to ensure the company file is free from errors. It is designed to fix company file issues effectively.
> Run the Verify Utility
- Open QuickBooks on your desktop.
- Go to the File menu. You will see a list of options in the File menu. Choose the Utilities option. Then, choose the Verify Data option.
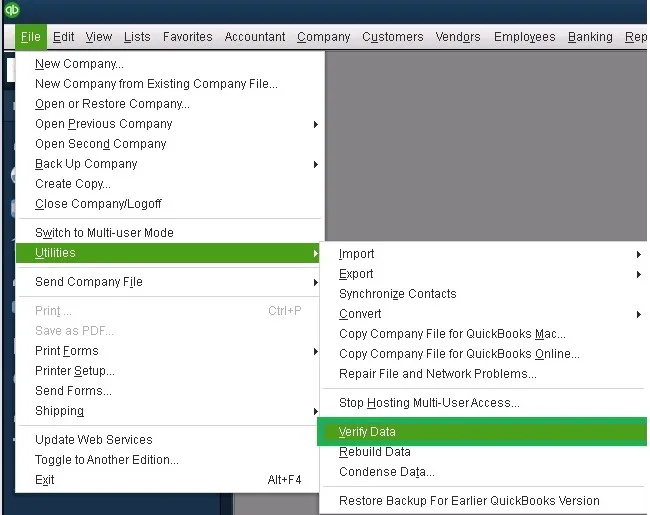
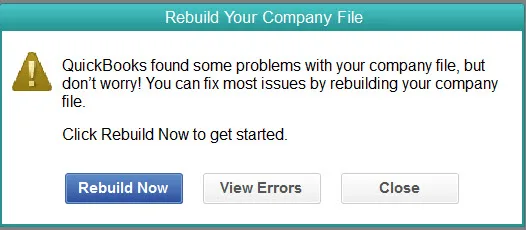
- At this point, a couple of possibilities lie ahead. Firstly, there could be no issues with your data. It means your company file is safe and sound. A notification saying ‘QuickBooks detected no problem with your data’ will confirm the same. In this case, you can continue to use your company file without any hindrance.
- Secondly, If Verify Utility finds an issue with your data, you will be asked to resolve that issue promptly. You will see Rebuild Now or View Errors options on the screen.
- Tap on Rebuild Now to proceed further.
> Run the Rebuild Utility
- Go to the Utilities option and tap on it. A list of options will appear on the desktop. Now, choose the Rebuld Data option
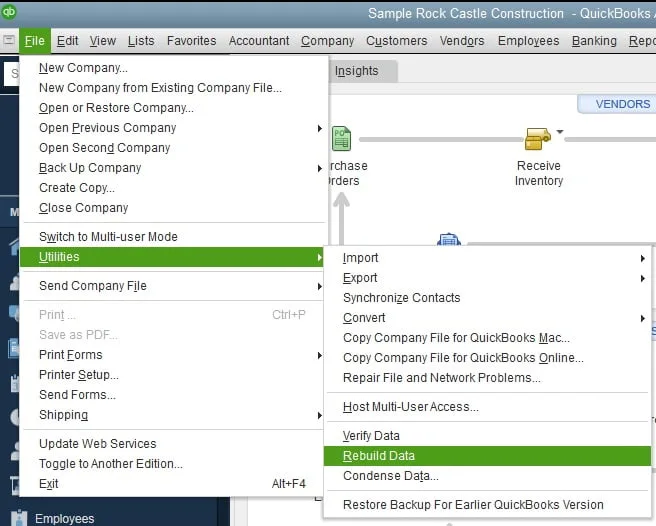
- A prompt asking you to back up your company file will appear. Select OK to back up your company file. A fresh backup of your company file will be created instantly.
- Select a suitable location to save that instantly created company file backup.
Note:- As soon as the data rebuild process begins, your mouse cursor will start revolving in a circular motion. It signifies that the rebuild is going on. However, the Windows screen may demonstrate a message saying, ‘QuickBooks is not responding.’ Don’t panic! Rebuilding is on and will take some time to finish.
- As soon as the rebuilding process is completed, a notification saying, ‘Rebuild has completed’ will appear to confirm the same. Now, you can proceed to the further steps to easily update the company file.
After running Verify, I still get errors
Don’t panic! It’s pretty common that the Verify Utility may detect issues with your data despite executing the rebuilding process once. In such cases, you may be required to run the Rebuild Utility twice or even thrice.
2. Run QuickBooks File Doctor Tool to Fix Company File Issues in QuickBooks
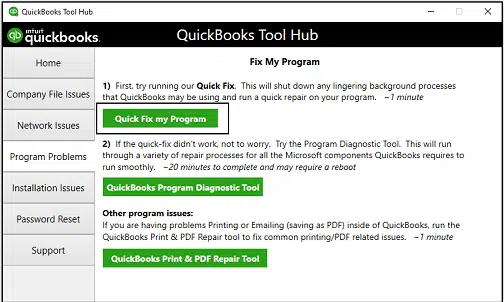
If you are unable to open your company files, learn how to use the QuickBooks File Doctor Tool. It is a majestically effective tool to resolve errors related to company files. If you intend to use this tool, you must first download and install QuickBooks Tool Hub.
Step 1: Consider Downloading and Installing QuickBooks Tool Hub
QuickBooks Tool Hub is a comprehensive utility where you can avail the features of various essential tools like File Doctor Tool, Condense Data tool, PDF and print repair tool and many more. Installing QuickBooks Tool Hub is the first step towards fixing company file issues. Let’s learn how to install it.
- Firstly, exit QuickBooks.
- Now, before you proceed to download QuickBooks Tool Hub, make sure to download its latest version. Now that you have downloaded the newest version, save the file to a location where you can easily find it without any hassle. For instance, you can save it in the downloads folder or documents folder or simply Windows desktop.
Note:- If you already have QuickBooks Tool Hub installed on your desktop, you must check which version it is. With this purpose in mind, select the HOME tab. Windows will display the version of the Tool Hub at the bottom. Now, based on the version of your Tool Hub, you can decide your activities accordingly.
- Now, open the file you have downloaded and saved to your desired location. The file must look like this: QuickBooksToolHub.exe.
- Now, the Windows screen will display a set of instructions. You must follow the on-screen steps to install the Tool Hub. Another key point is that you must agree to the terms and conditions to help Tool Hub get installed on your desktop.
- Once the installation process finishes, double-click the app icon to access Tool Hub.
Note:- If you are unable to find the app icon, you can quickly do a simple search to locate your application. Go to your Windows search bar and type in QuickBooks Tool Hub. It will appear right before you. Now, click to open it.
Step 2: Run Quick Fix My File
- Go to Company File Issues in the QuickBooks Tool Hub.
- Now, choose Quick Fix My File here.
- Choose the OK option once it finishes and launches QuickBooks.
Step 3: Run QuickBooks File Doctor
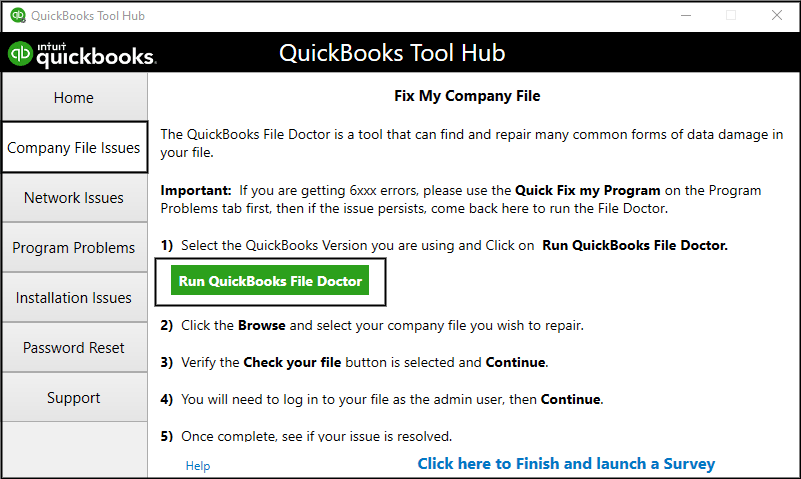
- Here, consider opening the QuickBooks Tool Hub and going to Company File Issues.
- Now, you need to select the Run QuickBooks File Doctor option visible on your screen. File Doctor may take up to a minute to get started.
- A “Can’t open your company file?” tab will open. Here, you need to select your company file by clicking the drop-down menu. However, if you are unable to spot your company file from the drop-down menu, there is a Browse option adjacent to it. Select Browse to find your file.
- After selecting your desired company file, select the Check Your File option out of the three options and hit the Continue option appearing in the lower right corner of the screen.
- Now, you need to enter your QuickBooks admin Password. After typing in your admin password, select the Next option.
In conclusion, the scanning process of your desired company file will begin and may take up to 10 to 15 minutes, depending on the size of your company file. The ongoing scanning will uproot all the issues in your company file. Surprisingly, the scan may claim that it was unsuccessful. But don’t worry! It will still manage to fix your company file issues. You can open QuickBooks to open your company file as soon as the scan finishes.
3. Consider Re-registering the Reboot.bat File
Re-registration of the Reboot.bat File is crucial when you are willing to update QuickBooks company file. In this specific segment, you will gain invaluable insights about how to re-register the Reboot.bat File with ease. Follow the steps carefully.
- The first thing you need to do is close QuickBooks and all other programs running on your system at the moment.
- Secondly, consider pressing the Windows key + R simultaneously on your keyboard. It will instantly launch the Run dialogue box.
- Now, you need to type in ‘cmd’ in the Run dialog box. After typing in ‘cmd,’ press the Enter button. It will immediately open the Command Prompt on your system.
- Type “cd C:\Program Files(x86)\Common Files\Intuit\QuickBooks” (without the quotes) in the Command Prompt Window and hit the Enter button.
Note: In case QuickBooks is installed in a different location, consider replacing “C:\Program Files(x86)\Common Files\Intuit\QuickBooks” with the correct path to the QuickBooks installation folder on your desktop.
- Type in “reboot.bat” (without the quotes) and press the Enter button to run the file.
- You need to wait until the reboot.bat file completes its process.
- Once the process is finished, exit the Command Prompt window and consider opening the QuickBooks.
- Ensure you have resolved the “company file needs to be updated” issue by re-registering the file. You must do it to make sure you have got the desired result in the end.
4. Update QuickBooks Desktop to the latest release
Keeping QuickBooks up-to-date is necessary to reap the benefits of its latest utilities and products. Secondly, if you are willing to update QuickBooks company file, updating QuickBooks parallely is considered an appreciable move. So, let’s move ahead to update QuickBooks by adhering to some simple steps.
Note:- In order to save yourself from manual labor, you can enable auto-update in QuickBooks. With auto-update on, QuickBooks will download and install the latest updates whenever they are available.
Ensure that you have the latest release
- To begin with, open QuickBooks on your desktop.
- Hit the F2 button on your keyboard to open the Product Information Window. However, you can also press Ctrl + 1 to do the same.
- The Product Information Window will present crucial information such as QuickBooks’ current version and release, license number, product number, etc.
- Check your QuickBooks’ current version and release and take action accordingly. If you already have the latest release, you need not proceed further to update QuickBooks. But, if you don’t have a fresh release, you can move ahead to update QuickBooks.
Update QuickBooks manually
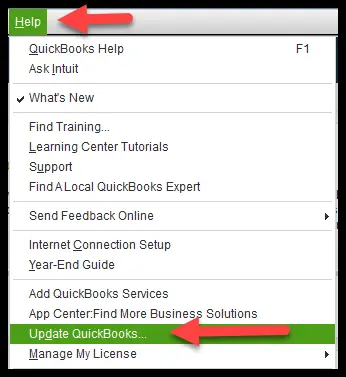
- Tap on the Help option. When you glance down, you will see the Update QuickBooks Desktop option at the bottom. Select it.
- A new tab will open on the screen. Firstly, select Update Now and then select Get Updates.
- When the update completes, exit QuickBooks and then open it again.
- A prompt will ask you to install the update; select Yes.
- Here, you must follow the on-screen instructions once the installation finishes.
Note:- If you have an active payroll subscription for QuickBooks, you can go on to download the latest payroll tax table for seamless payroll processing in QuickBooks.
Use System File Checker (SFC) From Within Windows as an Administrator
Applicable to Windows 11, Windows 10, and Windows 8 or 8.1
SFC, or system file checker, plays a key role in repairing those Windows files that are integral to QuickBooks. It fixes some common Windows issues. Let’s learn how to run SFC on your Windows. We have mentioned the essential steps systematically to help you follow the steps with ease.
- To begin with, press the Windows + X keys simultaneously.
- Go to the Menu bar and choose Command Prompt (Admin) visible on the screen.
Before you proceed further, you must know that the System File Checker can also be run from Windows PowerShell (Admin).
- A User Account Control (UAC) prompt will open on the screen; hit Yes.
- You need to type in SFC /scannow in the Command Prompt Window. Press the Enter key.
- Now, the System file checker utility will check the integrity of Windows system files. If it detects some issues, it will repair them accordingly.
- Now, you can reboot the system once the process is done.
Conclusion
To summarize, the first thing to remember is that switching from older versions of QuickBooks to newer ones will only ensure more seamlessness and productivity in your business. On the negative side, it may provoke errors. The issues that appear while you update QuickBooks company file are the ones we have taken into consideration in this particular blog post. This detailed troubleshooting guide has presented a few concrete fixes to help you update your company file in no time.
Frequently Asked Questions
Yes, you can update your company files easily from anywhere whenever required, all you need to do is download your company file to the local system and upload it after updation.
There can be different reasons behind this:
The company file might be damaged.
Your company file isn’t compatible with the QB version that you are using currently.
No, there is no need to update your file every time. It’s only required when you switch to a different version of QB. Thus, your company file needs to be compatible with the QB version. However, there can be minor updates that you can do from time to time.
It depends on the size of your company file and the internet speed.

Oriana Zabell, a professional cloud engineer, has over three years of experience in desktop, online QuickBooks support and troubleshooting. She is currently working as a cloud hosting consultant with Asquare Cloud Hosting. She loves to read and write about the latest technologies such as cloud computing, AI, DaaS, small businesses, manufacturing. When not writing, she is either reading novels or is indulged in a debate with movie fanatics.