Last Updated on November 20, 2025
There are times when you might need to switch to a new QuickBooks version after the discontinuation of payroll and other services in the 2022 version, or to gain access to new features that come with the newer platforms. To do so, you need to change the QuickBooks license number for registering the product. If you have already received the new license number and product code, it’s very easy to enter this info in QuickBooks and activate it. This blog is a guide to teach you how to change your license and product key in QuickBooks. So without further ado, let’s get started.
Need assistance with finding and changing your license number in QuickBooks? Contact our Asquare Cloud Hosting team at +1(855)-510-6487 today! We’ll ensure that your migration process is smooth-sailing.
What’s the Difference Between QB License Number & Product Code
You should first have both the product and the license number ready before you begin the process of switching versions of QuickBooks Desktop. However, you’ll receive both the license number and product code at your email address when you buy the software. The Product number is used to determine the manufacturer of the software, while the license number is used to activate it. The product number is usually 6 digits in XXX-XXX format, while the license number is 15 digits in a XXXX-XXXX-XXXX-XXX format. Now, let’s take a look at the steps you need to follow to change the QuickBooks license and product number.
Note: Having trouble with software activation? Learn where and how QuickBooks stores your license and validation data in the Windows system registry by visiting our guide on QuickBooks Validation Code in Registry.
Changing License Number in QuickBooks Desktop: Detailed Procedure
Now that you understand the basic difference between the license number and the product code, let’s take a look at the methods you can use to change your license number in the QBDT application for both Mac and Windows OS.
Change License in QB Desktop Windows
Follow the steps given below to change your license code in QB Desktop for Windows:
- Launch your QBDT application
- Click on the Help menu.
- Then select the Manage My License option
- Hit Change My License Number
- Now, type in your new license number
- Press Next
- Finally, click on Finish
This would change license number in QuickBooks Desktop for Windows. Now let’s take a look at the steps for Mac.
Change License Code in QBDT Mac
Mentioned below are the steps you can implement to change the license number in the Mac version of QBDT:
- Open the QBDT app
- Click on the QuickBooks menu and tap on the the Manage My License option
- Now, click on Deauthorize This Computer
- When prompted, press Deauthorize and Quit
- Then, reopen the QB Desktop software
- Follow the registration process
- Enter your new license
This would change QuickBooks license number in the Desktop app for Mac.
NOTE: If you’re experiencing issues while registering QuickBooks after installation, refer to our detailed guide on How to Fix QuickBooks Registration Errors.
Change the Product Code in QB Desktop (For Windows Only)
You are required first to uninstall and reinstall the application to change the product code, then activate your QuickBooks Desktop with the following steps:
- Open QB Desktop application
- Go to the Help menu
- Select Activate QuickBooks Desktop
- Follow the steps on your screen
- Verify your info
This would change the product info of your QuickBooks application. However, the same thing can be done by manually editing the qbregistration.dat file for QuickBooks Enterprise.
Change Product Code in QB Desktop Enterprise
Earlier, we already discussed the steps to change the license number in QuickBooks, which are applicable for the enterprise version too. But now, let’s see the steps to change the product code:
- Open QuickBooks Desktop
- Press F2 (or Ctrl +1) on your keyboard
- Then, press F3 (or Ctrl + 2) to open the Tech Help window
- Go to the Open File tab
- Choose QBREGISTRATION.DAT
- Now, choose Open File
- The file will open in the Notepad app
- Backup your qbregistration.dat file
- In the Notepad, click on the File menu
- Choose Save As
- Now, opt to save the file on the Desktop
- Hit Save
- Close the file
- Now, open the qbregistration.dat file from the Tech Help window again
- Close the QuickBooks app
- Keep the file open in the Notepad app
- Press Ctrl + H in the notepad where your qbregistration.dat file is open.
- Now, type in your old product code under the Find What field.
- Then, head over to the Replace field
- Here, Type in your new product number
- Make sure the code is in XXX-XXX format
- Press the Replace All button
- Now, from the File menu, hit Save
After you are done following these steps, restart your system for the changes to take effect. This was the process for changing the QuickBooks license number and product code.
How to Fix Activation & License Issues in QuickBooks Desktop
To fix the QuickBooks license number or activation issues in your system, perform the following methods:
Solution 1. Use Quick Fix My Program from the QB Tool Hub
One of the reasons why you might be facing activation issues with QuickBooks is program problems. Thus, you should use Quick Fix My Program to resolve that with these steps:
- Close the QBDT software
- Download and install the QuickBooks Tool Hub
- Run the QB Tool Hub app.
- Then navigate to the Program Problems tab
- Tap on the Quick Fix My Program
- In the end, wait for the tool to complete its process
Now, once the steps are done, restart the app to see if the activation issue is gone; if not, move on to the next solution.
Solution 2. Use the 3371 Error Fix tool from the QuickBooks Tool Hub
You can use the 3371 Error Fix tool to resolve any activation or license issues. To do so, go through the steps given below:
- Begin with launching the QuickBooks Tool Hub
- Go to the Installation Issues tab
- Click on 3371 Error Fix
- Then, hit OK
This would eliminate any activation and license issues if you recently did change QuickBooks license number.
Change QuickBooks License Number – A Quick View
Presented below is a concise summary of this blog on the topic of changing the license number in QuickBooks in a tabulated format:
| Change QuickBooks license number | When you upgrade to a newer version of QuickBooks, you often need to change the license and product number of it in order to activate it. |
| Steps to do it | To do this, go to the Help menu in QB, click on Manage My License, and then select Change My License Number for the Windows version. For Mac, you can do so by first deauthorizing the system and then opening the app again and following the registration process. |
| Ways to fix any errors | Use the Quick Fix My Program Tool and the 3371 Error Fix Tool from the QuickBooks Tool Hub. |
| Tools used | Quick Fix My Program Tool and 3371 Error Fix Tool. |
Conclusion
In this blog, we talked about the way you can change QuickBooks license number and product number. Moreover, we also provided you with a step-by-step guide to fix any activation issues you may encounter. If you need any further assistance, don’t hesitate to contact Asquare Cloud Hosting Helpline at +1(855)-510-6487.
Frequently Asked Questions (FAQs)
How do I change QuickBooks license number?
To change your QuickBooks license, first navigate to the Help menu and click on Manage My License. Then, press Change My License Number and type in your new license. Finally, finish it off by pressing Next, followed by Finish. This would change QuickBooks license number on your system.
How to get the QuickBooks license number?
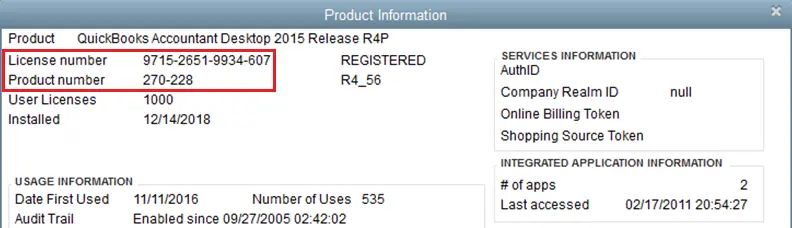
You can find your QuickBooks license number in the Product Information window. To access it, press F2 on your keyboard while your QB Desktop app is open. It’s usually 15 digits long in a XXXX-XXXX-XXXX-XXX format. If you purchased the software online, you can also find the license in the confirmation email.
Is there any way to transfer a QuickBooks license from one computer to another?
The option to transfer your QB license from one system to another is available. To do so, first have your product and license numbers in hand. You can find them by pressing F2 on your keyboard while QBDT is open to access the Product Information window. The product code is 6 digits and looks like XXX-XXX, while the 15-digit license number looks like XXXX-XXXX-XXXX-XXX.

Kate is a certified public accountant (CPA) with expertise in various accounting software. She is technically inclined and finds passion in helping businesses and self-employed people carry out bookkeeping, payroll, and taxation without worrying about errors. Every once in a while, Kate loves to travel to far-off places and relax in the lap of nature.