Last Updated on March 12, 2026
QuickBooks errors are common because the program uses complex algorithms. One of these errors is known as QuickBooks error 121. This error, also known as the ‘Permission Denied’ error, is experienced by users when accessing the QuickBooks Point of Sale program when the user is not logged in as an administrator. This somewhat uncommon error occurs when an individual attempts to perform an administrative task, thereby denying them full access privileges.
Detailed Explanation of What is QuickBooks Error 121
Before applying any troubleshooting for solving this issue, it is important to understand QuickBooks error 121. It is like you have to log into the POS from a different system rather than the system where the admin appeared with this issue.
It often comes with the pop-up message: “QuickBooks POS Error 121 denied you do not have permission to select from timeouts.”
In simple words, it means that the software rejected changes because the user has signed in as a guest. Several methods can be followed to fix it.
Potential Causes Behind Error 121 in QuickBooks Desktop
QuickBooks error 121 may be due to several technical issues. These root causes, on the other hand, will show what might be preventing QuickBooks from connecting to the internet or accessing some of its online features.
- Weak or unstable internet connection
- Firewall or antivirus blocking QuickBooks
- Incorrect proxy server settings
- Bank server downtime or maintenance
- Outdated QuickBooks version
- Incorrect bank account details
These issues prevent QuickBooks from communicating with banking services and result in QuickBooks Error 121. When the cause is identified, troubleshooting becomes much easier and more precise.
8 DIY Troubleshooting Methods to Overcome QuickBooks Error 121
You must remove the WSActivity.xml file and erase all of the data in the Entitlement Client folder in order to resolve QuickBooks POS error 121. Make sure that every Point of Sale procedure and service is disabled or halted before attempting the resolution procedures.
Method 1: Eliminate All the POS Process & Services
To effectively troubleshoot QuickBooks POS-related concerns, some active background processes or services must be terminated. To accomplish these, the steps below will help close all processes listed in the Task Manager, as well as any other services associated with QuickBooks, in a safe manner. For that, perform the instructions below:
- Begin by opening the Task Manager tab
- Next, select the specific processes you need to manage
- Identify and end all active processes
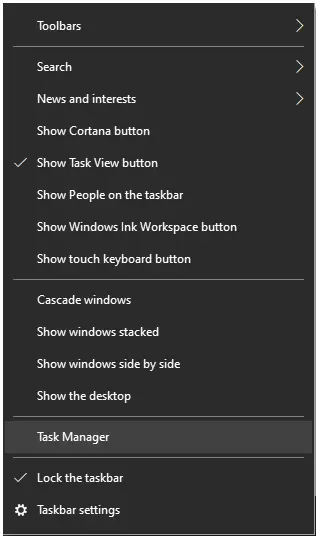
- Exit the Task Manager
- Next, enter services.msc in the Windows search bar

- Or enter services.msc in the Run dialog box
- In the Services window, locate QBPOS Database Manager XX (your QuickBooks version)
- Stop the service and close the Services window
After that, check again whether the issue is resolved. However, if the problem still appears, try the next method.
Method 2: Remove the Required Files
To resolve installation or registration issues with QuickBooks Point of Sale, this process involves deleting specific files related to entitlement and QuickBooks Point of Sale. Follow these steps according to the version of Windows installed:
- You must enable the option to display hidden Windows folders
- Windows 8.1 and 8
- Windows XP
- Vista and Windows 7
- Next, head to the appropriate directory based on your Operating System:
- Windows 8 and 8.1: C:\ProgramData\Intuit\Entitlement Client\v8.0
- Vista and Windows 7: C:\ProgramData\Intuit\Entitlement Client\v8.0
- For Windows XP version: C:\Documents and Settings\All Users\Application Data\Intuit\Entitlement Client\v8.0
- Select all files inside the folder and choose the Delete option
- Then go back to the directory: C:\ProgramData\Intuit\QuickBooks Point of Sale XX.0
- Open the INI folder and remove the WSActivity file
- Relaunch the Point of Sale and proceed to download and install any necessary updates
- Finish the registration process to finalize the setup
Once these files are deleted and the updates are reinstalled, QuickBooks Point of Sale should function correctly without entitlement or registration errors. If the issue persists, additional troubleshooting may be required.
Note: To ensure smooth operations, initializing the QBPOS Application Log is vital. This process creates a log file that helps track system activities. By setting up QBPOS logs, you enable efficient troubleshooting, audit capabilities, and improved performance monitoring.
Method 3: Install the QuickBooks Digital Signature Certificate
You can install the digital signature certificate for QuickBooks Desktop to fix QuickBooks Error 121 by following the steps outlined below:
- Right-tap the QuickBooks desktop icon and choose Properties
- In the Shortcut tab, click Open File Location, and then press OK
Note: You can manually reach this path by opening your product’s application folder, as illustrated below. Make sure to replace the Xs with the specific year of your QuickBooks version.
- For QuickBooks Desktop Pro Plus, Premier Plus, or Premier Accountant, go to: C:\Program Files (x86)\Intuit\QuickBooks 20XX
- For Enterprise or Enterprise Accountant editions, navigate to: C:\Program Files (x86)\Intuit\QuickBooks Enterprise Solutions XX.0
- In the File Location window, find the Application (.exe) file, right-click it, and choose Properties
- Open the Digital Signatures tab and select an entry from the Signature list, then click Details
- In the Digital Signature Details window, choose View Certificate to open the Certificate window
- Under the General tab of the Certificate window, select Install Certificate
- In the Certificate Import Wizard, confirm the Store Location is set to Current User, and click Next
- On the Certificate Store screen, let Windows use the default certificate store, then choose Next and Finish
- When the system confirms the certificate import was successful, click OK
Note: Repeat steps 2–6 for all remaining Security Certificates listed under the Digital Signature section.
Method 4: Use QuickBooks Install Diagnostic Tool
You can use the QuickBooks Install Diagnostic Tool within the QuickBooks Tool Hub to resolve QuickBooks error 121 by following these steps:
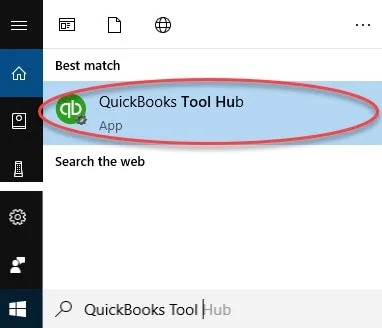
- Launch the QuickBooks Tool Hub application
- Go to the Installation Issues section
- Select the QuickBooks Install Diagnostic Tool option to run it
- Allow the tool to run its diagnostic process
- The scan may take as long as 20 minutes to complete
After that, you must check whether the issue is resolved. However, if you are still facing the same issue, follow the next method.
Method 5: Manually Update QuickBooks Desktop
You can manually update the QuickBooks Desktop application if you’re encountering QuickBooks error 121 by following the steps below:
- Launch the QuickBooks Desktop application
- Make sure all company files are closed
- Go to the Help menu
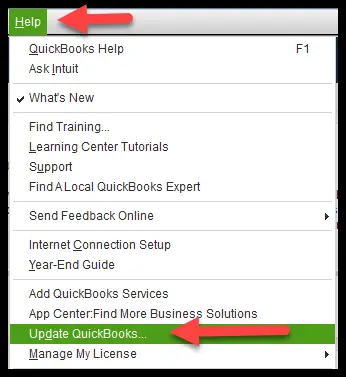
- Choose the Update QuickBooks Desktop feature
- Open the Options tab, and click the Mark All button
- Confirm by selecting Save
- Proceed by clicking Update Now
- Enable the Reset Update checkbox
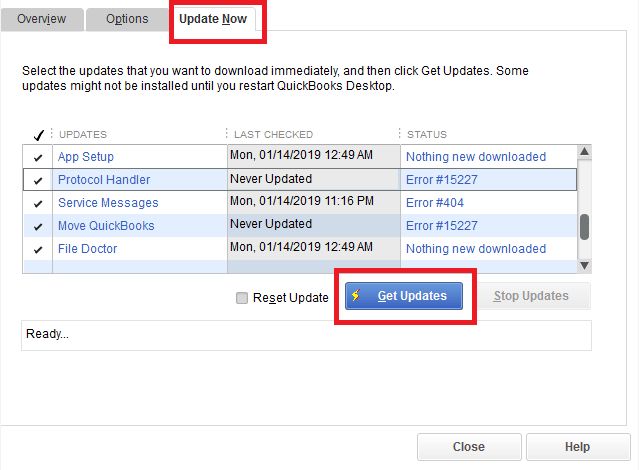
- Click the Get Updates button
- Exit QuickBooks Desktop, and relaunch it to complete the update installation
This will upgrade your QuickBooks Desktop application to the most recent version.
Method 6: Verify and Rebuild Your QB Company File
If your QuickBooks Company file is corrupted and you are experiencing QuickBooks error code 121, you can repair it using the Verify and Rebuild Data utility by following these steps:
- Launch QuickBooks Desktop and open the File menu
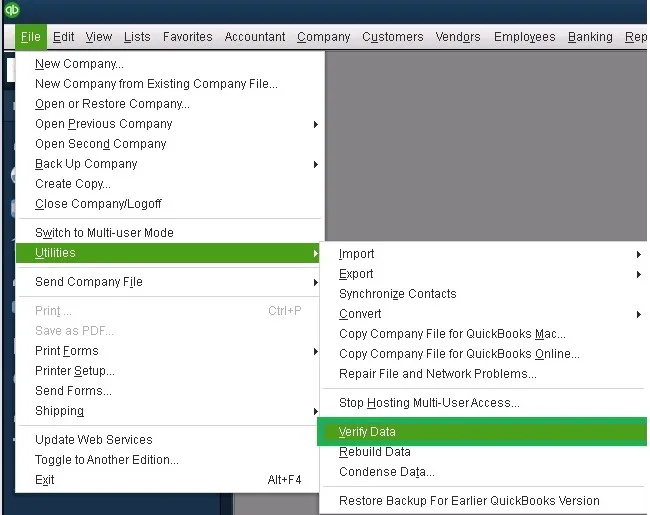
- Select Utilities and choose Verify Data
- Return to the File menu and open Utilities again
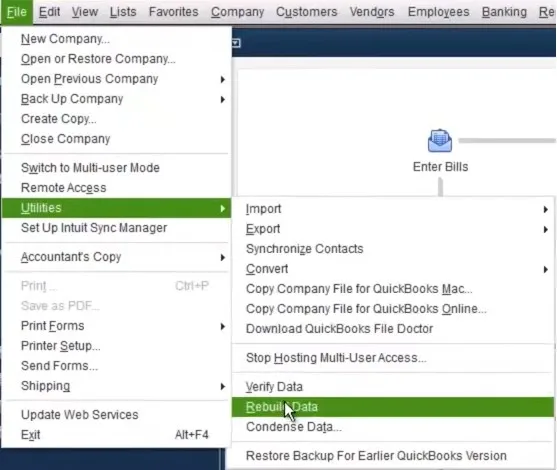
- Select Rebuild Data and click OK when asked to create a backup
- Choose the backup save location and press OK
- Ensure you don’t overwrite an existing backup and enter a unique file name
- Click Save and wait for the rebuild-complete message
- Click OK and finish the process
After implementing the above steps, check whether the issue is resolved. However, if the problem still exists, follow the next method.
Method 7: Check the Date and Time Settings on Your System
If the date and time settings on your PC are incorrect, you may encounter the QuickBooks update error 121. To fix it, follow the steps below:
- Navigate to your computer’s home screen
- Right-click the system clock in the bottom-right corner
- Select Adjust date/time
- Choose the correct current date and time
- Close QuickBooks Desktop and open it again
- Try updating QuickBooks Desktop to the latest version to check if the error is resolved
Once done, check again whether QuickBooks error 121 is resolved. However, if you are still seeing the same issue, try the next method.
Method 8: Clean Install QuickBooks Desktop
As a final try, you need to perform a clean install of the QB application by manually renaming the installation folders to resolve QuickBooks error 121.
Uninstall QB Desktop
- Open the Start menu on your PC
- Type Control Panel in the search bar and open it
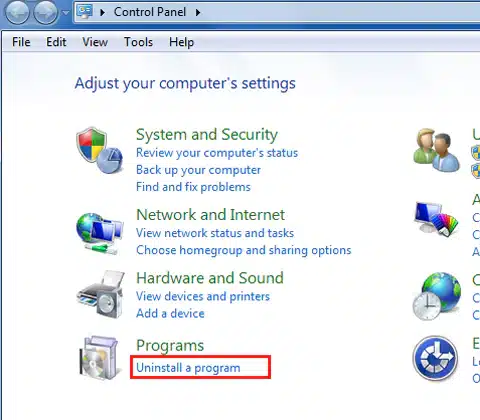
- Select the Uninstall a Program option
- From the displayed list, select QuickBooks Desktop
- Click on Uninstall/Change
- Proceed by selecting Next
Rename the QB Installation Folders
- Launch File Explorer
- Now, head to the directory where your QuickBooks company file is located
- The folder is typically located in one of the following paths:
- C:\ProgramData\Intuit\QuickBooks (year)
- C:\Users(current user)\AppData\Local\Intuit\QuickBooks (year)
- C:\Program Files\Intuit\QuickBooks (year)
- 64-bit version: C:\Program Files (x86)\Intuit\QuickBooks (year)
- Right-click the specific QuickBooks folder
- Select the Rename option
- Append .old to the existing folder name
Install QBDT Again
- Run the QuickBooks.exe installer
- Select one of the installation methods:
- Express Install
- Custom and Network Options
- Click Next to continue
- Begin installation by selecting Install
To know more about clean install QuickBooks, check out our dedicated guide on it. These methods should resolve the underlying issues causing QuickBooks error 121 and restore normal functionality. If the error still appears, advanced repair or professional support may be necessary.
A Quick Overview of QuickBooks Error 121
Go through the table below to see a concise version of the information this blog contains.
| Error description | QuickBooks error 121 is an update- and POS-related issue that occurs when the application lacks the necessary admin permissions or encounters damaged program components. It prevents QuickBooks Desktop or payroll from updating properly and interrupts normal workflow. |
| Common causes | Outdated QuickBooks version, unstable internet, blocked access by firewall or antivirus, incorrect proxy settings, or temporary bank server downtime. |
| Proven fixes | You can eliminate this problem by updating the QB application with admin rights, installing the digital signature certificate, running Quick Fix my Program, using the Install Diagnostic Tool, creating firewall exceptions, running the File Doctor tool, manually installing updates, using the Verify & Rebuild utility, correcting your system’s date and time, renaming installation folders, and performing a clean reinstall if required. |
Conclusion
QuickBooks error 121, usually caused by a permission issue, corrupted files, or some installation conflict, can be fixed with the proper troubleshooting steps. This post will describe techniques that will help QuickBooks Desktop users regain consistent performance and enable them to upgrade seamlessly. In such cases, this would be the best time to seek expert assistance. For that, you can dial +1(855)-510-6487 to speak with a certified QB expert.
Frequently Asked Questions (FAQ’s)
Why am I seeing QuickBooks error 121?
You may encounter error 121 due to insufficient admin rights, damaged company files, blocked QuickBooks processes, invalid digital signatures, or issues with updates and system settings.
How do I fix QuickBooks error code 121?
You can fix the error by updating QuickBooks with admin rights, installing a digital signature certificate, running Quick Fix My Program or the Install Diagnostic Tool, verifying and rebuilding your company file, correcting system time settings, or performing a clean install.
Does a damaged company file cause error 121?
Yes, the problem may be caused by a faulty or incomplete business file; it is typically fixed by utilizing the Verify and Rebuild Data program.
Will reinstalling QuickBooks remove my company data?
No, a clean reinstall does not delete your company file as long as you avoid removing the data folder. Still, keeping a backup is recommended.

Kate is a certified public accountant (CPA) with expertise in various accounting software. She is technically inclined and finds passion in helping businesses and self-employed people carry out bookkeeping, payroll, and taxation without worrying about errors. Every once in a while, Kate loves to travel to far-off places and relax in the lap of nature.