Last Updated on November 20, 2025
When the ending balance doesn’t match the bank or credit card statement during reconciliation, it is a reconciliation discrepancy. This is common in QuickBooks and other accounting software.
Correcting this is important to ensure the integrity of the books. In this guide, we will see how to resolve a QuickBooks reconciliation discrepancy in easy steps. However, let’s first understand why reconciliation discrepancies arise.
Some Reasons Why Your Ending Balance is Incorrect in QuickBooks
Here are some common reasons why your bank statement and QuickBooks transactions don’t match, and you get an issue with the ending balance.
- At the beginning of the reconciliation, the ending balance was entered incorrectly.
- A transaction or more was deleted from the ones that were already reconciled.
- You have entered certain transactions still to clear your bank, and thus, it doesn’t show on your bank statements.
- The adjustment made via a journal entry in the last reconciliation period was incorrect.
- The opening or beginning balance at the start of the accounting period was entered incorrectly.
Now that you have an idea of what went wrong and led to a QuickBooks desktop reconciliation discrepancy, let us see how to correct it.
Related Post: How to Undo a Reconciliation in QuickBooks Online and Desktop
8 Steps to Correct a Reconciliation Discrepancy
To resolve the reconciliation discrepancies in QuickBooks Desktop, let us check the beginning balances and utilize QB reports.
1. Check the Beginning Balance
The beginning balance is the amount entered when the financial period begins. It is the amount brought forward by the business from the last accounting period.
Check the beginning balance for the reconciliation and ensure it is correct.
- Tap on the Edit info option on the Reconcile window.
- Go to Edit the information from your statement page.
- Check that the Ending balance and Ending date are correct and tally them with your bank or credit card statement.
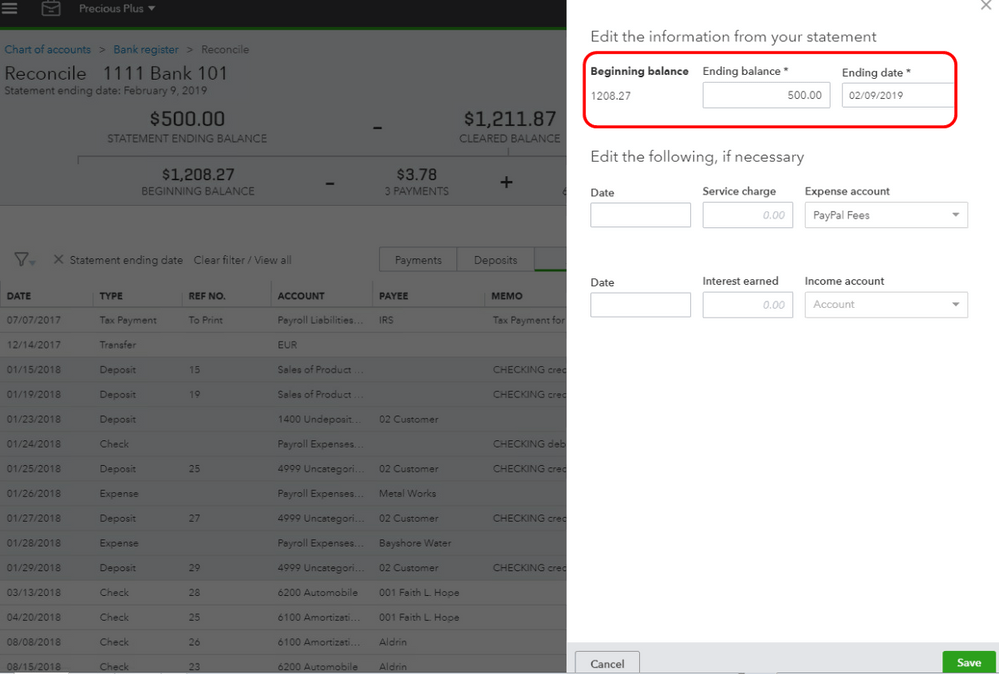
- If required, change the Ending balance and Ending date.
- Finally, select Save.
Now, check if the QuickBooks reconciliation discrepancy you faced earlier is resolved.
2. Check the Opening Balance
Although it’s rare, to be safe, let us check whether the opening balance is correct, as it can lead to ending balance issues in QuickBooks. When you link QuickBooks to your bank or credit card account, the amount of money in the account is lodged as the opening balance. You can also enter your own opening balance or edit it.
Here is how you can find the opening balance in QuickBooks Desktop.
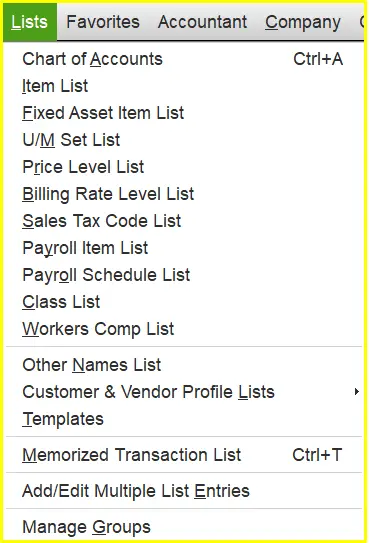
- Open the Lists menu in QB Desktop and go to Chart of Accounts.
- Locate the Opening Balance Equity account.
- View the account balance.
This is your opening balance. If you find it is incorrect, you can edit it. However, if you realize that the QuickBooks reconciliation discrepancy wasn’t due to the opening or beginning balances, let us run some reports.
3. Use QuickBooks Reconciliation Discrepancy Report
Issues with reconciliation could be because of transactions you or someone changed since you last reconciled.
This can be brought up by the reconciliation discrepancy report.
- Open the Reports menu.
- Keep the cursor over Banking and go to Reconciliation Discrepancy.
- Choose the account that you are reconciling, followed by OK.
- Check the report and find the discrepancies there.
Get to know why certain changes in the transactions were made, who made them, and if they are valid. If you need to, edit and correct them.
4. Use Missing Checks Report
Another report that can help you fix the reconciliation discrepancies in QuickBooks Desktop is the missing checks report.
This report looks up the missing checks that are affecting QB’s ending balance.
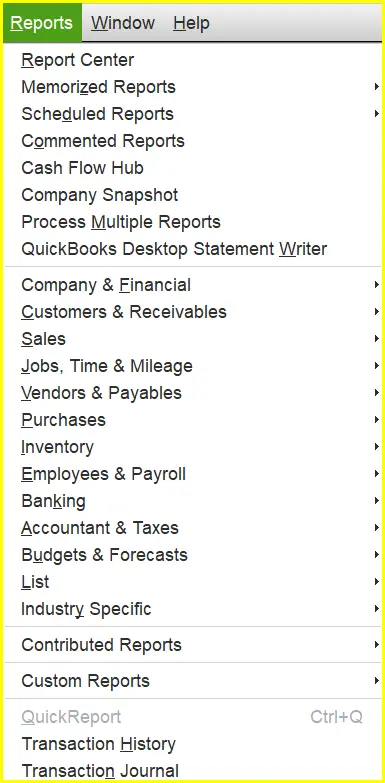
- Open the Reports menu.
- Keep the cursor over Banking and go to Missing Checks.
- Choose the account that you are reconciling, followed by OK.
Check the report and find the transactions you see on the report that are not included in the bank statement.
The transactions that don’t show up in the bank statement shouldn’t show up in the reconciliation window.
Read also :- How To Import Bank Transactions Into QuickBooks Desktop & Online
5. Use QuickBooks Transaction Detail Report
Transaction detail report helps you find all the transactions that have been changed.
- Open the Reports menu and keep the cursor over Custom Reports.
- Choose Transaction Detail and go to the Display tab.
- Select the earliest date in QuickBooks in the Date From field. Alternatively, you can leave it blank.
- Choose the date of the last reconciliation in the Date to field.
- Open the Filters tab and go to the Account field.
- Choose the account you’re reconciling for.
- Go to the Entered/Last Modified field.
- Select the date of your last reconciliation as the Date from.
- Set today as the Date to.
- Finally, choose OK, which will run the report.
- Now, locate the transactions that don’t match your bank or credit card statement or other discrepancies.
Learn why certain changes were made in the transactions, who made them, and whether they are valid. If necessary, edit and correct them.
6. Review Reconciliation Adjustments
When the balance doesn’t match at the end of the reconciliation, users often make reconciliation adjustments to close the reconciliation. The reason for the QuickBooks reconciliation discrepancy you face might be because an incorrect adjustment was made during the last reconciliation.
Therefore, you need to check the adjustment and ensure it is not incorrect or inaccurate.
- Open the Lists menu and choose Chart of Accounts.
- Go to the Reconciliation Discrepancies account.
- Set the dates of your last few reconciliations in the Dates field.
Review the adjustments and if you suspect certain adjustments are affecting the reconciliation and the ending balance, get to know who made the adjustments and why they were made. If they are invalid or inaccurate, make the required changes.
7. Undo the Last Reconciliation, Then Do it Again
If nothing helps correct the QuickBooks reconciliation discrepancy, you will need to undo the last reconciliation and then do it again.
However, before you do so, follow the steps given in the bottom of the guide to backup the company file.
- Once you are done, open the Banking menu.
- Choose Reconcile and click on Undo Last Reconciliation.
- You will see a message window. Select Continue, followed by OK.
Now, close the reconciliation window and reopen it.
8. Create a Journal Entry to Make an Adjustment
However, if nothing works and if you need to close the reconciliation urgently, you can make an adjustment.
To do so, just choose Enter Adjustment. This will prompt QuickBooks to make a Journal Entry in Reconciliation Discrepancies, which is a special expense account.
Related Post: QuickBooks Journal Entry: Add, Edit, Reverse, or Delete
Conclusion
This was on how to resolve a QuickBooks reconciliation discrepancy in the desktop application. Now, you can reconcile your books accurately and close off the reconciliation in no time. However, if your issue is not resolved and you still find the ending balance incorrect, speak to a QB expert. Dial +1(855)-510-6487 and speak to a QuickBooks expert.
Frequently Asked Questions
How do I fix a reconciliation discrepancy in QuickBooks?
To resolve the QuickBooks reconciliation discrepancy, review the opening and beginning balances. Moreover, check the last reconciliation adjustments. You can run the Missing Checks report, Reconciliation Discrepancy report, and Transaction Detail report. If you find transactions that need to be changed, edit them.
What is a reconciliation discrepancy?
Reconciliation discrepancy is when your bank statement and accounting software, such as QuickBooks, don’t match. Learn how to fix a reconciliation discrepancy through this guide.
What to do if there is a difference in bank reconciliation?
If there is a difference in bank reconciliation, verify that the statement date is set correctly. Moreover, check that the end balance and bank account are correct.

Kate is a certified public accountant (CPA) with expertise in various accounting software. She is technically inclined and finds passion in helping businesses and self-employed people carry out bookkeeping, payroll, and taxation without worrying about errors. Every once in a while, Kate loves to travel to far-off places and relax in the lap of nature.