Last Updated on November 20, 2025
QuickBooks Desktop Enterprise is a robust software that empowers and assists you in handling your accounting and tax operations like a pro. As comprehensive as the software is, the process of installing it and setting it up can be challenging as well.
This is why we drafted a comprehensive guide for you. Let us show you how to install QuickBooks Desktop Enterprise and set it up on the server and the workstations.
How to Install QuickBooks Desktop Enterprise and Set It Up: Detailed Steps
In this section, we will show you how to install QuickBooks Desktop Enterprise. We will take you through the nuances of installing and setting up this robust application. Alright then, let us begin.
1. Prepare and Test the Network
Before you install QuickBooks Desktop Enterprise, you need to prepare and test the network first. Let us show you how to do it step by step.
a. Ensure There’s an IT Expert or Network Administrator Available
QuickBooks Desktop is an advanced application, and setting it up requires essential technical expertise. It needs knowledge of file sharing, networking, and permissions for a smooth installation.
Therefore, it is recommended to have the following people available during the installation and setup of QuickBooks Desktop Enterprise:
- A system/network professional with expertise in networking, file sharing, and installing and configuring software.
- A financial or accounting professional who is knowledgeable of your company’s requirements to set up the company file and get the software ready to use.
If you don’t have these professionals ready, connect with a ProAdvisor, who can install the software. Once you are all ready, move to the next step.
b. Back up the Data from the Previous Accounting System
When you migrate to QuickBooks Desktop Enterprise, you need to back up your data on the previous one.
The Internal Revenue Service (IRS) requires you to have company and financial data of up to 10 years. Once you have backed up your data safely, move to the next step.
c. Choose How to Setup the Network
QuickBooks Desktop allows you to collaborate at a time and work on the same company file from various workstations, which often becomes crucial for business or Enterprise.
The company file is hosted by a QuickBooks program called QuickBooks Database Manager. Now, there are three major ways to host your company file. You need to choose from these three ways to set up your network.
(i) Central Server
The central server hosts the company file, and QuickBooks Database Server Manager is installed here to do so.
The rest of the computers on the network act as workstations where QuickBooks Desktop Enterprise is installed.
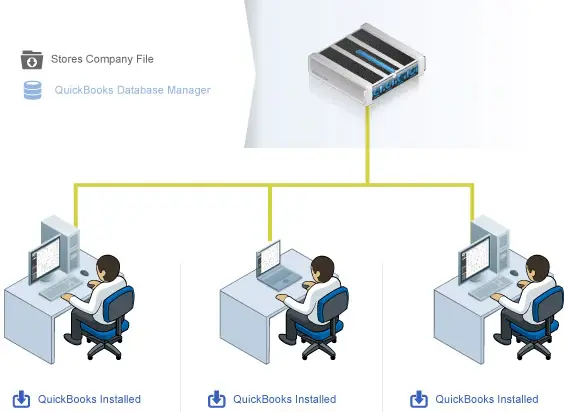
Thus, you and your teammates can work on the same company file hosted on a central server from each of your workstations.
(ii) Peer-to-Peer
In a peer-to-peer network setup, QB Enterprise is installed on every workstation, and one of them hosts the company file.
Needless to say, the workstation hosting the company file, i.e., acting as a server, will need to have Database Server Manager installed.
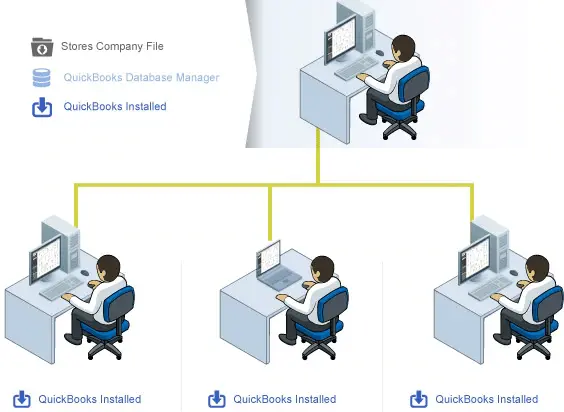
You and your teammates will be able to carry out QuickBooks operations on all workstations.
(iii) Remote Desktop Services
Remote Desktop services store the company file on one workstation, and the other workstations access the company file over the network.
All of them have QuickBooks Desktop Enterprise installed.
Moreover, you can host the company file on a Linux server as well. Once you have decided how you’re going to set up the multi-user environment for QuickBooks, move to the next step.
d. Test the Network Bandwidth
If you are going to work in multi-user mode and share and access the company file over the network, you need to test the network bandwidth first.
- You need to ensure that your network is fast enough for that.
- Begin with selecting a large data file for testing. Note down how long the file is in megabytes.
- Now, place the file on the network if it isn’t already so, and then download it to your system. Note down the time it takes.
- Now, divide the eight times the file size by the time it took to find out the network bandwidth.
Here’s what your calculation might look like:
File size (in MB) × 8 ÷ copy time = Bandwidth
For instance:
- 150 MB (file size) × 8 ÷ 25 seconds (time it took to download) = 48 MB per second (Mbps)
The bandwidth should be more than 40 mbps for optimum performance. If it’s too slow, you might find issues in working in multi-user mode in QuickBooks, such as sluggish performance.
We recommend you opt for a high-speed and stable network connection.
e. Check the Firewall and Antivirus Settings
Windows Firewall or the antivirus or security software’s firewall might limit QuickBooks from connecting to the internet.
However, QuickBooks must access the network to share files and connect to the Intuit server. Therefore, you will need to test the firewall and antivirus settings to allow QuickBooks the firewall and ports access it requires.
f. Verify the System Specs with the Requirements
If you are planning to install QuickBooks Desktop Enterprise on a computer, it needs to have certain specifications for the software to run smoothly.
Therefore, check the system requirements for QuickBooks Enterprise and make sure your computer(s) meets them.
2. Install QuickBooks Enterprise and Setup Database Manager
You will need to download and install QuickBooks Desktop Enterprise on all the computers you want to use as workstations.
If you haven’t done so, the steps below will guide you on how to download and install QuickBooks Desktop Enterprise on your system.
a. Download QuickBooks Desktop Enterprise
Download QuickBooks Desktop Enterprise from Intuit’s website to your computer. Once on the webpage, choose your country and QuickBooks product.
If asked where to save the download file, save it anywhere that is easily accessible and secure. After the file is downloaded to your computer, follow the next step to install it.
Optional: In case you ordered the product CD, you can also install it from it. However, downloading the QuickBooks Desktop Enterprise setup file from the website ensures that you get the latest release.
b. Install Enterprise on the Host Computer
Let us show you how to install QuickBooks Desktop Enterprise on your computer.
Firstly, all the running programs in the background, including the antivirus or security program, must be closed.
- Go to where you downloaded the file and double-click it to begin the installation.
- Now, proceed with the instructions you see on the screen until you reach the window for Choose Installation Type.
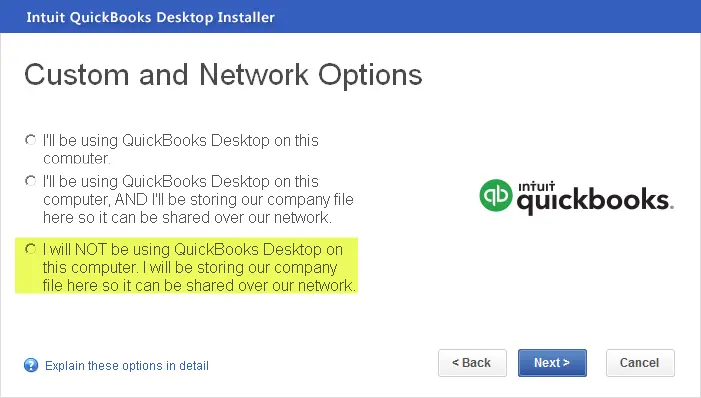
- You need to choose either Express or Custom and Network option to install QB Enterprise.
Note: The Custom and Network option will allow you to personalize the installation and location for it, whereas if you choose Express, the installer will intelligently decide the best location and manner to install it.
- Next, you will need to choose between three options depending on whether you will be using QuickBooks on this computer, storing company files or both:
Here are those three options:
(i) I’ll be using QuickBooks on this computer; however, the company file will be stored on another computer.
Use this option if you desire this computer only to be a workstation and not to host the company file.
(ii) I’ll be using QuickBooks on this computer and storing our company file here so it can be shared over our network.
This option means you want to choose this system as the server and host the company file in a peer-to-peer hosting setup.
The computer hosting the company file and acting as the server must be a high-performance computer. Therefore, if you have many computers on the network, choose the best computer to host the company file.
(iii) I will not be using QuickBooks on this computer, but I’ll be storing our company file on it so it can be shared on our network.
This option means that you will be hosting the company file on this computer but not running QuickBooks on it. The installer will only install QuickBooks Database Server Manager on it and not QuickBooks Desktop Enterprise.
- After choosing one of three options, go ahead with on-screen instructions to complete the installation process.
c. Setup the QuickBooks Database Manager on the Server
You need to configure the QuickBooks Database Server Manager ONLY on the server (the host computer). There is no need to configure the Database Server Manager on the workstations that won’t be hosting the company file.
QuickBooks Database Manager (QBDmgrn) allows you to check the QuickBooks Database Server running in the background to host the company file over the network so that the users on the other computers can access and work on it.
If, after QuickBooks installation, you find that the Database Server Manager doesn’t open automatically, launch the Start menu, search for QuickBooks Database Server Manager, and open it from there.
After the QBDbmgrn opens, follow the steps below to scan the company file. However, if you haven’t created a company file yet, come back to this step after setting up the company file.
(i) Scan for the Company Files
- Once the Configuring Database Server Manager window opens, navigate to the Scan Folders tab.
- Tap on the Add Folder button and then locate the folders that contain company files and choose it. You will see the folders in the box for Folders That Contain Company Files.
Note: However, if you can’t find the folder where the company file is located, you can scan the disk drive containing it.
- Tap on the Scan button. The scanning process will start, and when it is complete, you will see the company files in the box labeled QuickBooks Company Files Found.
Note: However, when you move the company file to a new location or create a new company file, you will need to scan the folders again.
(ii) Monitor the Hard Drive
QuickBooks Database Server Manager will monitor the selected drives or folders storing the company file.
Follow the steps to monitor the drives on the system:
- Tap on the Monitored Drives tab.
- Now, choose the drives that you wish to monitor.
Note: Remember that you won’t be able to see and monitor the mapped drives.
3. Set Up to Share Your File in Multi-User Mode
Now, let us set up the file-sharing permissions for QuickBooks users over the network.
a. Give Access to Company Files
You need to make sure that all users have read/write access and create/delete rights to the directory where you keep the company file.
If this is not the case, talk to your network administrator or an IT expert to ensure the folder permissions are set correctly. Once done, move to the next step.
Install QB Desktop Enterprise on All Workstations
Now, if you haven’t already installed the QuickBooks Desktop Enterprise on all workstations, please do so.
For guidance on how to do so, go to the b section in Step 2 and follow the instructions there.
C. Configure Multi-User Environment
The computer that has the company file will need to act as a server and host it. This is crucial for multi-user mode to work.
In case you are only hosting the company file on the server and not using it as a workstation, you wouldn’t need to go and enable multi-user mode in it. When installing QuickBooks Enterprise, you needed to select the option that you will only be storing the company file here and not run QB on it, and therefore, QuickBooks Database Server Manager should have been installed here.
However, if you needed to both host the company file on this computer and run QuickBooks on it and choose the same option during installation, both QBDT Enterprise and QBD Manager would have been installed here. You will need to open QuickBooks and enable the multi-user mode here.
The multi-user mode will only need to be enabled on the host computer (server) and not the workstations that are only meant for running QuickBooks but not hosting the company file.
The table below gives a clearer idea of where the multi-user hosting status needs to be enabled.
| Computer | Multi-User Hosting Status |
| Peer-to-Peer Hosting Where one computer has both QuickBooks Enterprise installed and hosts the company file and others access it. | |
| Remote Desktop Services Server Where one computer has QuickBooks Enterprise installed, and other workstations access it. | |
| Central Server Where one computer hosts the company file and other workstations access it. |
If the hosting configuration is incorrect, you might get an error like H202 when switching to multi-user mode.
d. Enable Company File Hosting on the Server
Follow the steps below to check and enable the company file hosting on the server.
Note: If the server doesn’t have the QuickBooks Desktop Enterprise installed and only the Database Server manager, you don’t need to follow the steps below; you can jump to step e.
- On the server, launch QuickBooks Desktop Enterprise.
- Open the File menu and choose Utilities.
- You need to make sure that you see the option to Stop Hosting Multi-Access in the Utilities menu, which you MUST NOT click. The fact that you see the option to stop means the service is already running).
If you see the option to Stop Hosting Multi-Access in the Utilities menu, directly jump to step e and don’t follow the steps below.
- However, in case you see the option to Host Multi-User Access in the Utilities menu, the computer is not hosting the company file. In that case, follow the steps below.
- Tap on Host Multi-Access, and when prompted to confirm starting multi-user access, choose Yes.
- When asked to close and reopen the company file, choose Yes again.
Once done, move to the step e.
e. Ensure the Workstations Except the Server Have Hosting Turned Off
Follow all the steps on these workstations to make sure that the hosting access is turned off on the workstations.
- On the server, launch QuickBooks Desktop Enterprise.
- Open the File menu and choose Utilities.
- You need to ensure you see the option to Host Multi-User Access in the Utilities menu, which you MUST NOT click. The fact that you see the option to host means the service is not already running).
If you see the option to Host Multi-Access in the Utilities menu, directly jump to step e and don’t follow the steps below.
- However, if you see the option to Stop Hosting Multi-User Access in the Utilities menu, the computer is already hosting the company file. In that case, follow the steps below to disable it.
- Tap on Stop Host Multi-Access, and when prompted to confirm disabling multi-user access, choose Yes.
- Follow the instructions you see on the screen.
Do this on all workstations to turn off multi-user hosting. Once done, move to the next step.
4. Set Up the Company File and Import Data
Now, let us register QuickBooks Desktop and set up the company file. Perform the following steps on the server if the QuickBooks Desktop Enterprise is installed there.
If you have a dedicated server with only QB Database Manager installed, follow these steps on a user workstation.
a. Register QB Desktop Enterprise
Firstly, let us register QuickBooks Desktop Enterprise, which will give you access to various benefits of the software, including technical assistance.
Note: Once you install QuickBooks Enterprise, you need to register it in 30 days. Once you register Enterprise on the server, you need to go ahead and register it on all the workstations as well.
Here is how you can register your QuickBooks Desktop Enterprise:
- Launch QB Enterprise and open the Help menu.
- Choose Register QuickBooks, followed by Begin Registration.
- Go ahead with the instructions.
However, if you weren’t able to register for Enterprise online, you can do so with telephonic assistance. For that, connect to a ProAdvisor.
Note: In the future, if you move QuickBooks Desktop to a new computer, you will then need to register there as well. The product and license information you have will be crucial when doing so; therefore, keep them safe.
b. Create a QuickBooks Company
You won’t have a QuickBooks company file if you are new to QuickBooks Desktop. If you haven’t set up your QuickBooks company file already, you will need to do it as the first thing before you begin your accounting operations.
The company file will save all your business and accounting data. Now, if you are migrating from accounting software like Quicken, Peachtree, or Microsoft Small Business / Office Accounting, you can use the QuickBooks conversion tool.
If not, here is how you can create a company file from scratch.
- Launch QB Enterprise.
- Choose Create A New Company. If you don’t see that, tap on the File menu and choose New Company.
- Select Express Start and follow the instructions you see on the screen. However, if you need to fine-tune and carefully set up your company file for the business requirements, choose the Guided Start option.
c. Scan for Company Files
When you are done creating and setting up the company file, you need to scan it in the database server manager so that all the workstations can access it.
Go to section c in step 2 for the guided instructions. Once done, you can configure QB Enterprise.
5. Configure Enterprise for the Business
Accordingly, as per the business requirements, you will need to set up several things and verify them, such as payroll, bank accounts, audit trail, etc.
You can utilize Quick Start Center to finish some standard tasks like entering sales receipts and bills, writing checks, creating invoices, and checking the vendor and customer balances.
Moreover, you can enter historical data, if any, set up payroll, back up company files, and make optional adjustments.
6. Create Users and Set Up Roles
In QuickBooks Desktop Enterprise, you can assign different roles to users and limit who can view, create, modify, delete, and print data.
Moreover, you can use various presets with predefined roles such as Accounts Payable, Accounts Receivable, Sales, Banking, and Payroll Manager.
How to Set up Roles and Create Users in QuickBooks Enterprise
Let us first show you how to set up a role in QuickBooks Enterprise:
- Launch QuickBooks Enterprise and open the Company menu.
- Choose Users followed by Set Up Users and Roles.
- Tap on the Role List tab followed by the New option.
- In the Role Name field, type in the name or select an already existing role.
- Define what activities and the level the role will have access to and choose OK.
Now, we will tell you how to create a user in QB Desktop Enterprise:
- Tap on the User List tab and choose the New option.
- In the User Name field, type in the name of the user
- In the Password and Confirm Password fields, type in a password that you will remember and have noted down somewhere. (The user will need it to log into QuickBooks).
- Now, define what roles the user should have and then tap on OK.
One can log in to QuickBooks Desktop Enterprise with the user profile just created and resume accounting.
Conclusion
In this guide, we discussed how to install QuickBooks Desktop Enterprise and then set it up. The process can be quite challenging and needs technical expertise.
Therefore, if you come across an issue while setting up QB Enterprise on your computer, don’t worry. Connect to a QuickBooks expert at +1(855)-510-6487 who will help install and set up Enterprise so that you can start accounting right away!
Frequently Asked Questions
How do you install QuickBooks Desktop on a new computer?
To install QuickBooks Desktop on a new computer, you can either use the migration tool or download and install QuickBooks from Intuit’s website. You will then need
Is QuickBooks Enterprise a desktop version?
Yes, QuickBooks Enterprise is a high-end, advanced edition of the QuickBooks Desktop lineup, which also includes QuickBooks Desktop Pro and Premier. It is the only product in the lineup that is not going to be discontinued after 2024 and will continue to have updates.
How many computers can I install QuickBooks Enterprise on?
You can install QuickBooks Desktop Enterprise on as many computers as the number of user licenses you have. One user license can be used only on one computer to install QuickBooks. When you want to increase the number of users, you need to buy the license for one more user.

Kate is a certified public accountant (CPA) with expertise in various accounting software. She is technically inclined and finds passion in helping businesses and self-employed people carry out bookkeeping, payroll, and taxation without worrying about errors. Every once in a while, Kate loves to travel to far-off places and relax in the lap of nature.