Last Updated on November 24, 2025
QuickBooks is accounting software used for financial operations in both small and large businesses. With QB, you can easily keep a record of your business transactions, which helps you create individual accounts for your customers and vendors. There can be situations when you would need to merge vendors in QuickBooks, for instance to delete duplicate accounts. This blog is to help you integrate vendors. Continue reading and follow the steps given in this blog to do so without any hassle.
If you need any help with QuickBooks transactions or managing the records, get in touch with an expert at +1 (855)-510-6487 for free guidance!
Things to Keep in Mind When You Merge Vendors In QuickBooks Enterprise
The process of merging two accounts means changing the data on your computer. Before you Merge Vendors in QuickBooks, you should ensure the following:
- You should back up your company file in QBDT for Windows or macOS.
- Ensure that you are using the company file in Single User mode. If it’s in Multi-user mode, switch it to single-user mode.
- If there are any pending accountant changes, clear them first to avoid unexpected discrepancies.
- Make sure multi-currency isn’t enabled in QuickBooks Desktop for Windows.
- Understand that the merge process is irreversible, so verify which accounts need to be merged.
- You should exempt these vendor accounts from merging-
- Tax Authority
- Tax-Exempt
- Payment Made through Online Banking
- Direct Deposit vendor
Now, let’s move on to the next section, which explains the steps to merge vendors in QuickBooks for Windows OS.
Learn How To Merge Vendors In QBDT For Windows
In this section, we will understand the steps to merge entries from the Chart of Accounts, item list, Customer List, and Employee List:
- Navigate to the list with the entries you want to merge.
- Copy the names of those entries that you wish to keep.
- Right-click on those entries that you don’t want to keep.
- Then, select the Edit option.
- Paste the names of those entries that you copied.
- Tap on the Save & Close option.
- Choose the Yes option to merge the entries.
When the message pops up in the Chart of Accounts with the message “You cannot merge an account that has online information associated with it into another account,” you need to have an active bank feed on one of the accounts. If you have any duplicate accounts, then follow the steps below:
- Look for the account that you want to keep.
- Under the Action section, choose the Edit option.
- Here, note the Account Name, Account Type, and Detail Type of the account. Ensure the information is identical across the accounts you wish to merge.
- Verify your account to determine if it is a subaccount or a parent account.
- The names of subaccounts are under the Name area of the Chart of Accounts list.
- Head back to the Chart of Accounts section.
- Look for the duplicate accounts.
- Go to the Action column.
- From the drop-down menu, choose the Edit option.
- Now, change the Account Name and Detail Type to the name of the account that you want to keep.
- When you wish to create this as a subaccount, ensure to:
- When you are merging two parent accounts, ensure they don’t have any subaccounts.
- If you are merging two subaccounts, ensure they both have the same parent account.
- When you merge a subaccount and a parent account, modify the Account Type to exactly match the other parent account so it becomes a parent account.
- Choose the Save option.
- Opt for Yes to merge accounts.
QuickBooks moves the past transactions from the duplicate to the account you wish to keep in your database. In the next section, we will look at the benefits of the merge vendor tool and how to use it across different QB versions.
Utilize the Merge Vendors Tool in QuickBooks Enterprise and Accountant
When you are using the Enterprise and Accountant edition of QuickBooks, the steps are mentioned below, which should be followed:
- QuickBooks Desktop Accountant edition
- Navigate to the Accountant menu.
- Then, select Client data review.
- Tap on Merge Vendors.
- QuickBooks Desktop Enterprise
- Navigate to the Company menu.
- Then, select Accounting tools.
- Tap on the Merge vendors.
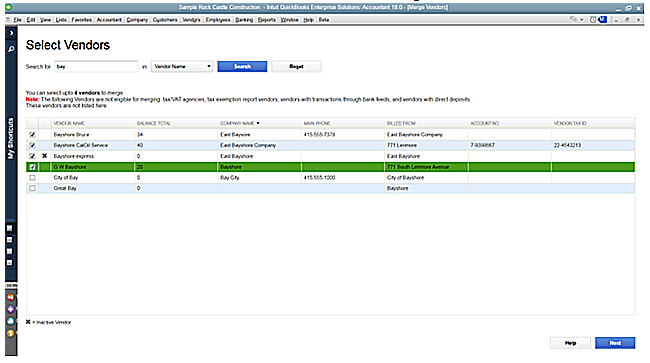
- Select all the vendors you wish to merge.
- Then, choose the Next option.
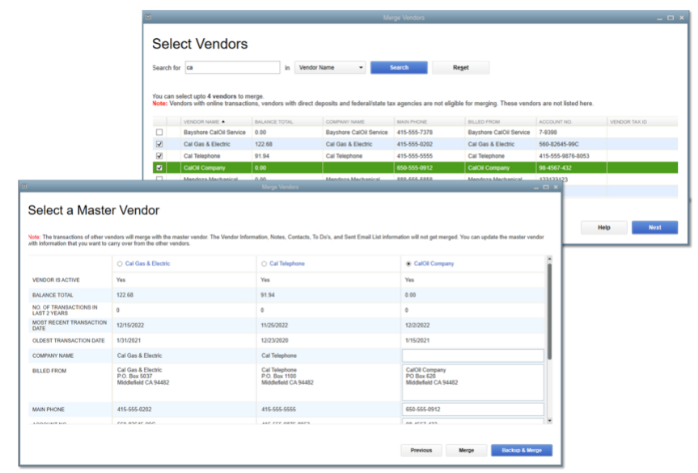
- Choose a Master Vendor section.
- Select the Merge option.
- Tap Yes to merge the vendors.
- Press OK
QuickBooks for Windows 2018 or Previous Version
- Go on to the Vendors menu.
- Then, choose the Vendor Center section.
- Copy the name of the vendor that you wish to keep.
- Right-click the vendors you don’t wish to use.
- Now, choose the Edit Vendor option.
- Paste the name you copied.
- Press OK.
- Press Yes in order to merge the vendors.
QuickBooks Desktop for Mac
- Navigate to the list containing the entries you wish to merge.
- Copy the name of the vendor you wish to keep.
- Select the entries you don’t want to keep and then tap on the Pencil icon in order to edit them.
- Paste the name you copied.
- Then, choose OK
- Tap on Yes in order to merge the entries.
How Are QuickBooks Desktop Data Import Tools Helpful?
When you handle vendor data manually, it can be a hectic, time-consuming process and may lead to errors in your system. Listed below are the ways in how the tool makes your work easier:
- You can import vendor lists in bulk without any duplicate entries in the data.
- The tool eliminates duplicate entries during the import process, ensuring data accuracy.
- Easily syncs the data with QBDT, which saves time.
- Since this tool performs the operations, manual errors are eliminated.
These were the helpful aspects of the data import tool that will help you to merge vendors in QuickBooks Desktop.
Conclusion
When you wish to merge vendors in QuickBooks Desktop, this blog will cover the steps you should follow, whether you run QuickBooks on Windows or macOS. Moreover, we mentioned the QB data import tool that will help you import the data into your system. If you need any help with the merge process of your data, feel free to get in touch with our experts at +1 (855)-510-6487.
Frequently Asked Questions (FAQs)
How can I download the historical data in QuickBooks?
The steps to download the data are mentioned below:
1. Go to the gear icon.
2. Then choose Export Data.
3. Choose the reason why you want to download.
4. Tap on Continue.
5. Under the Reports tab, choose the desired date range.
6. Swap the button from Reports and Lists.
7. Choose Export to Excel.
What are the steps to deactivate an account in QuickBooks?
When you wish to deactivate an account in QBDT, follow the steps:
1. Go to the Accounting section.
2. Choose the Chart of accounts.
3. Look for the account.
4. From the Action menu.
5. Tap on the View register section.
6. Now, choose the Make inactive option.
7. Tap on Yes.
How do I merge vendors in QuickBooks Desktop?
Go to Lists > Vendor List, select the vendor you want to merge, and click Edit Vendor. Change the name to match the vendor you want to keep. QuickBooks will prompt for confirmation. Click Yes to merge, transferring all transactions to the remaining vendor.
Can I undo a vendor merge in QuickBooks Desktop?
Yes. You can only merge vendors within the same company file, and the vendor names must match exactly for merging. Also, inactive vendors can be merged, but QuickBooks will not merge vendors with different types or classes without adjustments.

Oriana Zabell, a professional cloud engineer, has over three years of experience in desktop, online QuickBooks support and troubleshooting. She is currently working as a cloud hosting consultant with Asquare Cloud Hosting. She loves to read and write about the latest technologies such as cloud computing, AI, DaaS, small businesses, manufacturing. When not writing, she is either reading novels or is indulged in a debate with movie fanatics.