Various kinds of QBWin.log errors come up in QuickBooks Desktop. In this guide, we are going to tell you how to fix them. Here are some error messages you might see on the screen:
| “Verify Primary: Duplicate transaction number: Primary, Trans, txn#, date, doc#.” |
| “Verify Primary: totTrans wrong. Is ### should be ###.” |
| “Verify Primary: Next trans number is ### should be ###.” |
| “LVL_ERROR–Error: Verify Names List: Index XXX record XXX.” |
| “Error: QBwin.log: LVL_SEVERE_ERROR–GetDecryptedCreditCardNumber The decryption has failed” |
| “QBWin.log: LVL_ERROR – Error: Verify Item History: Build txn target bad pending state. Item = nnnnn” |
| “QBWin.log: Verify Account Balance failed.” |
| “Error: QBwin.log: LVL_SEVERE_ERROR–GetDecryptedCreditCardNumber The decryption has failed” |
| “QBWin.log: LVL_ERROR-error: Verify Account List Item: View out of sequence.” |
| “QBWin.log: Verify Target: Invalid Open Balance” |
Different errors include different aspects of the program and components, and thus they need different steps to troubleshoot them. Therefore, we have compiled separate sections to help you resolve them. Thus, scroll to the section that is the most relevant to the issue you are facing and follow the instructions given there.
A) Fix QBWin.log Errors – Verify Primary and Names List
In this section, we are going to troubleshoot the Verify Primary or Verify Names List or QBWin.log error messages.
| “Verify Primary: Duplicate transaction number: Primary, Trans, txn#, date, doc#.” |
| “Verify Primary: totTrans wrong. Is ### should be ###.” |
| “Verify Primary: Next trans number is ### should be ###.” |
| “LVL_ERROR–Error: Verify Names List: Index XXX record XXX.” |
Go through the solutions listed below and follow the instructions given carefully.
1. Update QuickBooks Desktop
The first thing you need to do is update your QuickBooks Desktop application. This often resolves technical issues, bugs, and software incompatibility. Once updated, if the QBWin.log error persists, move to the next step.
2. Rebuild the Company Data File
If a QBWin.log error mentions rebuilding the company file, then you need to do the same. The rebuild data utility file resolves any issues in the company file and ensures data integrity. Therefore, rebuild your company file and then move to the next step.
3. Review the Rebuild Report
Once you have rebuilt the company file, review the rebuild report.
- Launch QuickBooks Desktop and log in to the company file.
- Press the F2 key, which will launch the product info window.
- Choose Review last Verify / Rebuild.
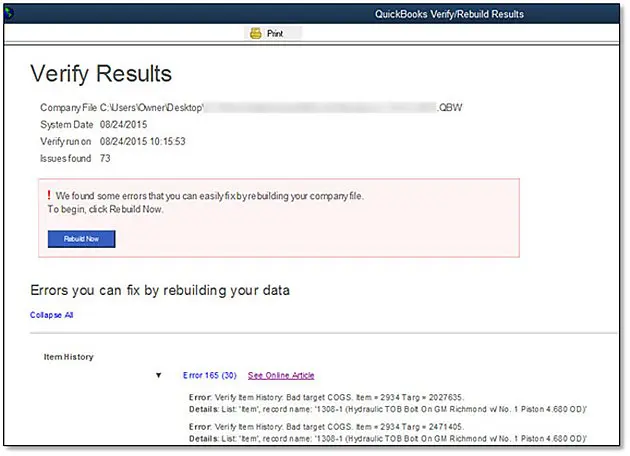
- Now, go through the Verify/Rebuild results. Tap on Expand All and look for any QuickBooks errors.
If you continue to see a QBWin.log error or Verify Primary or Verify Names List error message, move to the next step.
4. Restore a Recent Backup
If none of the above methods worked, you would need to restore a recent backup. However, when doing so, you will lose any progress made since the date the backup was created.
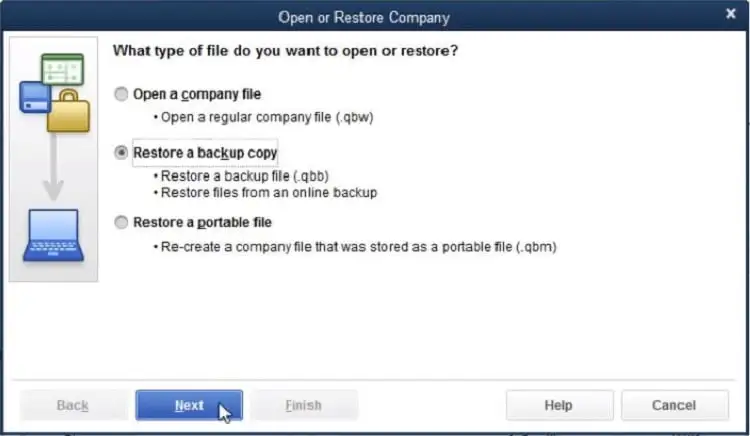
However, if you don’t have a recent backup or if restoring it didn’t resolve the QBWin.log errors in QuickBooks Desktop, move to the next step.
5. Utilize the Auto Data Recovery (ADR) Tool
QuickBooks Auto Data Recovery tool allows you to restore lost data. Run the tool to resolve the QBWin.log errors in QB Desktop.
B) LVL_SEVERE_ERROR–GetDecryptedCreditCardNumber The decryption has failed
Error: QBwin.log: LVL_SEVERE_ERROR–GetDecryptedCreditCardNumber The decryption has failed
Sometimes, the Verify utility fails, and one of the following error messages is on the screen:
| “LVL_SEVERE_ERROR–GetDecryptedCreditCardNumber Failed: The decryption has failed. CHECKPOINT: Failed to decrypt customer’s credit card number. Customer ID: nnnn” |
| “LVL_ERROR–Unable to decrypt social security number/Social Security number” |
In this section, we will show you how to resolve the above QBWin.log errors.
However, before moving ahead with the troubleshooting, there are two things mandatory to do:
- Update your QB Desktop software to the latest release
- Create a company file backup or portable company file
Once done, follow the steps listed below.
1. Check if the QB Admin User Profile is Damaged
If the admin user profile is damaged or corrupt, this can give way to QBWin.log errors. Therefore, let us check that.
a. Re-Encrypt QuickBooks Company
- Log in to QB company using the admin profile.
- Now, change the password of the admin profile.
- Allow QuickBooks to re-encrypt the data in your file, which may take several minutes.
Note: If QB crashes while encrypting, speak to a ProAdvisor. They might need to send your file to Data Services to get rid of all the sensitive information.
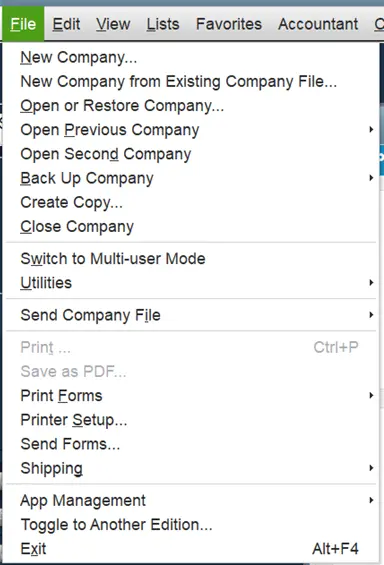
- Now, log out from your company file. Tap on the File menu and choose to Close Company or Logoff, and then exit QB.
- Launch QB again and log in with QB using the admin user profile to ensure the completion of the re-encryption process.
b. Verify Company Data
Now, let us verify if the re-encryption is successful. To do so:
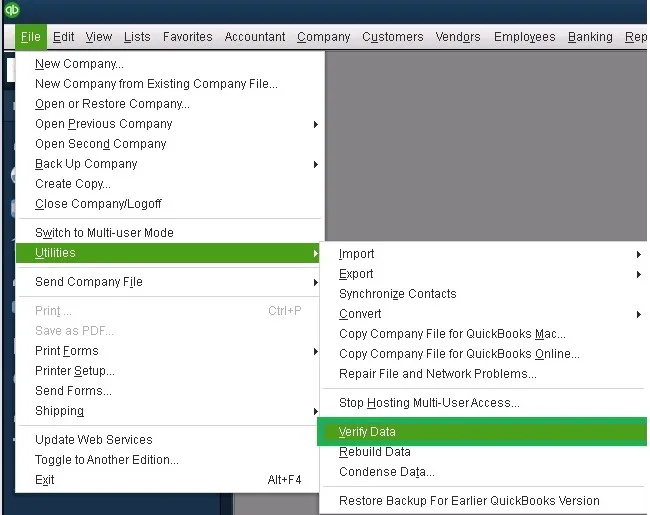
- First, run the verify data tool by launching the Window menu and navigating to Close All, followed by File menu and then Utilities < Verify Data.
- Now, from all the entries in the log file, check the most recent one.
- If you see one of the following error messages on the screen, you will need to contact Data Services to get your file repaired:
- “LVL_SEVERE_ERROR–GetMasterKey Failed: The decryption has failed.”
- “LVL_SEVERE_ERROR–GetDataAccessKey Failed: The decryption has failed.”
If the admin user gets the Masterkey error, data repair is mandatory. Otherwise, if it’s a non-admin user, you can delete the affected users and recreate them.
2. Fix Damaged or Missing Encrypted Fields
Let us check for damaged or missing encrypted fields and resolve them. In the steps that follow, we will use credit card numbers, but you can use similar steps for vendor tax IDs or employee SSNs.
a. Verify Company Data
Firstly, verify your company data to find possible damages.
- Launch QB Desktop and open the Window menu.
- Now, tap on Close All.
- Open the File menu and navigate to Utilities, followed by Verify Data.
Now, proceed to the next step.
b. Review the Error Message in QBWin.log
QBWin.log file will list all the error messages. Therefore, open the QBWin.log file and check the error messages.
- Open QB Desktop and while you are on the Home screen, press the Ctrl+1 keys which will open the Product Information window.
- Now, press the Ctrl+2 keys, which will open the Tech Help window, and choose the Open File tab.
- Tap on QBWin.log, followed by Open File. Save the file somewhere you can easily open it from,
- Now, right-tap on the QBWin.log file and choose Open with, followed by Notepad.
- Look for the customer names and IDs in the QBWin.log and note them down.
Next, edit the credit card number for the customers that are affected.
c. Refresh the Credit Card Number for the Erroneous Customer
If there is damaged data, editing the credit card number can resolve it. Let us show you how to edit the credit card number in simple steps.
Note: If there are a lot of customers affected, it will take forever to edit the card details for them. In that case, you can utilize advanced import, which will override the credit card details.
- Launch QB, open the Customers menu, and go to the Customer Center.
- Tap on the dropdown icon above the search bar and click on All Customers.
- Now, select the Customers or Jobs you found affected with the help of the QBWin.log file.
Here’s what to do if you don’t find the name of the Customer or Job on the list
1. Firstly, export the Customer list in the form of an IIF file.
2. Right-tap on the IIF file and choose Open With, followed by Microsoft Excel or a similar text editor.
Note: In case you see a message when opening the file, choose Next. Now, in the Delimiter section, select Other: and enter an apostrophe ('). Ensure other items aren’t selected and choose Finish.
3. Now review the spreadsheet and verify if the Customer ID you noted in the log file matches any Customer ID in the REFNUM column. Note down the customers for whom you find a match.
- Double-tap the Customer or Job to edit, and then tap on the Payment Settings tab.
- Type in a 16-digit dummy credit card number and expiration date, different from the correct one, and then choose OK.
- Once again, click on the Payments Settings tab and now type in the correct credit card number and expiration date, and choose OK.
Do this for all the customers you found affected in the QBWin.log file. Once done with that, let us ensure the data is free from errors.
d. Check and Ensure that Data is Rid of Errors
Now, let us verify the company data to make sure the file is free from errors.
- Open QB Desktop and launch the Window menu.
- Now, tap on Close All.
- Open the File menu, go to Utilities, and tap on Verify Data.
If QuickBooks finds no issue, the error is fixed. In case, however, the verification fails, check for the errors in the QBWin.log file and resolve them.
If you especially encounter, “Verify Error: QuickBooks found a problem with the Acct #/Card #/Note field for other asset”, follow step 1 to troubleshoot the damaged admin user.
C) Verify Item History: Build txn target bad pending state. Item = nnnnn
You might end up with the following errors after updating the company file.
| “QBWin.log: LVL_ERROR – Error: Verify Item History: Build txn target bad pending state. Item = nnnnn” |
| “LVL_ERROR–DB error -185 ErrorMessage:’SELECT returns more than one row’ from file:’..\src\DMEDLSQLContactEditElement.cpp’ at line 2679 from function:’DMEDLContactEditElement::LoadAdditional” |
Let us show you how to resolve the above errors. However, first, you need to ensure you have updated QuickBooks Desktop and then follow the instructions given below.
1. Verify and Rebuild Company File
Rebuild the company file and then verify it to check if the error has been resolved.
- Open QB Desktop and go to the Window menu.
- Now, choose Close All.
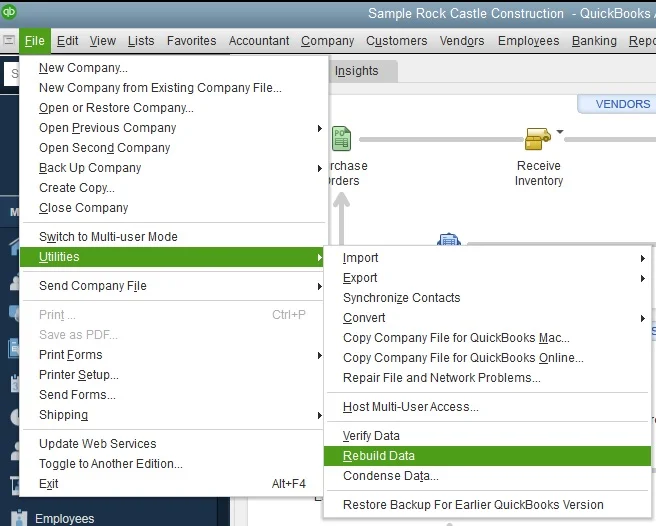
- Navigate to the File menu, followed by Utilities, then Rebuild Data.
Now, verify the company file.
- Launch QB Desktop and go to the Window menu.
- Now, choose Close All.
- Navigate to the File menu, followed by Utilities, and tap on Verify Data.
If you find no issues, you are good to go. However, if you find an error, go to the next step.
2. Find and Manually Edit the Damaged Item
Let us find the damaged items manually and edit them. We will do that in four steps.
a. Review the QB.Win Log and Identify Item Number
Follow the steps listed below to open the QB.Win Log and identify the item number.
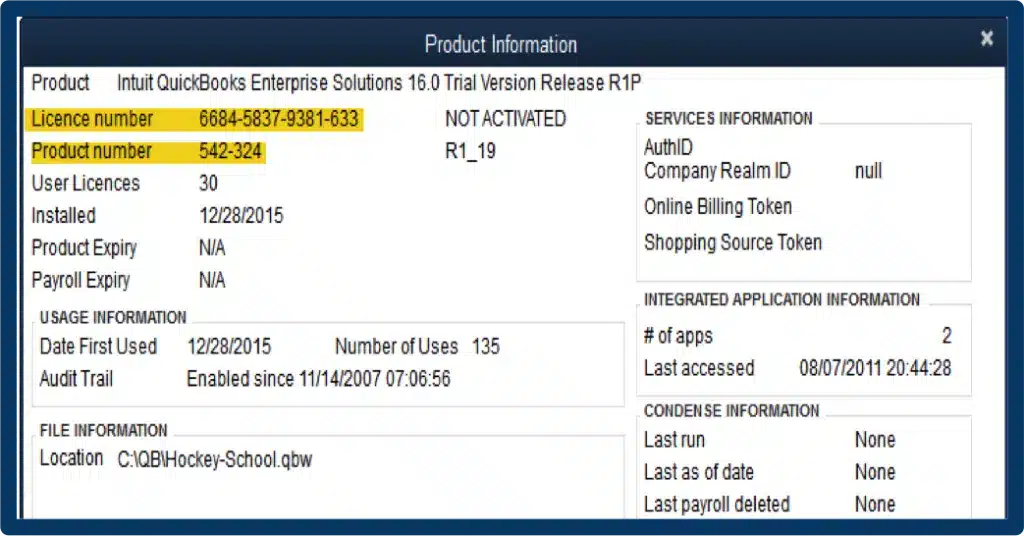
- Open QB Desktop and press the F2 keys, which will launch the Product Information screen.
- Press the F3 key, and it will open the Tech Help window.
- Now, tap on the Open File tab and choose QBWIN.LOG, followed by Open File.
- Once QBWIN.LOG opens, press the CTRL + F keys, and then in the search box that appears, type error.
- Note down the item number you see in the error message.
Now, move to the next step.
b. Export Lists and Find the Damaged Item
Follow the steps below to export lists and locate and find the name of the damaged item.
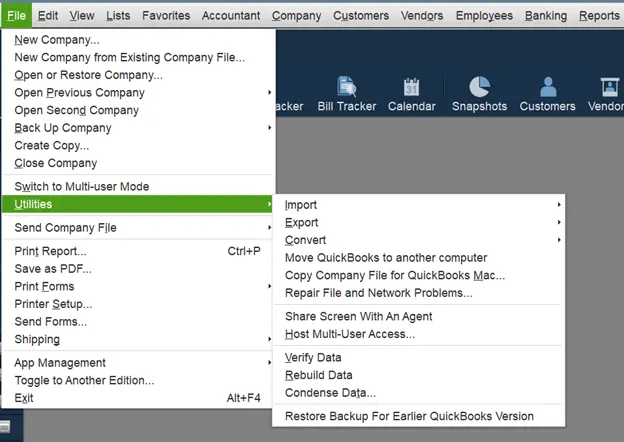
- Open QuickBooks, and then launch the File menu. Navigate to Utilities > Export > Lists to IIF Files….
- Now, in the Export window, choose Item List and tap on OK.
- Choose where to save the file, usually in an easily accessible location, and click on Save.
- Now, right-click on the IIF file and choose Open with, followed by Excel.
- Look for the REFNUM that matches the item number you saw in the error message.
- Note down the name of the item.
Once you have the item name ready, let’s go ahead and correct its quantity on hand.
c. Edit the Item’s Quantity on Hand (QOH)
Here is how to edit the quantity on hand for the item.
- Open Reports and choose Inventory, then Inventory Valuation Detail.
- Tap on the Dates dropdown menu and choose Select All.
- Now, look for the item and note down when its quantity crossed zero to become negative for the first time.
- Finally, remove the “build assembly” associated with the negative-on-hand.
Next, let us verify the company file to make sure the data is free of errors.
d. Verify Data to Ensure It is Rid of Errors
Here is how you can verify data and make sure that there are no more issues with the company file.
- Open the File menu.
- Choose Utilities followed by Verify Data.
If QuickBooks finds no problems with the data, the error is resolved. However, if you see a similar error, repeat from step a.
D) QBWin.log: Verify Account Balance failed
Sometimes, verifying QuickBooks Data might fail and give way to the following error, which you can find in QBWin.log:
| “verify: c (###) : CHECKPOINT: ####: Fri Jun xx 07:09:03 Error: Verify Account Balance failed. Account = Inventory Asset. Ref = ##. Home – Calc bal = ###,###.## . List bal = ###,###.##” |
Note: This is just an example, and you may see any balance sheet account in place of the Inventory Asset account.
To resolve these errors, update QuickBooks Desktop, rebuild the company file, and then verify it. For detailed instructions, scroll up to Section A and carry out Steps 1, 2, and 3, respectively.
E) Verify Account List Item: View out of sequence…
When you verify data, it might fail, and you will find this error message in the QBWin.log:
| “LVL_ERROR-error: Verify Account List Item ###: View out of sequence. Verify Account List Item XXXX: Invalid sublevel X, valid range is X to X.” |
This is caused by damaged charts of accounts and as a result, some accounts appear in incorrect order. To resolve this, rebuild the company data and verify it again.
1. Rebuild the Company File and Verify It
First, you need to rebuild your company file.
- Launch the File menu, and navigate from Utilities to Rebuild Data.
- When asked if you wish to back up the file, choose OK.
- Tap OK when QuickBooks tells you that the rebuild has been completed.
Now, verify the company data and check if the error is resolved.
- Launch the File menu, and navigate from Utilities to Verify Data.
- Tap OK when QuickBooks says it detected no problem.
However, carry out the next solution if QuickBooks runs into the same problem after verification. After that, re-sort the list.
2. Re-sort the List
Here is how you can re-sort the list in QuickBooks Desktop.
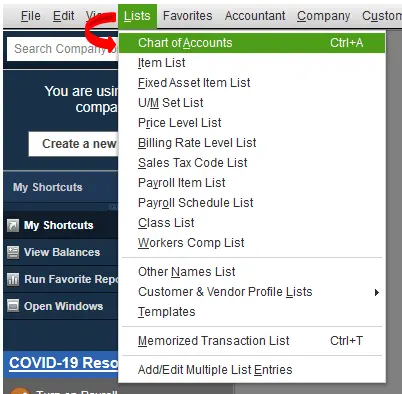
- Launch the Lists menu, and go to Chart of Accounts.
- Now, tap on the Account drop-down menu on the bottom-left, and then select Re-sort List.
- When you see the prompt, tap on Yes to re-sort the accounts to the original order.
- Now, verify if all the main account types are grouped right correctly for instance all the income accounts must be ordered in sequence.
- In case you find the account grouped incorrectly, for instance Other Current Asset appearing as a subaccount of an Income account or subaccounts appearing as main accounts, you will need to manually repair the accounts.
Proceed to the next step, which is to manually repair the accounts.
3. Manually Resolve the Damaged Accounts
Here is how you can fix the damaged accounts in simple steps.
- Go to the account you wish to fix and right-click on it. Now, select Edit Account.
- Check the box for Subaccount of accordingly, if you wish to convert a subaccount to a main account or to convert a main account to a subaccount.
- If you find that the box for Subaccount of is selected, select the correct account type by accessing the dropdown menu next to the box and choose OK.
- Repeat this for all the accounts that are affected.
Finally, carry out step 1 to rebuild the data and verify that the error is resolved.
F) QBWin.log: Verify Target: Invalid Open Balance
If there is damage to the data, you might find that the transactions reflect an incorrect open balance. When you verify data, the utility will find such transactions and show such errors in QBWin.log
| “Error: Verify Target: Invalid Open Balance.” |
| “Error: Verify Item: Item history Item Quantity on Hand mismatch error.” |
Let us show you how to resolve these QBWin.log errors in QuickBooks Desktop.
1. Rebuild the Company File and Verify It
You need to begin with rebuilding your company file.
- Launch QB Desktop, navigate to the File menu, and choose Utilities followed by Rebuild Data.
- Select OK when QuickBooks asks you to create a backup.
- When QuickBooks tells you that the rebuild has been completed, choose OK.
Now, verify the company data and check if the error is resolved.
- Open the File menu and go to Utilities, followed by Verify Data.
- Tap OK when QuickBooks tells you that it detected no problem.
However, if QuickBooks runs into the same problem, carry out the next solution.
2. Identify and Resolve Damaged transactions Manually
Follow the steps below to find and fix the damaged items.
a. Find the Item Number With the Help of QBWIN.log
Here is how you can identify the item number using the QBWin.log
- Launch QB Desktop, and press the F2 key (or Ctrl+1 keys) to fetch the Product Information.
- Now, press the F3 key or (Ctrl+2 keys) to bring the Tech Help screen.
- Then tap on the Open File tab, look for QBWIN.log, and click on Open to open it.
- After the QBWIN.log opens, press Ctrl + F, and in the search or Find bar that you see, type in error.
You might see errors like:

Error: Verify Target: Invalid Open Balance. Rcrd = [XXXX] Type: [transaction type] txn # [XXXX] Date: [XX/XX/XXXX] Doc# [XXXX] Source Account: [AccountName]
Error: Verify Item: Item history Item Quantity on Hand mismatch error. Item ID [XXXXX] expected value: [XXXXX] found value: [XXXXX]
- Now, from the errors, note down the record number, transaction type, and date.
Proceed to step b to manually fix these damaged transactions.
b. Manually Resolve the Damaged Transaction
Here is how to resolve the damaged transaction link or date
- Go to the damaged transaction mentioned in the QBWIN.log.
- Now, change the transaction date to 20 years in the future, for instance, from 1 May 2024 to 1 May 2044.
- Now, choose Save & Close.
- Re-open the transaction, edit the date back to the original date, and choose Save & Close.
Here is how to resolve the transaction out of balance
- Go to the damaged transaction mentioned in the QBWIN.log.
- Now, scroll to the bottom of the items on transactions, add any item, then Save & Close.
- Open the edited transaction again and take out the added item to get back to undo the addition you just made a minute ago.
- Finally, choose Save & Close.
This should resolve the QBWin.log errors in QuickBooks Desktop associated with an invalid open balance.
Conclusion
This was all on how to resolve the QBWin.log errors in QuickBooks Desktop when verifying data. These methods will resolve such error messages asking you to verify item history, name list, account balance, etc. However, if you continue to face an error, consider speaking to a QuickBooks expert. They are available 24/7 at +1(855)-738-0359!
Frequently Asked Questions
To resolve a QBWin.log error, update QuickBooks Desktop and then look for what the error message mentions. That could be your clue. For instance, if it talks about an invalid open balance, there are issues with transactions, and they reflect an invalid open balance. Now, search how to resolve the specific issue, or consult our guide on case wise troubleshooting.
To find the QuickBooks log file, launch the Desktop application and press F2 or Ctrl+1 keys. This will bring the Product Information window. After that, press the F3 or Ctrl+2 keys to open the Tech Help window. Now, tap on the Open File tab, followed by QBWin.log, and then click on Open File.
To resolve the QBWin.log: Verify List. Duplicate name encountered, find duplicate names, and then use the QBWin.log file to find duplicates. Utilize the Name List to find duplicate names and then utilize the regular lists to search for duplicate items, accounts, or templates. Finally, you need to modify one of the duplicate names so that only one item or account remains with that name.

Kate is a certified public accountant (CPA) with expertise in various accounting software. She is technically inclined and finds passion in helping businesses and self-employed people carry out bookkeeping, payroll, and taxation without worrying about errors. Every once in a while, Kate loves to travel to far-off places and relax in the lap of nature.