If you wish to switch to a new business account, you will need to update that in QuickBooks payroll. Don’t worry; this doesn’t mean any interruptions to tax payments or direct deposits.
The process for this transition might seem lengthy, but we are going to simplify it for you. Alright then, let’s dive into how to change payroll bank account in QuickBooks Desktop.
Before You Change Your Payroll Bank Account in QuickBooks
There are some things you need to ensure before you go ahead and change your payroll bank account in QuickBooks.
- You will need the bank details and principal office address to set up a new bank account in QuickBooks.
- Ensure that the current payroll bank account doesn’t have pending tax payments or payroll transactions.
- If you come across any error while changing your payroll account, resolve that first.
- QuickBooks Desktop payroll users will need the Payroll Pin as well to update their bank accounts.
Once done, proceed to the next section.
How to Change Payroll Bank Account in QuickBooks Desktop & Online
It is a multi-step process to update the payroll bank account in QuickBooks Desktop and Online. We will guide you through the nuances of it in this section. Alright then, let us see how to change payroll bank account in QuickBooks Desktop and Online.
1. Get Bank Account Info and Principal Officer Address Ready
Here are some banking and payroll details that you need to get ready.
- Firstly, gather your bank information, such as the bank information, routing number, account number. You can find these details on a check, or the website or application for your bank. Remember that the routing number in the deposit slips could be incorrect.
- Next, you might need to enter the physical address of the principal officer, which should not be a P.O. box address. Intuit ensures your payment information is correct and adheres to legal guidelines.
- If you use QuickBooks Desktop payroll, you will need to enter your Payroll Pin everytime you send payroll data.
Once you have arranged the above details and got them handy, move to the next step.
2. Configure the Bank Account in the Chart of Accounts
Now, you need to configure the new bank account in the Chart of Accounts. This will allow the payroll transactions to be posted in the right QB register.
Depending on whether you use QuickBooks Desktop payroll or QuickBooks Online payroll, the steps for that may vary.
A. How to Add a Bank Account in QuickBooks Desktop
Here is how you can add the bank account in the chart of accounts in QuickBooks Desktop.

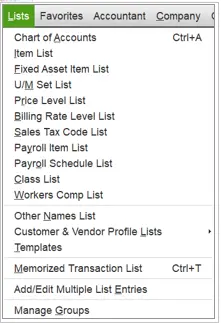
- Open the Lists menu and choose Chart of Accounts.
- Go to Accounts, followed by New, followed by Bank, and then Continue.
- Type in the bank account information.
- Now, choose to Save and Close.
This will add your new bank account to your QuickBooks Desktop chart of accounts.
B. How to Add a Bank Account in QuickBooks Online
Follow the steps listed below to add the bank account to the chart of accounts in QuickBooks Online.
- Open the Settings by clicking on the Settings or gear icon.
- Now, choose Chart of Accounts followed by New to create a new account.
- Now, choose Bank from the Account Type dropdown menu.
- Select the type of bank account from the Detail Type dropdown menu.
- You need to give your bank account a name, which you decide using the bank info. Optionally, you can add a description to the bank account.
- However, if this is a sub-account that you’re adding, choose the Is sub-account option and then select the parent account. A subaccount is nested under a parent account.
- Choose the time period from When you want to start tracking your finances from this account in the QuickBooks dropdown menu.
- In case the bank account you’re tracking is absolutely new, choose Today if the account you’re tracking is brand new as of today. You will need to enter the amount in your bank today in the Account Balance field.
- Choose Other if you have started the bank account on another date. Type in the date you wish to start tracking transactions in QuickBooks in the Select a date section. In the Account Balance field, enter the account balance for your chosen date.
- When you’re done, select Save and Close.
This will add your new bank account to the QuickBooks Online Chart of Accounts.
3. Find Pending Tax Payments, Direct deposits or Paychecks
You cannot change your payroll account in QuickBooks if there is a pending tax payment, direct deposit, or paycheck. Therefore, you need to resolve them before you proceed.
A. Check for Pending Tax Payments and Transactions in QB Desktop Payroll
Follow the steps below to find the pending tax payments and payroll transactions in QuickBooks Desktop.
You May Also See: Is QuickBooks Direct Deposit Not Working? How to Fix That
(i) How to Check for Pending Tax Payments (QuickBooks Desktop Payroll Enhanced only)
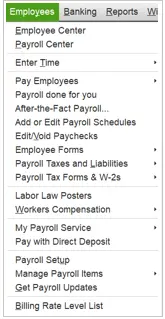
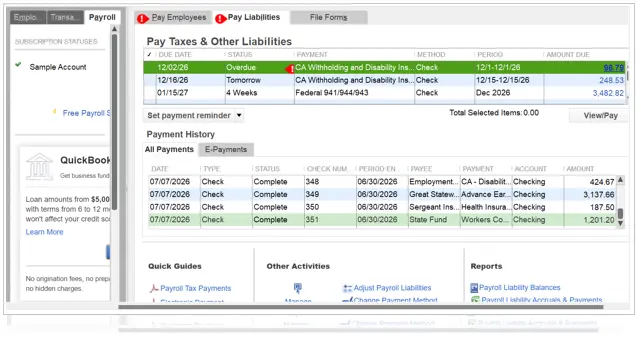
- Go to Employees, followed by Payroll Center, and choose the Pay Liabilities tab.
- Now, tap on the E-Payments tab to view the tax payments that are pending, if any.
(ii) How to Check for Pending Payroll Transactions in QuickBooks Desktop

- Go to Employees, followed by Payroll Center.

- Now, tap on the Payroll tab to view the payroll transactions that are pending, if any.
B. Check for Pending Tax Payments and Transactions in the QBO Payroll
Follow the steps below to find the pending tax payments and payroll transactions in QuickBooks Desktop.
(i) How to Check for Pending Tax Payments in QuickBooks Online
Login to your QBO company and choose Taxes, followed by Payroll Tax. Now, choose the tabs for Payments or Tax Payments.
In case you see any payments for the date of today or earlier, they will be deducted from the present bank account.
However, if there are any payments dated after today, connect with a QB or accounting expert on how to handle them.
(ii) How to Check for Pending Payroll Transactions in QuickBooks Online
- Open the Payroll menu and choose Employees, followed by the Paycheck list, and you will see the Run Payroll.
- In case you see any paychecks for the date of today or earlier, they will be deducted from the present bank account.
- If there are any paychecks with a date of two business days or later than today (and time before 6:00 PM PT), you can delete them. Mark the checkbox for the paycheck and choose the Delete button above the paychecks. After you have updated the payroll bank account in QuickBooks, you can create them again.
Once you are through with the pending tax payments and paychecks or direct deposits, move to the next step.
4. Change the QuickBooks Payroll Bank Account
Now, let us show you how to change payroll bank account in QuickBooks Desktop and online.
A. How to Change Payroll Bank Account in QuickBooks Desktop
Once you have configured the new bank account and enabled tracking, let us show you how to change the payroll bank account. Here is how you can update the payroll bank account in the QuickBooks Payroll Account Management Portal.
(i) If You Use QuickBooks Desktop Payroll Basic, Standard, Enhanced

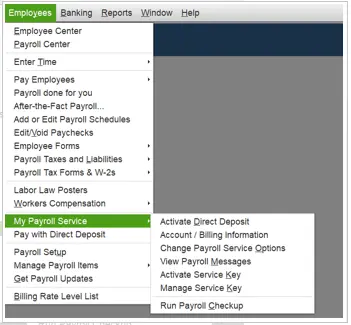
- Open the Employees menu and choose My Payroll Service, then Accounts/Billing Information.
- Log in using the Intuit Account login and then navigate to the Payroll Info section.
- Choose Edit under the Direct Deposit Bank Account.
- Provide the payroll PIN, and then choose Continue.
- Now, type in the new bank account details and choose Update.
- Tap on Close when you get the confirmation message on your screen.
(ii) If You Use QuickBooks Desktop Payroll Assisted

- Open the Employees menu, followed by My Payroll Service.
- Choose Billing/Bank Information, and you will see the Payroll Service Account Maintenance pages.
- Choose Edit next to your bank account in the Bank Account Information section.
- Type in the payroll PIN, followed by Continue.
- Now, type in the new bank account details and choose Update.
- Tap on Close when you get the confirmation message on your screen.
This will update the payroll bank account in QuickBooks Desktop.
B. How to Change Payroll Bank Account in QuickBooks Online
- Here is how you can update your payroll bank account in QuickBooks Online.
- Tap on Settings or the gear icon, and go to Payroll Settings.
- Click on the Bank Accounts and choose Edit.
- Choose Update followed by Add new bank account.
- Type your bank name. QuickBooks might ask you to type in your online banking user ID and password. If that doesn’t happen, choose to Enter bank info manually. Type in the routing and account number, then choose Save.
- Finally, choose Accept and Submit.
This will update the payroll bank account in QuickBooks Online.
5. Proceed with Bank Verification (In Case Connected Manually)
After adding your new bank account to QuickBooks payroll, Intuit verifies it within two to three business days with a test transaction.
Before You Verify the Payroll Bank Account
Here are some things to know before you proceed to the verification of your new payroll bank account.
- Once updating the payroll bank account, you should be able to see a test transaction in the bank account within two to three business days.
- The amount will be credited and debited from Intuit Payroll Service for anything less than USD.
- To verify the amount or transaction, you can check your bank statement online or call your bank.
- Before proceeding, you need to ensure the test transaction is cleared (not pending) on your bank statement. If that’s not the case, the bank verification will fail.
Once you have made sure of these pointers, you can go ahead and verify the payroll bank account in QuickBooks.
A. How to Verify Payroll Bank Account in QuickBooks Desktop
Follow the steps listed below to verify the payroll bank account in QB Desktop.
(i) If You Use QuickBooks Desktop Basic, Standard, Enhanced Payroll
- Open QuickBooks Desktop and then launch the Employees menu.
- Now, choose My Payroll Service, then Accounts/Billing Information.
- Log in using the Intuit Account login and then navigate to the Payroll Info section.
- Under Direct Deposit Bank Account, and tap on the Payroll Info section, and choose to Verify.
- Provide the payroll PIN and confirm it. Finally choose to Submit.
- When you see the message stating that, “Your bank account is verified” choose to Return to QuickBooks.
(ii) If You Use QuickBooks Desktop Assisted Payroll
- Open QuickBooks Desktop and launch the Employees menu.
- Choose My Payroll Service followed by Billing/Bank Information and you will see the Payroll Service Account Maintenance pages.
- Now, choose Verify under the Bank Account Information. You will see the Verify Bank page.
- Now, fill in the 2 test transaction amounts that you found in the bank statement into Amount 1 and Amount 2 fields (without decimals).
Note: The order doesn’t matter.
- Provide the payroll PIN and confirm it. Finally choose to Submit.
- When you see the message stating that, “Your bank account is verified” choose to Return to QuickBooks.
B. How to Verify Payroll Bank Account in QuickBooks Online
Follow the steps listed below to verify the new bank account.
- Once you see the cleared test transaction in the bank statement, login to QBO company.
- Go to Payroll and choose Overview.
- Now, in the TO DO list, locate the item titled Check your bank account, and tap on Edit .
- Choose Verify Amount and then type in the amount of the test transaction (no decimals) in both fields.
- Finally, choose to Verify.
Now, you will need to update the default bank account in QuickBooks preferences.
6. Update the Default Bank Account in QuickBooks Payroll Preferences
Your account is now verified and ready to use for tax payments or sending paychecks. However, we recommend you to set your new bank account to the default to ensure correct posting of tax payments and payroll transactions.
A. How to Change the Default Payroll Bank Account in QuickBooks Desktop
Follow the steps listed below to change the default payroll bank account in QuickBooks Desktop.
- Open the Employees menu and choose to Send Payroll Data.
- Now, choose Preferences on the Send/Receive Data window.
- Choose the new bank account in the Account Preferences drop down menu.
- Tap on OK to save the changes and then Close on the Send/Receive Data screen.
Now, set up the bank account as default for QuickBooks Payroll Service liability.
- Open the Employees menu and choose to Send Payroll Data.
- Choose Preferences which will open the Payroll Service Accounts window.
- Now, from the Pay Payroll Liabilities with menu, choose the new bank account.
- Tap on OK and then choose Send and provide the Payroll PIN.
B. How to Change the Default Payroll Bank Account in QuickBooks Online
- Tap on the Settings or gear icon and choose Payroll settings.
- Tap on Edit in the Accounting section at the bottom of the page.
- Choose Edit next to the Paycheck and payroll tax payments.
- Now, choose the account that you just added from the Bank account menu.
- Tap on Continue followed by Done.
After you have updated the default bank account in QuickBooks preferences, you are all set to recreate the deleted paychecks.
Conclusion
This was all on how to change payroll bank account in QuickBooks Desktop and Online. Once done with that, you can continue making tax payments or sending direct deposits or paychecks to employees. However, if you face an issue or have a query, speak to a QB expert. You can connect with QuickBooks experts at +1(855)-738-0359!
Frequently Asked Questions
If you wish to change the YTD payroll in QuickBooks Online, you can go to the Employees section, and choose the relevant employee. Now, from their pay history, edit the individual paychecks or payroll items to adjust the YTD amounts. Alternatively, you can choose to Adjust Payroll Liabilities and make big corrections to employee YTD information.
Open the Payroll menu, and go to Employees, followed by Edit payroll items. Choose to Pay types or Deductions & contributions to see your payroll items. Choose the item you wish to modify, and choose Edit for the employee you wish to change. You can modify the name, amount, or limit.
To change the payroll liabilities schedule in QuickBooks Desktop, here are the steps to follow, choose Employees, followed by Payroll Center and then tap on the Pay Liabilities tab. Choose Schedule payments in the QuickBooks Payroll Setup and then choose the tax liability you wish to change. Tap on Edit and choose the schedule from the Payment frequency menu. Finally, tap on Next, followed by Finish.

Kate is a certified public accountant (CPA) with expertise in various accounting software. She is technically inclined and finds passion in helping businesses and self-employed people carry out bookkeeping, payroll, and taxation without worrying about errors. Every once in a while, Kate loves to travel to far-off places and relax in the lap of nature.