Last Updated on October 27, 2025
QuickBooks Desktop application is the most preferred accounting application that helps small and mid-sized organizations simplify accounting operations. It uses different Microsoft components like .NET Framework to perform several crucial operations. Corruption in one of these several Windows components that QuickBooks uses can abruptly terminate the installation or repair process. In one such instance, when you open the QB Desktop application, it displays a notification prompting you to update with a countdown clock mentioning the time you can ignore the notification. When you try to do so, you get error 1712. However, most of the users get error 1712 when installing QuickBooks or while trying to update it after an upgrade. As a result, all business activities handled by QuickBooks come to a halt. The description of QuickBooks 1712 error says:
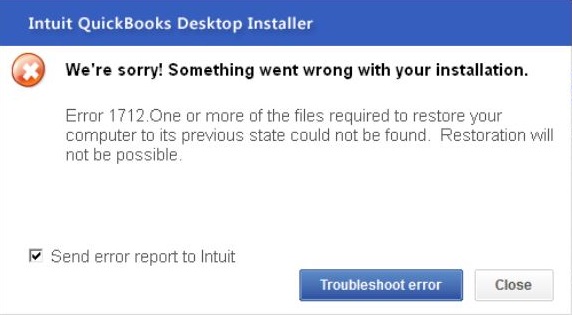
“We're sorry! Something went wrong with your installation.

Error 1712. One or more of the files required to restore your computer to its previous state could not be found. Restoration will not be possible.”
What Causes QuickBooks Install Error 1712
QuickBooks desktop installer error 1712 can appear on your screen because of your application or system problems. The detailed list for it is as follows:-
- Your QuickBooks Installation files got corrupted or damaged.
- The profile you are logged in with does not have sufficient permission.
- Your QB files of Windows files got infected with a virus.
- You are using an outdated Windows operating system.
- Error 1712 can appear if some components or files required to run the QB application are damaged or missing. These files can be QBregistration.dat or MSXML files.
- An outdated anti-virus program can also lead to error 1712.
- You may also face this error if you have opened or imported a Web Connect (.QBO) file without saving it first.
In the next section, we have covered the top potential solutions that help you fix QuickBooks update error 1712 after installing or uninstalling the program. So, carefully go with the flow without missing any important steps.
Note: Facing QuickBooks Error 1723 during installation or uninstallation? This error indicates a problem with your Windows installer package. Learn the causes and follow expert steps to resolve it efficiently.
Best Methods To Fix Error 1712 When Installing QuickBooks Desktop
Before proceeding with the troubleshooting steps, make sure to create a backup of your QuickBooks company files. This is an essential step, as the solutions mentioned below may require you to uninstall the QuickBooks application from the system, which could lead to data loss. Then follow the solutions mentioned below to fix the issue:
Solution 1- End Background Process from Task Manager
A QB process running in the background can be one possible reason for QuickBooks error 1712. You need to end all the QB related background processes to fix it.You can use Task Manager to end background processes and then install QB again. Follow these steps:-
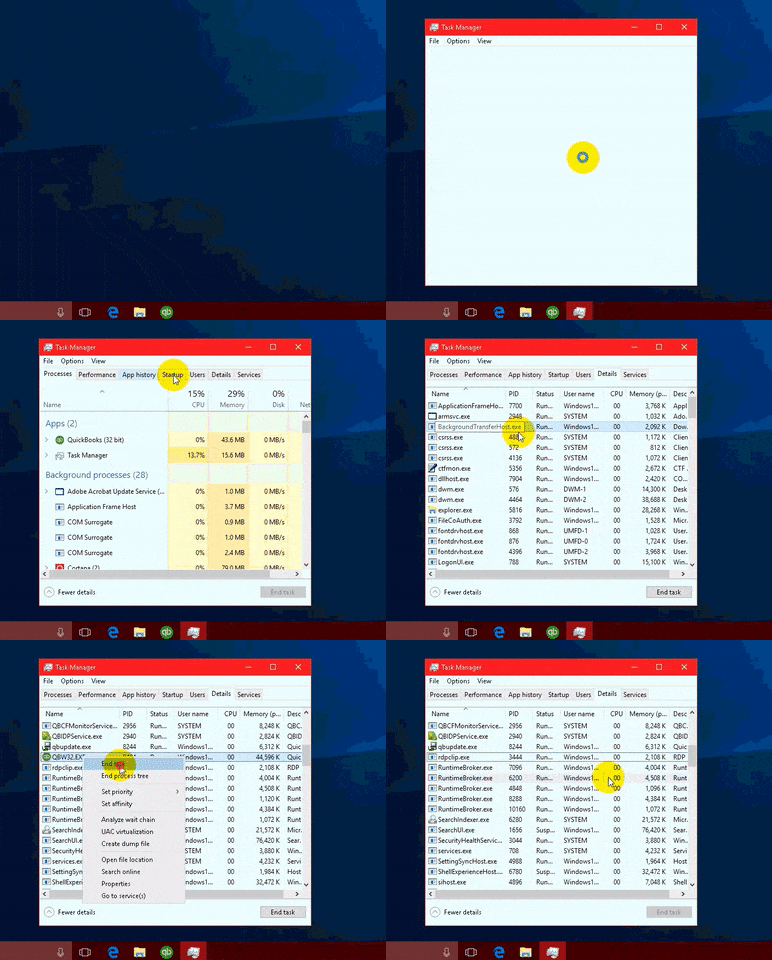
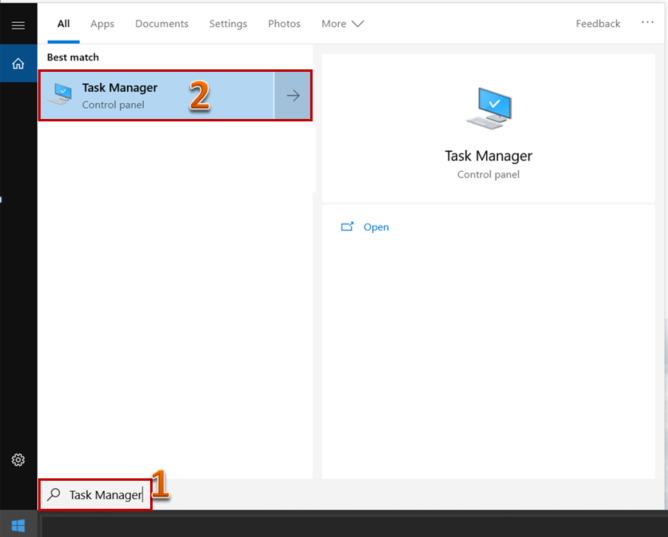
- Press the Alt + Ctrl + Del keys together to get advanced Windows options.
- Select Task Manager otion from the list of options on the screen.
- Go to the Process tab and select processes that have QuickBooks in their name.
- Right-click on them and choose End Processes one by one.
- After this, reboot the system and install QuickBooks again.
Solution 2: Use the Quick Fix My Program Tool from QuickBooks Tool Hub On the System
Quick fix my Program tool helps you to repair any damage to your company file. It can be accessed from QuickBooks Tool Hub. If you are using an old version of QB, you are first required to update it to the latest version. These are the steps you need to follow in order to use Quick Fix My Program:-
- Run QuickBooks Tool Hub.
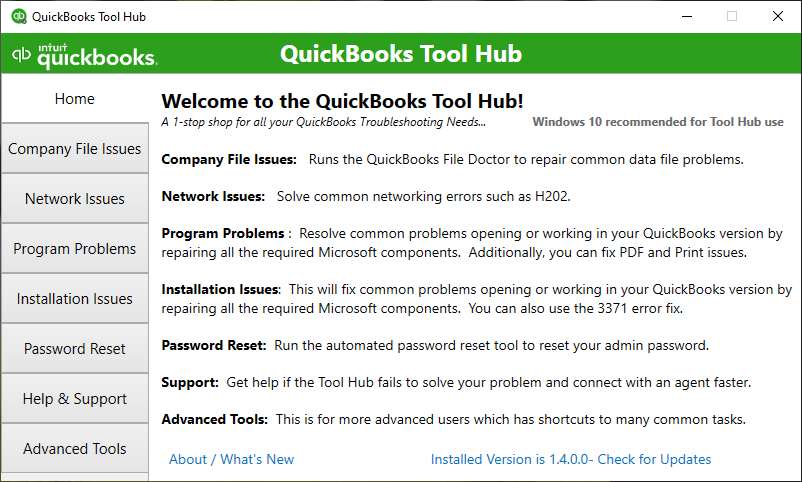
- Tap on Programs Problems and select Quick Fix my Program.
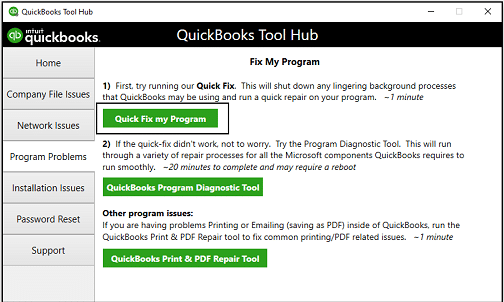
- Wait for the process to get completed, and then try reinstalling QuickBooks.
If you still encounter error 1712 when installing QuickBooks for Desktop, then move on to the next solution.
Also Read: How To Do 1099 in QuickBooks Desktop.
Solution 3- Create a new Windows user with Administrator Rights
Having insufficient access permissions for QuickBooks or the Windows profile that you are using can also be a reason for QuickBooks install error 1712. So, you need to create a new admin profile and give it the required access to QuickBooks. These are the steps you need to follow:-
Steps To Create A New Windows User
- Open the Windows Start Menu and select the All Programs tab.
- Go to the Windows Small Business Server section and select the Windows SBS Console option.
- Then, select the Users and Groups option, followed by the Add a new user account tab.
- Now, fill out the user info and the other information in the Add a New User Account wizard.
- After this, give the new user the administrator rights, and when done, hit the Finish button.
Steps To Give Admin Access to QuickBooks Program
You need to provide QB admin rights in order to run the multi-user network. However, if you have installed QuickBooks Database Server Manager, then QB automatically creates a new Windows user, and after that, you need to give the admin rights. Follow the below-given steps to provide the required admin access:
- Open the Windows Start menu, go to the Control Panel, and select the User Accounts option.
- Find the QBDataServiceUserXX option for your QuickBooks Desktop version. For QB Desktop 2020, search for QBDataServiceUser30, and for the QB 2019 version, look for QBDataServiceUser29. Similarly, the number goes down for each version.
- After this, select the Change the Account type option followed by Administrator.
- Then select Change Account Type and hit Apply to save the changes.
- You need to repeat all these steps for each version of QuickBooks Database Server Manager that you use.
After following the steps mentioned above, try to install the QuickBooks Desktop application on the system using this Windows user. If you still face the same issues, move on to the next step.
Solution 4: Fix Windows Installer Issue
Sometimes, Windows blocks you from installing or removing any program, and this may trigger error 1712 while installing QuickBooks. However, using the Windows Program Install and Uninstall troubleshooter can help fix this issue. Here’s how you can use WIndows Install and Uninstall troubleshooter:
- You need to download the troubleshooter on the system.
- When you see the File Download box, click the Run or Open option.
- The troubleshooter will prompt you with some steps; follow them.
- If you do not see QuickBooks or other programs in the uninstall options, then it will ask you for the program’s product code.
- You can read the MSI file to fetch the product code; it will be in the property table of the MSI file.
- A tool is required for reading the MSI files; ask an IT professional for help if you do not have it.
After this, try installing the QuickBooks application and check for the error code 1712.
Solution 5: Repair the QuickBooks Desktop Application
You can repair the QB Desktop application to fix any unexpected behavior of the application. Here’s how to fix the error 1712 QuickBooks by repairing the application:
- Go to the Start menu and then navigate to Control Panel.
- Under the Program and Features section, select Uninstall a Program.
- Then, from the list of all the applications, select QuickBooks Desktop.
- Hit the Uninstall/Change button and choose the Repair option.
Solution 6: Fix Windows Components Manually
The last method to fix the error code 1712 is to repair the damaged Windows components. You need to manually repair the Microsoft .NET Framework and Microsoft MSXML components of Windows.
Repair Microsoft .NET Framework
Follow the below-given steps on Windows 10 or newer versions:
- Close all the open programs on the system and open the Windows Start menu.
- Then, type the command Control Panel in the search box and hit Enter to open it.
- When the Control Panel opens, go to the Programs and Features tab.
- Now, select the Uninstall a Program option followed by Turn Windows features on or off.
- Then, find the .NET Framework in the list. You need to check the settings for both .NET Framework 4.5 (or later) and .NET Framework 3.5 SP1. The steps for .NET. Framework 4.5, 4.6, 4.7, and 4.8 versions are the same.
Steps to fix NET Framework 4.5 (or later)
If the .NET Framework 4.5 (or later) checkbox is not checked, then you need to perform the following steps:
- Mark the checkbox against the .NET Framework 4.5 (or later) to enable it.
- Then, hit OK to save the changes and restart the computer.
If the .NET Framework 4.5 (or later) checkbox is already checked, then you need to perform the following steps:
- Deselect the box against .NET Framework 4.5 (or later) to disable it.
- Then, hit OK and restart the computer.
- After you sign in back to Windows, follow the above-mentioned steps and enable the .NET Framework 4.5 again.
Steps to fix .NET Framework 3.5 SP1
If the .NET Framework 3.5 SP1 checkbox is not checked, then you need to perform the following steps:
- Click the checkbox and enable the .NET Framework 3.5 SP1.
- Hit OK and restart the computer.
If the .NET Framework 3.5 SP1 checkbox is already checked, then you need to perform the following steps:
- Deselect the checkbox against .NET Framework 3.5 SP1 to disable it. Do not turn it on back.
- Then, hit OK and restart the computer.
- After you sign in back to Windows, follow the steps mentioned above to enable the .NET Framework 3.5 SP1 again.
Repair Microsoft MSXML
Perform these steps to repair the damaged Microsoft MSXML:
Steps to Register MSXML on a 64-bit operating system:
- Go to the Start menu and type the command cmd.
- Then, right-click cmd and choose to Run as Administrator.
- At the C: prompt, enter the command cd\windows\syswow64, then type regsvr32 MSXML6.dll and hit Enter.
Steps to Register MSXML on a 32-bit operating system:
- Open the Run command from the Windows Start menu or by pressing the Windows + R keys on the keyboard.
- Then, type cmd in the Run window and hit the Enter key.
- On the command prompt, type regsvr32 MSXML6.dll and hit Enter.
After performing the above-mentioned steps for respective systems, try installing the QuickBooks Desktop application and check for error 1712 QuickBooks Desktop.
Conclusion
Hopefully, after following the steps mentioned above, you will not face error 1712 while installing QuickBooks Desktop application. This error can appear due to several reasons, but the above-mentioned steps can help you fix it. However, if you still get stuck over it and cannot install the QB application, you can connect with QuickBooks experts at Asquare Cloud Hosting for instant assistance +1(855)-510-6487.
Frequently Asked Questions (FAQs)
Error 1712 in QuickBooks installation indicates that the system encountered some issues while installing QB because some of the files required for restoring the system could not be found. Generally, it is related to damaged Windows components.
You can use the QuickBooks Program Diagnostic Tool to fix the QB Desktop installation errors. Apart from that, you must ensure all the components required to install and run QuickBooks are working perfectly fine on your system.

Oriana Zabell, a professional cloud engineer, has over three years of experience in desktop, online QuickBooks support and troubleshooting. She is currently working as a cloud hosting consultant with Asquare Cloud Hosting. She loves to read and write about the latest technologies such as cloud computing, AI, DaaS, small businesses, manufacturing. When not writing, she is either reading novels or is indulged in a debate with movie fanatics.