Last Updated on November 20, 2025
QuickBooks records payroll transactions, such as tax withholdings, salary payments, and benefit deductions. These transactions must match with the bank for accurate reconciliation of the financial accounts. In this guide, we will discuss different instances when you find payroll check transactions not matching with the bank. Also, you will find some essential actions to perform before matching the payroll transactions and what to do when they do not match.
Different Instances Where Payroll Check Transactions Do Not Match
The different instances where you find QuickBooks paycheck transactions not matching are listed below:
- When you go to the Transactions tab, you see the check, but it does not match the payroll check.
- You can’t match the direct deposit amount with the bank transactions, and the payroll checks do not appear on the Register and ‘Find Match’ page.
- You notice QuickBooks automatically adding bank transactions for the paychecks, which is incorrect.
- QuickBooks won’t allow you to match the payroll check transactions.
- Incoming transactions do not match with what you have entered in QuickBooks.
- After upgrading to Advanced Payroll from Standard, you notice unknown transactions in the banking that do not match the actual transactions.
- Journal entries for the employees do not match the transactions.
If you are also dealing with one or more of the issues above, check out the next section for important considerations to avoid issues such as QuickBooks payroll check transactions not matching.
However, if you are facing a problem with check alignment when printing, learn how to resolve check printing alignment issues in QuickBooks.
Points to Consider Before Matching QuickBooks Payroll Check Transactions
If your QuickBooks checks are not matching, check the following important considerations:
- The expenses you try to match must be recorded in the bank register.
- Take note of the date when the transactions match.
- The amount spent and the payee’s description must be the same.
- Ensure to reconcile the transactions before matching.
- Be sure not to match a transaction previously matched to another transaction you downloaded.
- Check if the transaction you entered in QuickBooks has a different amount, number, date, or payee from the downloaded expenses.
You may also see: Instant Approaches on QuickBooks Write Check Columns Missing
Reasons Why Payroll Check Transactions Not Matching
Check out the reasons below to know why your payroll check transactions do not match.
- If the transactions are older than 180 days, they cannot match.
- The dollar amount in QuickBooks and what the bank cleared are different.
- There are different transaction types in the bank and QuickBooks. QuickBooks only matches expenses that are ACH or credit/debit card swipes.
- If the transactions are recorded in different bank accounts.
- QuickBooks has two or more open transactions for bank payment/deposit transactions.
Let’s move on to the next section to learn how to fix all these issues so that the payroll check transactions match in QuickBooks without any issues.
Do This to Match Payroll Check Transactions in QuickBooks
The solutions mentioned below will help you fix any issues with the web browser, chart of accounts, check register, and QuickBooks so that your transactions match the bank.
Solution 1: Use Private/Incognito Mode to Use QuickBooks
Using the shortcut keys below, we will run the browser in private/incognito mode to help avoid obstructions and issues created by junk files stored in it.
Google Chrome
- Windows: Press Ctrl + Shift + N
- Mac: Press Command + Shift + N
Microsoft Edge
- Windows: Press Ctrl + Shift + P
- Mac: Press Command + Shift + P
Mozilla Firefox
- Windows: Press Ctrl + Shift + P
- Mac: Press Command + Shift + P
Safari
- Mac: Press Command + Shift + N
Solution 2: Clear Junk Files Stored in the Browser
The instructions below will help remove junk files stored in the browser, which can cause issues matching payroll check transactions in QuickBooks Desktop.
Therefore, clear cache and Intuit-specific cookies on your browser. Now, check if you the payroll check transactions are matching.
Solution 3: Fix Bank Account Info in the Chart of Accounts
The instructions below will help you add the correct bank account info in the chart of accounts to help fix issues matching paycheck transactions in QuickBooks.
- Launch QuickBooks and select Transactions under the Bank Transactions menu.
- Click the tile next to the bank name to edit the name, and hit the Pencil icon next.
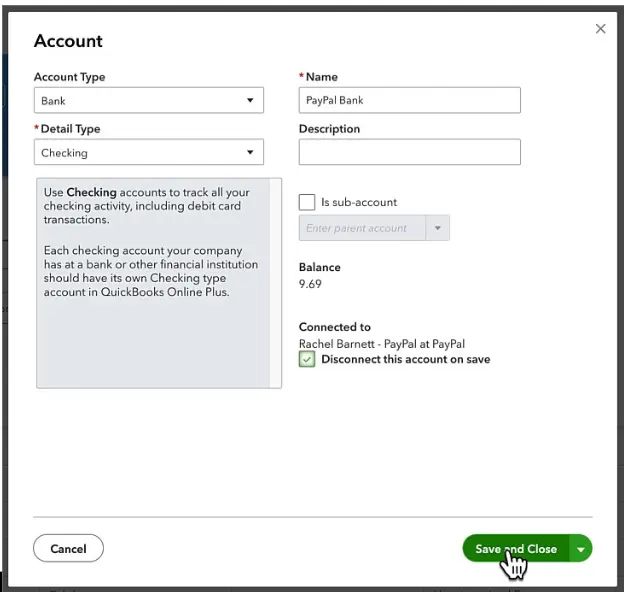
- Choose the Edit Account Info option, checkmark the Disconnect this Account on Save option, and click Save and Close.
Now, to reconnect the account, follow the instructions below:
- Select Charts of Accounts under the Accounting menu, locate your bank account and click the drop-down menu next to the View Register option.
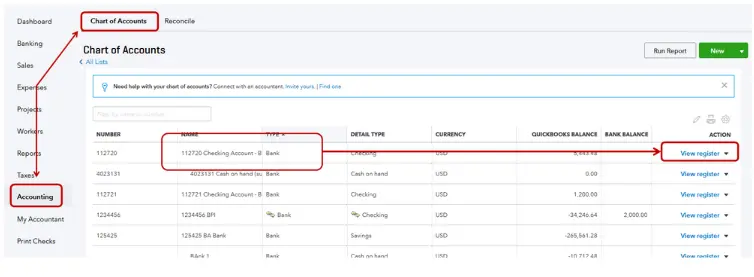
- Select Connect Bank and follow the on-screen instructions to enable the connection.
Related Post: Troubleshoot QuickBooks Error 2308 When Submitting Payroll
Solution 4: Review and Edit the Transactions
The instructions below will help you review and correct the transaction information to fix issues matching check transactions in QuickBooks.
Step 1: Finding the Transaction
Below are three different ways you can find transactions in the chart of accounts.
- By Filtering the Transactions
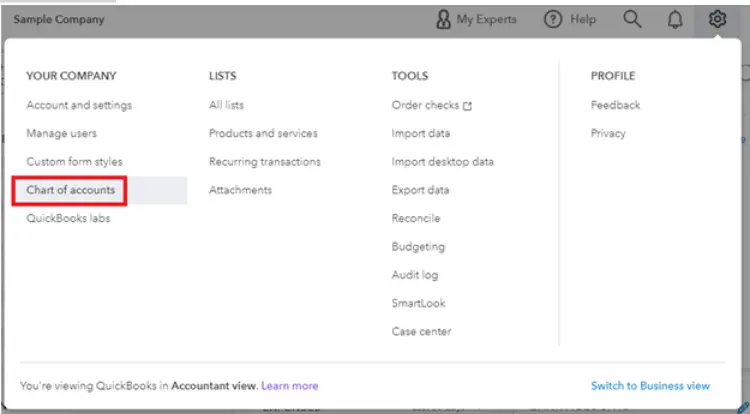
- Move to Settings, choose Chart of Accounts, and select an account you want to review.
- Go to the Action column, select View Register, hit the Filter icon, and select the filter you want to apply.
- You can now search for a reference number, memo, or amount using the Find field.
- Click Apply, hit X next to the filter name, and click Clear filter / View All to clear it.
- Sorting the Transactions
Sorting the transactions will help you get the most recent transactions at the top of the list. You can sort and reorder the transactions by reference number, date, reconcile status, and payment type.
- Move your cursor to the header column, hit the Sort icon (▲ or ▼), and sort the transaction by the value displayed in that column.
- Select any column header and sort the account history by the value in ascending or descending order.
Now, to remove the columns or change the view, follow the steps below:
- Choose the Settings option at the top.
- Uncheck the boxes to hide the column.
Step 2: Editing the Transactions
If you find issues in the account info, follow the instructions to modify them accordingly.
- Select the transaction you want to modify in the Account Register.
- Enter the correct info in the text fields, and if a field is grayed out, click Edit.
- Once you click Edit, you will get the complete transaction form where you can make the necessary changes.
- Click Save or Save and close once all the changes are done.
You may also check: Timesheets Hours Will Not Populate in QuickBooks Payroll- Guide
Solution 5: Move the Transaction Back into the For Review Section
If you have mistakenly downloaded or matched a transaction with the wrong one, follow the instructions below and move it back into the For Review section.
- Go to the Transaction menu, select Bank Transactions, and select the bank or credit card tile from which you downloaded the transactions.
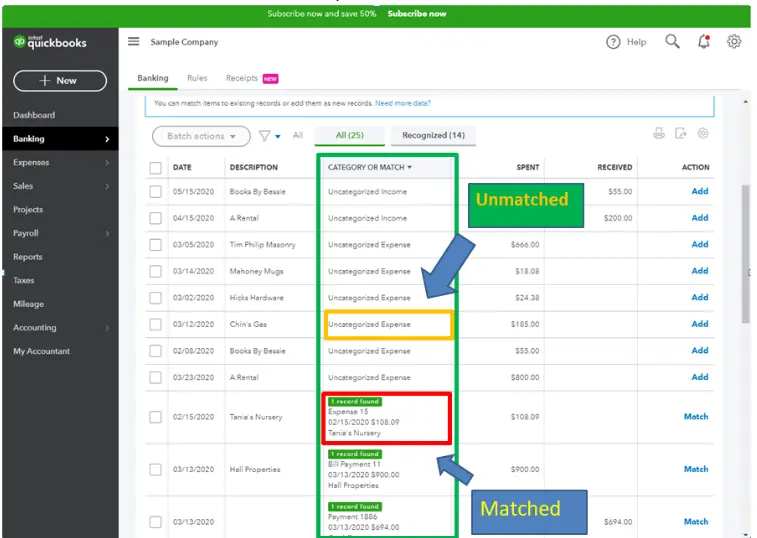
- Go to the Categorized tab and find the transaction you want to match. Click the blue transaction link under the Added or Matched column to see the matched transaction.
- Finally, select Undo under the Action column.
Solution 6: Match the Transaction Manually
Before manually matching the transactions, make the necessary changes to the amount on the paycheck and ensure it matches the bank feed.
Fix the difference between the amount in the transactions you are matching
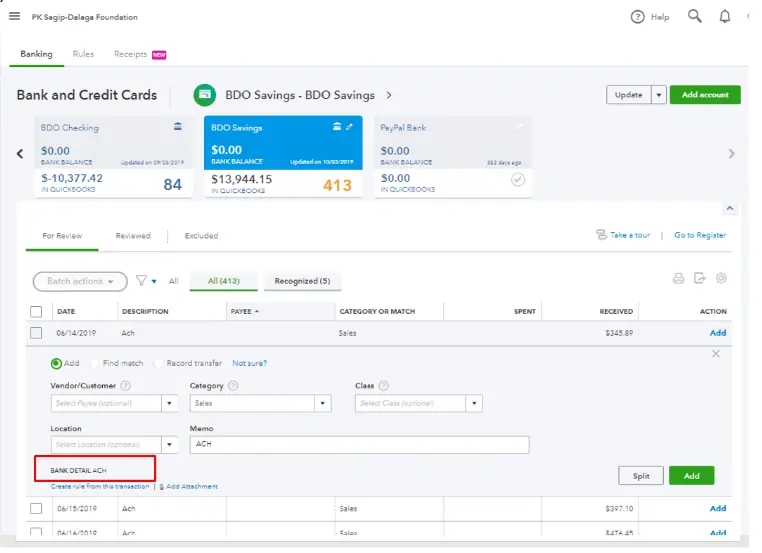
- Go to the bank feed in QuickBooks, select the transaction that is not matching, and choose Find Match.
- Checkmark the box next to the transaction, use the Filter section to narrow the list, and enable the Resolve feature.
- Enter the required info and the difference in the Amount field and click Save.
Manually clear the check in the Account Register and exclude the transaction you downloaded
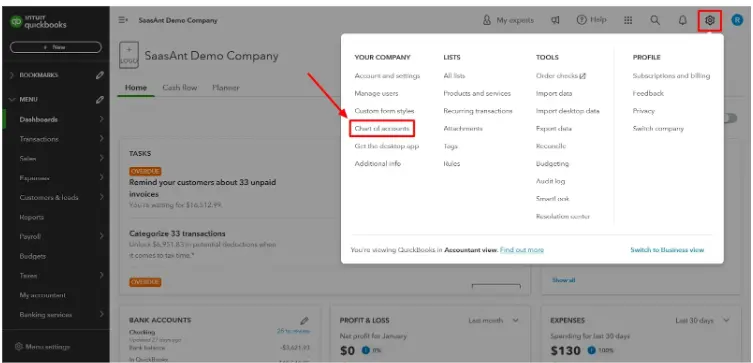
- Click the Gear icon at the top-right, choose Settings, and select Chart of Accounts.
- Find and select the transaction to view it in the expanded window.
- Under the Check (✔) column, click the checkbox until you get the letter C, and hit Save.
Solution 7: Exclude the Unwanted Transactions
The instructions below will help you exclude duplicate transactions and those you mistakenly downloaded to another company.
i. Excluding the Transactions Downloaded in Another Company
- Go to the Banking tab under the Banking or Transaction menu, select the For Review option, and put a checkmark next to the transactions you want to exclude.
- Hit Exclude to save the changes.
ii. Excluding the Duplicate Transactions
If you have added transactions to the same payroll account under the Banking section, you may get duplicate figures in the account balance. You can fix this issue under the For Review tab even if you have matched or categorized the transactions.
If you find duplicate transactions under the For Review tab
- Go to the Transaction menu, select Bank Transactions, and select the affected bank account.
- Go to the For Review tab, select the duplicate transactions, and a black box will appear at the top, displaying the number of transactions you have selected.

- Click Exclude, and if you want to remove these duplicate transactions permanently, go to the Exclude tab.
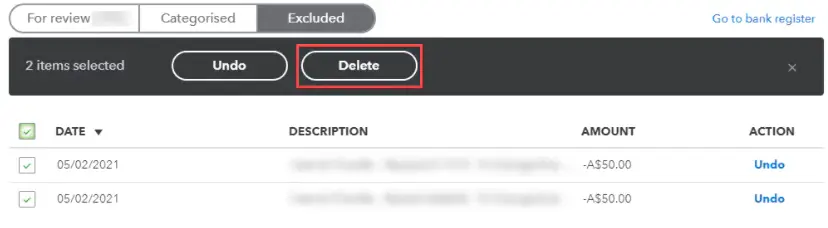
- Put a checkmark next to the Date column to mark all duplicate transactions, and click Delete.
iii. Excluding the transactions that you have already categorized or matched
- Go to the Transaction menu, choose Bank Transactions, and select all duplicate transactions under the Categorized tab.
- You can now see all the selected transactions in a black box on the screen.

- To move the transactions back into the For Review tab, click Undo and go to the For Review tab.
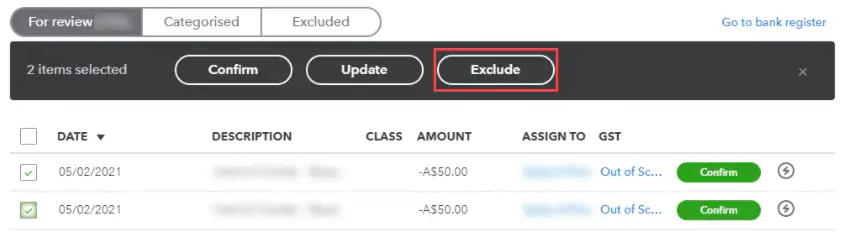
- Checkmark the duplicate transactions and click Exclude in the black box at the top.
- If you want to delete the duplicate transactions permanently, move to the Exclude tab, put a checkmark next to the Date column, and click Delete.
Conclusion
In this guide, we explained the instances when you might find payroll check transactions not matching, crucial points to consider to avoid them, reasons for the same, and solutions to get out of the trouble. In case the payroll check transactions still do not match or you start facing other issues like QuickBooks payroll checks not working or payees not matching in QuickBooks, reach out to the support team at +1(855)-510-6487.
Frequently Asked Questions
How do I fix paycheck errors in QuickBooks?
You might face different paycheck errors in QuickBooks, each with a different troubleshooting approach. If you get an error while creating the paycheck, install the most recent QuickBooks updates. Adjust the payroll liabilities if you get an incorrect amount on the paycheck. If you cannot adjust the amount on the paycheck, you can simply void it in QuickBooks by going to the paycheck list and selecting Void or Delete. If you find the QuickBooks check number not matching, go to the Banking page in the Banking menu, move to the For Review tab, click Find Match to get the Match Transactions window, and enter the correct range in the From and To fields. Now, choose the correct match to fix the issue.
What happens if a payroll check is not cashed?
If a paycheck is not cashed within 180 days, it expires and is treated as abandoned property by the state government. Some checks become stale only 60 or 90 days after being issued, while others expire after six months.
Why do my bank balance and QuickBooks not match?
Some of the most common reasons your bank balance and QuickBooks don’t match are having outstanding/duplicate/edited/deleted transactions, new transactions for a connected account, and credit card (liability account.)

Kate is a certified public accountant (CPA) with expertise in various accounting software. She is technically inclined and finds passion in helping businesses and self-employed people carry out bookkeeping, payroll, and taxation without worrying about errors. Every once in a while, Kate loves to travel to far-off places and relax in the lap of nature.