Last Updated on November 20, 2025
Often, users come across QuickBooks printing alignment issues or can’t find a way to align the paychecks before printing. They might find that the print grid is too high or too low and doesn’t align with the envelope windows. Needless to say, this hampers business operations and must be fixed immediately.
Therefore, we have compiled a guide on how to adjust check printing alignment in QuickBooks desktop. Continue reading the guide for detailed instructions on QB Desktop, check alignment, and carry out these steps before you print them.
Before You Make Check Printing Alignment Adjustments for QuickBooks
Before you go ahead and make QuickBooks check printing alignment for either QBDT for Mac or Windows, there are a few things to take care of:
- Ensure your printer is turned on and connected to your computer.
- Verify that the forms in the printer’s paper feed are the ones you wish to print.
Now, scroll to the section that best fits your QB product description and carry out the instructions given there to make alignment adjustments.
Section 1: How to Align Paychecks in QuickBooks Desktop (Windows)
If you’re utilizing checks, invoices, or forms that you bought from Intuit, make coarse modifications. This method does not allow for the adjustment of other continuous-feed formats. You won’t require fine adjustments if your coarse changes are successful.
However, if coarse adjustments don’t work, you will need to make fine adjustments.
1. Make Coarse QuickBooks Check Printing Alignment Adjustments
Here is how you can make coarse alignment adjustments in QuickBooks Desktop before printing paychecks.
- Open the File menu and go to Printer Setup.
- Click on the Form name dropdown menu and choose Check/Paycheck.
- Click on the Printer Type dropdown menu and choose Continuous (Perforated Edge).
- Choose Align and select a template you want to use. Click OK.
- Click on Coarse, followed by OK, to print a sample form.
- Examine the pointer line that QuickBooks printed in the center of the example. The number nearest to the arrow points should be noted. After entering this value in the Pointer Line Position area, click OK. QuickBooks may print one additional example.
Important Note: In case QB prints a third sample when you choose OK, there is an issue with the sample test print. Thus, don’t manually adjust the printer – instead, check the printer settings.
- Note down the printer alignment position on the test form to refer to later in the future.
Now, check if this resolves the QuickBooks check printing alignment issues you faced earlier. However, if the problem persists, coarse adjustment isn’t enough, you need to make fine adjustments.
Related Post: What You Should Do If Unable To Print Checks In QuickBooks Correctly
2. Make Fine Adjustments Before Printing Checks
Here is how you can make fine check printing alignment adjustments in QuickBooks Desktop for Windows.
- Open the File menu and go to Printer Setup.
- Click on the Form name dropdown menu and choose Check/Paycheck.
- Click on the Printer Type dropdown menu and choose Continuous (Perforated Edge).
- Choose Align and select a template you want to use. Click OK.
- Click on Coarse, followed by OK, to print a sample form.
- Check the alignment grid QuickBooks prints on the sample. Estimate how far to move the text.
- In the Vertical and Horizontal fields, enter a number to specify how much and in what direction to move the printed text on the form.
- Click on Print Sample, which will test the form alignment.
- When you find the fine adjustment settings are correct, choose OK. This will close the Printer Setup window.
Now, check if the paychecks are printing correctly in QuickBooks Desktop. However, if you continue to face a printing alignment issue, run QuickBooks PDF and Print Repair Tool.
Section 2: How to Align Paychecks in QuickBooks Desktop (Mac)
Let us learn how to align paychecks in QuickBooks Desktop for Mac. Follow the steps below to adjust the alignment of the text on a form.
Open the form for which you want to adjust the alignment, such as Checks/Paychecks.
Click on Print. If you can’t see the details, click on Show Details.
Click on the Alignment tab.
Now, move the block box as required to make QuickBooks check printing alignment adjustment.
Verify the text alignment in the print preview and ensure it’s correct.
When you are satisfied, click on Print. Now, test the alignment.
Now, you can print paychecks in QuickBooks Desktop without an alignment issue.
Section 3: Resolve QuickBooks Online Check Alignment Problems
Ensure that you are using QuickBooks-compatible checks to print paychecks in the QBO payroll. Now, let us guide you on how to align the paychecks in QuickBooks Online before printing.
- Open QBO and sign into your company file.
- Choose Settings followed by Payroll Settings.
- Go to the Printing field and choose Edit.
- Choose Paycheck on QuickBooks-compatible check paper.
- Now, choose either Print paycheck and 2 pay stubs or Print paycheck and 1 pay stub.
- Click on Align check and choose Print alignment form to print a sample check.
- Now, carry out the steps as instructed. Finally, close the window.
- Proceed as instructed and enter the letter and number that is the most suitable.
Some tips to adjust the alignment
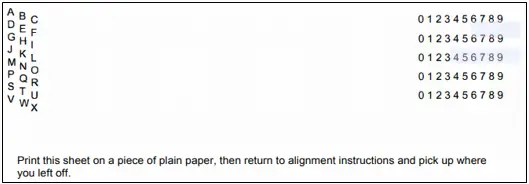
For instance, let’s say the letter K and number 5 are your present settings in the Printer setup preference. When you print a sample check, you find the content of the form is too:
Far left: Enter a number greater than 5 (6 to 9) to move the content of the form to the right.
Far-right: Enter a number less than 5 (0 to 4) to move the content of the form to the left.
High: Enter a letter after the letter K (L to X) to move the content of the form down.
Low: Enter a letter before the letter K (A to J) to move the content of the form up.
- When you are satisfied, choose Save followed by Done.
Recommended to read: Cannot Print Invoices In QuickBooks? Try These 9 Solutions
Summing It Up
This was all about how to make QuickBooks check printing alignment adjustments. We saw how to make these adjustments in both Windows and Mac computers before printing paychecks.
However, if even after carrying out the steps above, your issue persists, or you face another problem while printing paychecks, speak to a QuickBooks expert. They are domain experts and are available 24/7 to help you out.
QuickBooks Printing Issues FAQs
How do you adjust the check printing alignment in QuickBooks Desktop?
To adjust check printing alignment in QB Desktop, you can go to the Printer Setup option and choose Align. Now, make a coarse alignment, and if it doesn’t fix the issue, go ahead and make a fine alignment.
How do you fix the check alignment on QuickBooks Online?
1. Choose + New, followed by Print checks.
2. Click on Print setup and then select No, continue setup. …
Now, drag the grid to ensure the numbers are where they should appear on the sample print to numbers to adjust the printing alignment.
How do I set my printer to print checks?
Follow these steps to set the printer to start printing checks in QuickBooks right away:
1. Go to the File menu and choose Printer Setup.
2. Click on Check/PayCheck as the Form Name.
3. Now, choose the printer followed by printer type.
4. For the Check Style, choose Standard.
5. Tap on the Partial Page tab and now choose the printing style.
Can you change the check layout on QuickBooks?
To change the check layout in QuickBooks, select Print Setup. Now, choose the Check Style you need from the list of options. Click on Check Layout and choose as per your requirement. Following that, click on Check Position and select that as well.

Kate is a certified public accountant (CPA) with expertise in various accounting software. She is technically inclined and finds passion in helping businesses and self-employed people carry out bookkeeping, payroll, and taxation without worrying about errors. Every once in a while, Kate loves to travel to far-off places and relax in the lap of nature.