Last Updated on September 18, 2024
Several users run into QuickBooks error H202 or H505 when switching to multi-user mode. This implies that the multi-user connection to the server computer is blocked.
Such connection issues between the server system and the workstation mean the users can’t work in the multi-user environment. In this article, we will get to know error H202 in QuickBooks Desktop in detail and its most common reasons. We will then walk you through the solutions to fix this multi-user mode error like a professional.
The fastest way to fix multi-user mode errors is through assistance from a QB expert. Connect to a QB Consultant now!
What Is QuickBooks Error H202 While Switching to Multi-User Mode?
Let us begin with understanding what QuickBooks network error H202 is and what it implies.
Error H202 in QuickBooks is a multi-user mode error that occurs when the user computer (workstation) is unable to communicate with the host computer (server) where the company file is located. It could be due to a variety of reasons, such as network connectivity problems, firewall settings, or issues with the QuickBooks Database Server Manager.
Thus, the user won’t be able to access the company file in a multi-user environment. Meanwhile, an error message will appear on your screen when switching to QuickBooks in multi-user mode.
Here’s what the error message might say:
| “This company file is on another computer, and QuickBooks needs some help connecting.” Or “Problem with multi-user hosting setup. QuickBooks could not open the file in multi-user mode. (H202)” |

The error message further advises you on what you can do to switch to multi-user mode. Here’s what it says:
“On the computer where the company file is located, open the start menu, then open QuickBooks Database Server Manager. The Database Server Manager will scan your files and restore the connection.”
However, a quick solution is often inadequate and requires you to implement additional troubleshooting procedures.
Let’s move ahead and look at some common reasons why you get QuickBooks error H202 while switching to multi-user mode.
Read more: How To Resolve QuickBooks Multi-User Mode Not Working Error?
Why Error H202 won’t let you switch to multi-user mode?
Knowing the reasons for an error simplifies troubleshooting, and you come to know what solutions would be the most effective and when to implement them.
Thus, we have compiled a list of possible reasons responsible for triggering error code H202 in QuickBooks Desktop. Take a look at these below.
- An improper hosting configuration is one of the most common and apparent causes of QuickBooks Desktop error H202.
- The firewall application installed on the server, be it the built-in Windows Firewall or a third-party application, restricts all incoming and outgoing connections.
- Error H202 can also appear because of DNS conflicts.
- Your workstation might not be able to connect to the server because of an incorrect or missing IP address.
- Some crucial services like QBCFMonitor and QuickBooksDBXX required to host the company file are not running on the system.
- Corruption in the Network Data file (.ND) is corrupt or damaged.
- QuickBooks database server manager is not installed or running on the system.
- QuickBooksDBXX and QBCFMonitor services don’t have admin permissions to run on the server system.
- A reason might be that you have not added a server to the Windows host file is also a reason.
Next, let us discuss some crucial suggestions by experts to avoid multi-user errors and data loss while troubleshooting.
What should be done Before You resolve QuickBooks Error H202
Before we go ahead to carry out comprehensive solutions for fixing QuickBooks error H202, there are some things you need to do to ensure your data stays safe.
1. Backup the Company File
Backing up the company file is crucial when troubleshooting any company file-related issue. This ensures the data will be safe if something goes wrong while implementing the troubleshooting solutions. Here’s how to quickly back up the company file to a secure location.
- Firstly, launch QuickBooks, go to the File tab, and select Switch to Single-user Mode.
- secondly, open the File tab again and select the Back up Company option.
- Choose the Create Local Backup option and select Local Backup.
- After that, hit Next, and under the Local Backup Only section, click Browse.
- Now select a safe location on your system to save the backup file.
- If you want, you can select the number of backups that you want to keep.
- Now, QuickBooks will run a quick scan to check the company file is damage-free.
- Click OK and hit the Save it Now option.
- Click Next, and QuickBooks will notify you when a single company file backup is created.
You can now restore this backup file if you accidentally damage the original company file while troubleshooting error H202 QuickBooks Desktop.
2. Contact Third-party Hosting Solutions
If you are using a third-party hosting solution like Right Networks, AbacusNext, Itopia, etc., contact them for troubleshooting help. Alternatively, you can contact us for assistance with advanced troubleshooting.
NOTE: You must not use QuickBooks database server manager on devices like Network Attached Storage (NAS) as they are not supported.
3. Install QuickBooks Database Server Manager on the Server
You must have the QuickBooks database server manager installed for each version of QuickBooks you have on the workstations to host the company file and avoid errors like H202. QuickBooks database server manager needs to be installed on the computer that hosts the company file, not the workstations.
If you don’t have QuickBooks Database Server Manager installed on your computer, find the instructions on how to do so at the end of this guide.
NOTE: If the QB Database Server Manager is installed on your computer, you can skip this step.
Expert Insights to Resolve QuickBooks Error H202
We will list the solutions you can use to resolve QuickBooks error code H202. We advise you to carry out these steps in the order they are written.
However, if you have an idea about the cause of the error, you can jump to the relevant solution and carry out the instructions.
1. Use QuickBooks Database Server Manager
Assuming you already have QuickBooks database server manager installed on the server system, run it using QuickBooks Tool Hub.
Step 1. Download and Install QuickBooks Tool Hub
Before running QuickBooks Tool Hub, you will need to quit QuickBooks Desktop, and for the best results, run it on Windows 10, 64-bit system.
- First, download and install the latest version of QuickBooks Tool Hub on your computer.
- Save the file to a location that you can easily navigate to later.
NOTE: If the Tool Hub application is installed on the system, ensure it is the latest version (1.6.0.3). To check the version, launch QuickBooks Tool Hub, and the version will be displayed at the bottom of the home screen.
- Once the Tool Hub is downloaded, move to the download location and double-click the QuickBooksToolHub.exe file.
- This will initiate the installation process, where you will need to follow the on-screen instructions and accept the terms and conditions to complete the installation.
- Once installed, a shortcut icon will be created on the desktop screen, which you can use to launch QuickBooks Tool Hub.
- If you can’t find the icon for QuickBooks Tool Hub, search for it in the search bar beside the Windows Start menu and select it to launch it on the system.
Step 2. Launch QuickBooks Database Server Manager
Now, we will run QuickBooks Database Server Manager on the server system to which all the workstations are connected. This might resolve the QuickBooks error H202 or H505 you see while switching to multi-user mode.

- Go to the Network Issues tab in QuickBooks Tool Hub and select the QuickBooks Database Server Manager option.
- Click the Start Scan option if your company file folder is displayed on the screen.
- If you don’t see the company file folder in the QuickBooks database server manager, click Browse and select the folder where the company file is saved.
- Once the company file folder is selected, click Start Scan, and the QuickBooks database server manager will automatically repair the firewall permissions.
- Once the process is complete, choose the Close option.
- Launch QuickBooks and select the Switch to Multi-user mode option in the File tab on the server system.
Try to access the company file on every system where you see QuickBooks error code H202 and check if the issue is now resolved. If you still can’t access the company file, follow the next step to run QuickBooks File Doctor.
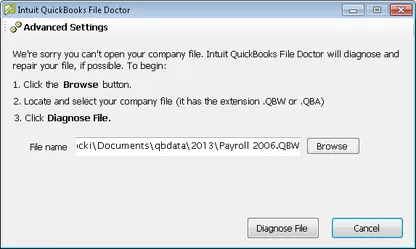
Step 3. Repair Company File and Network Issues Using QuickBooks File Doctor
QuickBooks File Doctor is designed to identify and fix any issues in the company file and network, and you can access it from QuickBooks Tool Hub.
- Launch QuickBooks Tool Hub and move to the Company File Issues tab to access QuickBooks File Doctor.
- Choose the option that says Run QuickBooks File Doctor and wait for about a minute for it to load.
NOTE: If you can’t launch QuickBooks File Doctor from Tool Hub, perform a manual search for it and select it to launch.
- After opening QuickBooks File Doctor, check if your company file is in the drop-down list.
- If you find your company file in the list, select it. If not, click Browse and manually locate and select the company file.
- After selecting the company file, click the Check your file and Network option and hit Continue.
- When prompted, enter the password of the QuickBooks admin account and hit Next.
Check if fixing the company file and network resolves QuickBooks error H202. If not, try the next troubleshooting solution.
2. Verify if QuickBooks Services are Running on the Server
Before verifying the status of the crucial QuickBooks services on the server system, you must ensure the hosting is enabled. To do this, go to the File tab, select Utilities, and choose the Host Multi-user Access option. If you see the Stop Hosting Multi-user Access option instead, don’t select it.

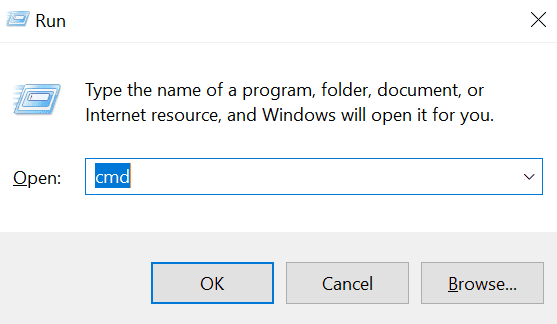
- Press Windows + R to launch the Run window and enter services.msc command in the text box.

- Press Enter. Now, find QuickBooksDBXX in the list of services.
NOTE: The XX in QuickBooksDBXX denotes the version of your QuickBooks Desktop. For example, if you have QuickBooks Desktop 2023, it will run the QuickBooksDB33 service.
- Double-click the QuickBooksDBXX service for your version of QuickBooks Desktop and choose Automatic from the Startup Type drop-down.

- Now look at the status of the service as it must be Started or Running. If it is not, click the Start option.
- Move to the Recovery tab and choose the Restart the Service option in the First, Second, and Subsequent failures drop-downs.
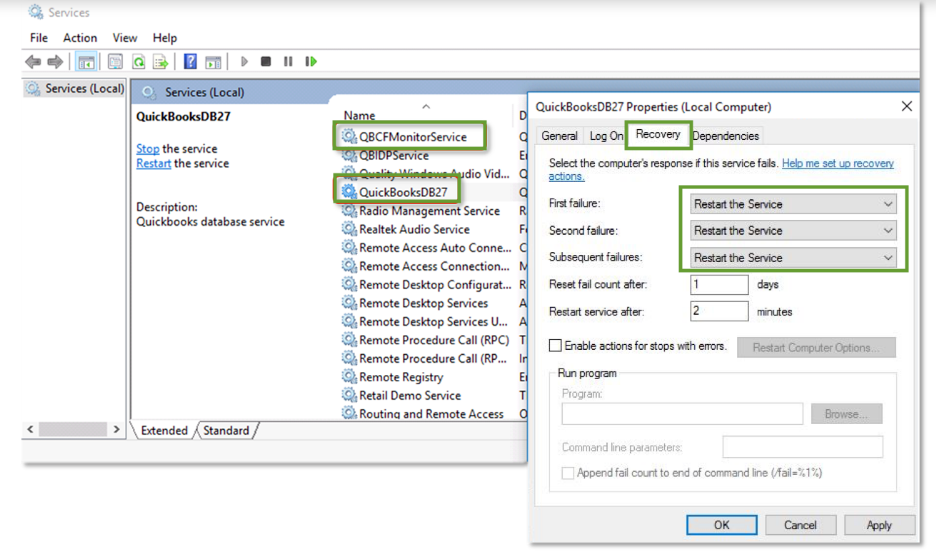
- Choose Apply, hit OK to save the changes, and repeat the same steps for QBCFMonitorService.
Check if you can now access the company file on workstations without an error. If you see QuickBooks error H202, try the next solution.
3. Add QuickBooksDBXX and QBCFMonitorService to the Windows Admin Group
QuickBooksDBXX and QBCFMonitorService are two crucial services required to host the company file in multi-user mode. In this solution, we will add both of these services to the Windows admin group so that they can run without any restrictions.
- Press the Windows + E keys to open File Explorer and navigate to the company file folder.
- Right-click the company file folder and choose Properties from the list of options.
- Choose Sharing and then click Share Add.
- Select the QBDataServiceUserXX that represents your version of QuickBooks Desktop.
- Choose Full Control as the permission level for both of the users and hit Share.
- Now repeat the same steps for QBCFMonitorService and retry to access the company file on the workstations affected by QuickBooks error H202.
If you still can’t access the company file because of multi-user mode error H202, follow the next troubleshooting solution.
4. Configure Windows Firewall to Remove Restrictions on QuickBooks
With the instructions below, first, we will add firewall port exceptions for QuickBooks. Then, add QuickBooks Desktop as an exception in the Windows Firewall.
Step 1: Create and Add Firewall Port Exception for QB Desktop
If you have more than one version of QuickBooks installed on the system, you will need to follow the instructions below for every version.
- Enter Windows Firewall in the search bar at the bottom of the desktop screen and select it in the search results.
- Now go to Advanced Settings and right-click on Inbound Rules.
- Choose the New Rule option and click Port.
- Click Next and ensure the TCP option is selected.
- Enter the ports mentioned below in the Specific Local Ports field.
- QuickBooks Desktop 2020 and later: 8019, XXXXX.
- QuickBooks Desktop 2019: 8019, XXXXX.
- QuickBooks Desktop 2018: 8019, 56728, 55378-55382.
- QuickBooks Desktop 2017: 8019, 56727, 55373-55377.
NOTE: If you have QuickBooks 2019, 2022, or any later version, dynamic ports will be used. These ports are automatically assigned during QuickBooks installation, and these are specific firewall ports, not a range. having a dynamic port ensures the QuickBooks application has a dedicated port for uninterrupted operations.
- Hit Next after entering the port number and click the Allow the Connection option.
- Hit Next again and make sure all the profiles are marked when prompted.
- Click Next and enter a name for this new rule. For e.g., QBPorts(Year).
- Click Finish to finalize the process and follow the same steps to create Outbound Rules. Just choose Outbound Rules in Step 2 above.
If you want to get the dynamic port number for your QuickBooks Desktop, follow the instructions below.
- Enter QuickBooks Database Server Manager in the search bar at the bottom of the screen and select it from the results.
- Go to the Port Monitor tab in the QuickBooks Database Server Manager and locate your QuickBooks version.
- The port specific to your QuickBooks version will be displayed on the screen, and you can use it to create firewall port exceptions.
Step 2: Create Firewall Exceptions for QB Desktop on Windows
In this step, we will add QuickBooks and other crucial executable files (.exe) as exceptions in Windows Firewall.
- Open Windows Firewall settings again and go to the Advanced Settings section.
- Locate and right-click the Inbound Rules option and choose New Rule.
- Select Program, click Next, and hit This Program Path.
- Select Browse and choose one of the files mentioned in the table below.
- Hit Next and choose Allow the Connection.
- Hit Next, and when prompted. Make sure to select all the profiles you see on the screen.
- Hit Next and enter a name for this new rule, like QBFirewallException(name.exe).
- Follow the steps above and create Outbound Rules for all the QuickBooks executable files. Just choose the Outbound Rule in step 2 and follow the rest of the steps.
| Executable files | Location |
| AutoBackupExe.exe | C:\Program Files\Intuit\QUICKBOOKS YEAR |
| Dbmlsync.exe | C:\Program Files\Intuit\QUICKBOOKS YEAR |
| DBManagerExe.exe | C:\Program Files\Intuit\QUICKBOOKS YEAR |
| FileManagement.exe | C:\Program Files\Intuit\QUICKBOOKS YEAR |
| FileMovementExe.exe | C:\Program Files\Intuit\QUICKBOOKS YEAR |
| QuickBooksMessaging.exe | C:\Program Files\Intuit\QUICKBOOKS YEAR |
| QBW32.exe | C:\Program Files\Intuit\QUICKBOOKS YEAR |
| QBDBMgrN.exe | C:\Program Files\Intuit\QUICKBOOKS YEAR |
| QBServerUtilityMgr.exe | C:\Program Files\Common Files\Intuit\QuickBooks |
| QBCFMonitorService.exe | C:\Program Files\Common Files\Intuit\QuickBooks |
| QBLaunch.exe | C:\Program Files\Common Files\Intuit\QuickBooks |
| QBUpdate.exe | C:\Program Files\Common Files\Intuit\QuickBooks\QBUpdate |
| IntuitSyncManager.exe | C:\Program Files\Common Files\Intuit\Sync |
| OnlineBackup.exe | C:\Program Files\QuickBooks Online Backup |
NOTE: If you see (x86) mentioned in the Program Files folder name, this indicates you are using a 64-bit OS. Also, if you have a third-party antivirus installed, visit its official website and look for the instructions to add a program as an exception. Follow those instructions and add QuickBooks as an exception in the antivirus program to remove any restrictions.
Restart the computer to apply all the changes to the Firewall and antivirus settings and retry to access the company file from the workstations where you encountered an error. If you still meet QuickBooks error H202, move to the next solution.
5. Check Server and Workstation Connectivity Using the Ping Command
Let us check if there is a connectivity issue due to which your workstation can’t connect to the server.
Step 1: Enable Network Discovery on Server and Workstations
You will need to enable the network Discovery on the server and every workstation that is receiving error H202 while accessing the company file.
- Search Network in the Windows search bar and select it from the results.
- Go to the Network and Sharing Center and select Change Advanced Sharing Settings.
- Now look at the Network Discovery and File and Printer sharing section.
- Check and make sure you have selected the Turn on network discovery option.
Step 2: Get the Server Name using CMD
In this step, we will get the server name to use later to run the Ping command on the workstations receiving QuickBooks message code H202.
- Press the Windows + R keys, and this will launch the Run dialog box on the screen.
- Enter CMD in the text box and press Enter.
- Now, enter the command ipconfig/all and hit Enter.

- You can now see the server name next to the Host Name in the Windows IP Configuration section.
- Take note of the server name and follow the next step.
Step 3: Ping the Server from the Workstation
Follow the steps below on every workstation where you are getting QuickBooks company file error H202.
- Press the Windows + R keys to launch the Run dialog box and enter CMD in the text box.
- Press Enter and enter the command ping [your server name] in the CMD window.
- Press Enter again and check if you get a reply for each packet sent to the server.
- Repeat the same steps on every workstation, getting error code H202.
If you notice no loss of packets with a prompt reply, the connectivity of the workstations with the server is fine. Thus, you should proceed to the next troubleshooting solution.
However, if you find that the packets are lost or you are receiving a slow reply, you must contact a professional or dial +1(855)-510-6487 to get in touch with one now.
6. Edit the Host File and Add your Server to It
Adding your server to the Windows Host file ensures all workstations in the network can locate the server system in the network, and no network issues arise. Before proceeding, take a pen and paper to note the details and ensure you log in as an admin on both server and workstations.
Step 1: Get the Name and Address of Your Computer
- Press Windows + R to launch the Run command dialog box and enter CMD in the text box.
- Press Enter and type the ipconfig /all command in the CMD window.
- Take note of the IP address (or IPv4) and the Host Name, and repeat the same steps on all the workstations connected to the server.
Step 2: Make the Necessary Changes to the Windows Host File
You will need to perform the steps below on both the server and workstations connected to it.
- Exit the QuickBooks Desktop program and press Windows + E to open the File Explorer window.
- Now, move to any one of the locations below.
- C:\Windows\System32\Drivers\Etc
- C:\Windows\Syswow64\Drivers\Etc
- Find the host file in the folder, double-click it, and select Notepad.
- Enter the IP address and then the computer name in the file. You must use the Tab key to enter the space between the IP address and the computer name.
- Also, you need to ensure that the server system has the workstation’s IP address and computer name, and the workstation should have the server system’s IP address and computer name.
Step 3: Save the Changes Made to the Host File
Once you have made the required changes to the server and workstation host file, we will save the changes with the instructions below.
If, even after making the required changes to the server and workstation host file, you receive QuickBooks error code H202 while accessing the company file, follow the next solution.
- Click the File tab in the Notepad and select Save.
- When prompted, enter “hosts” as the file name and ensure that you include the quotation marks.
- Choose Desktop to save the host file and locate the file on the desktop.
- Right-click the host file and select Copy.
- Go to the folder from where you accessed the host file earlier.
- C:\Windows\System32\Drivers\Etc
- C:\Windows\Syswow64\Drivers\Etc
- Select the host file in the folder and right-click it.
- Select the Rename option and add OLD at the end of the file name.
- Click Continue and press Ctrl + V to paste the copied host file.
- Select Continue to conclude the process.
If, even after making the required changes to the server and workstation host file, you receive QuickBooks error code H202 while accessing the company file, follow the next solution.
7. Set QuickBooks to Host Local Files Only
Setting QuickBooks to host local files only will ensure that no other system in the network will try to host the company file.
- Open QuickBooks and go to the Product Information screen by pressing the F2 key.
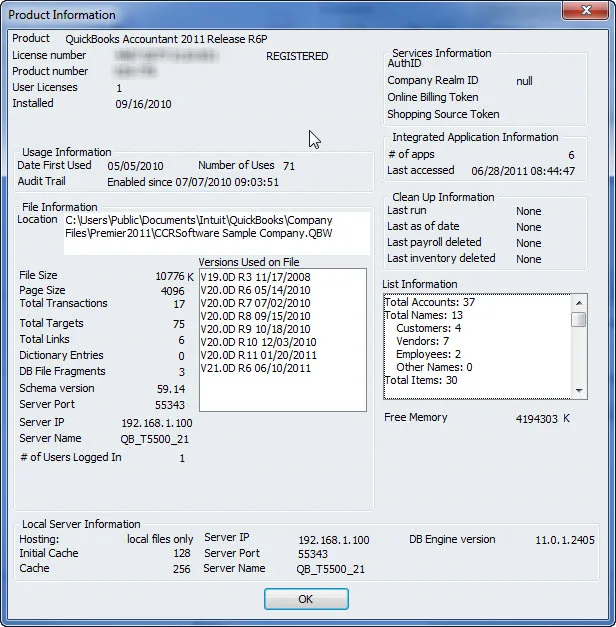
- Look at the bottom of the screen, and you will find the Local Server Information section.
- In this section, select Hosting to Local Files Only.
Once done, retry to access the company file on the workstation getting QuickBooks error H202 and check if this solution resolves the error. If not, follow the next troubleshooting solution and recreate the network data file.
8: Recreate the Damaged Network Data File
Recreating the network data (.ND) file will get rid of issues that arise from a damaged or corrupt file. If that was the reason for the QuickBooks error H202, this might fix it.
Press the Windows + E keys to open Windows File Explorer and enter *.ND in the search bar at the top.
- Windows will now search and display the file with .ND extension.
- Right-click the .ND file and select Rename.
- Add .OLD at the end of the file name. It must look like .ND.OLD.
- Now, run QuickBooks Database Server Manager using Tool Hub.
- After that, select Start Scan.
- Once done, retry to access the company file.
If You Don’t Have QuickBooks Database Server Manager on Host Computer
Let us show you how to download and install QuickBooks Database Server Manager (QBDBSM) on your host computer. You only need QBDBSM on the host computer, not the workstations.
a. Download QuickBooks Database Server Manager
QuickBooks Database Server Manager comes with the QuickBooks Desktop installation file; you only need to download and install QuickBooks to update it.
- Firstly, Visit the QuickBooks Product Download Page, select Yes, and click Next.
- Select the Country, Product, and Version, and hit Search.
- Now, select Download, and the QuickBooks setup file will be downloaded to the default downloads folder.
b. Install QuickBooks Database Server Manager
Installing QuickBooks database server manager is quite simple, and you can do it by following a few easy steps below.
- Firstly, close all applications that are running on the system, including QuickBooks Desktop.
- Go to the folder where you downloaded the QuickBooks setup file and double-click the Setup_QuickBooks.exe file.
- Follow the instructions in the installation wizard, and when prompted, choose Custom or Network Options.
- Click Next, select the best option to set up the network, and click Next again.
- If you already have QuickBooks Desktop on the server system, installing it again will not overwrite any data, so proceed without any concerns.
- Now select the option that says, ‘I’ll be using QuickBooks Desktop on this computer, AND I’ll be storing our company file here so it can be shared over out network’ if you have planned to use both QuickBooks and database server manager on the system.
- Select ‘I will NOT be using QuickBooks Desktop on this computer’ if you only want to have the database server manager on the system.
- Keep following the instructions on the screen to complete the installation and hit Finish as the last step.
Now, let’s proceed further and discuss the troubleshooting solutions that can help resolve this multi-user mode error as soon as possible.
Conclusion
The solutions given in this guide will help you resolve QuickBooks error H202 while switching to multi-user mode or accessing the company file. H202 is a complicated error and it can often be tricky to resolve it. If self troubleshooting doesn’t fix the issue, connect to an expert in the Asquare Cloud Hosting team. The team will run diagnostics using advanced tools and ensure you eliminate the error in the short time. Reach out to the Asquare Cloud Hosting’s expert team and allow them to take care of this dreaded multi-user error in QuickBooks Desktop.
Frequently Asked Questions
To fix Error: H202, you need to include certain ports in your firewall settings. The specific ports you should include are:
a. TCP port 8019: This port is used for QuickBooks Desktop version year 2018 and later.
b. TCP port 56728: This port is used for QuickBooks Desktop version year 2017 and earlier.
The QuickBooks install diagnostic tool repairs the damage to the installation of the QuickBooks program. If you suspect error H202 results from a damaged installation, the chances of which are very low, you can try running the QuickBooks Install Diagnostic Tool to resolve the error.
While installing QuickBooks Desktop, you get two options: The Full Program and The Server Only. If you plan to use both QuickBooks and the database server manager, choose the Full Program option. However, if you only want to have a database server manager on the system, proceed with the Server Only option.
QuickBooks Database Server Manager, a tool by Intuit, works as the backbone of the network when you host the company file. This tool also continuously monitors your network and ensures all workstations connected to the server can access the company file without any interruptions.
Error message H202 is most likely displayed by QuickBooks. It indicates a problem connecting to the company file stored on another computer or server, usually due to network issues, incorrect hosting settings, or firewall configurations.

Oriana Zabell, a professional cloud engineer, has over three years of experience in desktop, online QuickBooks support and troubleshooting. She is currently working as a cloud hosting consultant with Asquare Cloud Hosting. She loves to read and write about the latest technologies such as cloud computing, AI, DaaS, small businesses, manufacturing. When not writing, she is either reading novels or is indulged in a debate with movie fanatics.