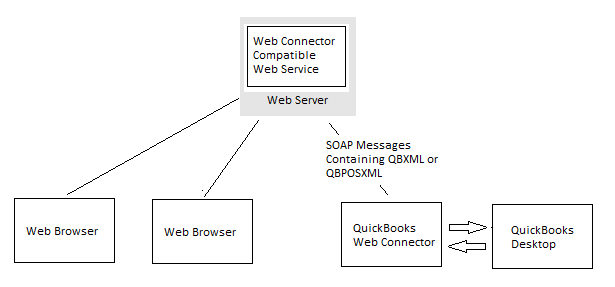
QuickBooks Web Connector, or QBWC, is a utility supported by the Windows OS. It enables web applications to share data with QuickBooks Desktop products, which includes Intuit applications such as QB POS and QuickBooks Time. This QBWC application may be installed on a local system or hosted on the cloud. It allows users to create a utility that directly communicates with a remote copy of QuickBooks without accessing the system containing QuickBooks.
Once the integration application is created, it must be registered with the QuickBooks Web Connector. This registration process involves specifying the location of the integration application and the QuickBooks company file it will be accessing. The QB Web Connector generates the QWC files as a bridge between the application and remotely hosted QBs. In this blog, we will learn how to install QuickBooks web connector and set it up in detail. Alright then, let us begin!
Getting to Know Web Connector in QuickBooks

QBWC setup is an effective way to connect QuickBooks to websites. It is two-way communication between QB products and web applications. Installing and configuring it for basic, manual, and automatic start provides all Web Connector benefits to the users.
Let us know about the QWC files and other essential things you need to know about before you install and start using the QB web connector.
What is a QWC File?
Before you integrate the application and web-based QuickBooks, you need to generate a QWC file. This file specifies the information of your utility and its requirements.
Why Do You Need the Web Connector in QuickBooks?
The QBWC has many benefits that help you seamlessly continue your accounting and business operations.
- It enables the QB POS XML & GB XML to share between cloud-hosted applications and QuickBooks POS/Financial Software.
- It schedules the communication with the web services automatically.
- It offers to add a new web service to the web services list so that QBWC can easily communicate.
How to Install and Set Up QuickBooks Web Connector
Web Connector offers the most effortless approach to setting up and managing an application. It allows you to see all your apps in one place, and the connected apps will show the apps you set up with QuickBooks. Go through the steps to set up the Web Connector in QuickBooks and follow them in the order they are given.
1. Download the QBWC Setup File
First, you need to download and install the QuickBooks Web Connector.

- Firstly, close all the QuickBooks windows, including the ones in the background.
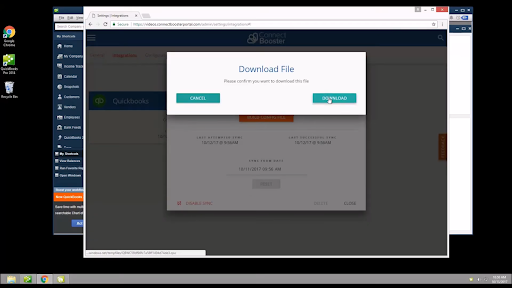
- Download the QBWC installer file.
Here are Some Recent QuickBooks Web Connector Versions
Here are the recent web connector setup files for different QuickBooks Desktop versions. Depending on the QuickBooks product you use, download the suitable web connector setup file.
| Version Information | Suitable for QuickBooks Version | Download File |
| Version 34.0.1001.27 | QuickBooks Desktop 2024 | Download QWC 34.0 |
| Version 33.0.1006.28: | QuickBooks Desktop 2023 | Download QWC 33.0 |
| Version 32.0.10011.30: | QuickBooks Desktop 2022 | Download QWC 32.0 |
| Version 31.0.10015.29: | QuickBooks Desktop 2021 | Download QWC 31.0 |
Related Post: Fix All QuickBooks Web Connector Errors
2. How to Install QuickBooks Web Connector
Now, let us proceed with installing the web connector on your desktop.
- Then, click right on the installer download and choose Extract All.
- Open the folder where your files are extracted and find the .exe file for your web connector.
- Right-click on it and choose Run as Administrator.
- Follow the instructions on the screen to install the QuickBooks web connector.
- Choose Allow devices to make changes to your computer, followed by Next.
- When you reach the License Agreement page, choose I accept the terms in the license agreement.
- Choose Next.
- Click on Install from the Ready to Install Program page.
- Choose Finish.
| In Case You Get an Error When or After Installing Web Connector In case you come across an error, try uninstalling and reinstalling the web connector. 1.) Press the Windows+R keys on your keyboard. 2.) When you see the Run window, type in control panel. 3.) Tap on OK. 4.) Choose Uninstall a program. 5.) Click on Web Connector followed by Uninstall. Note: In case you can’t find QuickBooks Web Connector in the control panel, go to these locations and delete the QBWebConnector folder. a.) C:\Program Files(x86)\Common Files\Intuit\QuickBooks\ b.) C:\Program Files\Common Files\Intuit\QuickBooks\ 6.) Finally, go to the steps above and install Web Connector. |
Note: However, if you find that you can’t install the latest version doesn’t, download and install an older version.
3. How to Add Application to Intuit Web Connector
Now, let us show you how to add an application to the QuickBooks Web Connector. Ensure that you are logged into QuickBooks as the admin, and then log in to your Intuit Account. You can connect the QWC file to QBs if you have the .qwc file from a third-party application.
- Choose File < App Management < Manage Web Apps.
- Now, choose Set up next to the app you want to set up. This will redirect you to the app’s website, where you can Sign in.
- Then, choose Connect to QuickBooks on the application webpage.
- Finally, open the QBs Desktop and choose Done on the Access Confirmation screen.
- This will complete the setup.
How to Manage and Delete an Application in QBWC
After you have added a web app, you might need to manage or delete the application in the future.
How to Manage an Application in QBWC
Ensure that you are logged into QuickBooks as the admin, and then log in to your Intuit Account.
- Navigate to File < App Management < Manage Web Apps.
- Then, choose Connected Apps to preview your apps and then make changes.
How to Delete an Application in QBWC
It’s easy to delete the app from the Web Connector. Once you delete the app, the data exchange won’t be possible with QB Desktop.
- Choose Edit < Preference < Integrated Applications.
- Now, click on Company Preferences.
- Finally, choose the app you want to delete.
- Select Remove, followed by OK.
How to Transfer Web App to Your Device
This feature lets you transfer your app to another system for the same company file. After moving the app, the connection will be removed from the other computer.
First, ensure you’re using a recent version of QuickBooks Desktop.
- First, choose File < Update Web Service < Manage Web Apps.
- Then, select Connected Apps to see your apps and make changes.
- In the end, choose “Transfer App to My Device” .The app connection will transfer to your new device. Continue with the data transfer.
How to Disable QuickBooks Web Connector
- Firstly, launch the Start menu and then click on All Programs.
- Then, click on Startup and press on QuickBooks.
- Now, click right on the Exchange Data with Web Services.
- Click Delete.
- Finally, click Yes for disabling the Web Connector in QB.
How to Use the Web Connector in QuickBooks
After installing the Web Connector, add a new Web Service that is a Web App to the Web Services list by which the Web Connector communicates quickly. Particular files with a . QWC extensions are the XML files that describe the Web Service, designed to interact with QBS and automatically opened by Web Connector.
How to Update QuickBooks Web Connector
To update your web connector, follow the steps below.
- Launch QuickBooks Web Connector on your computer.
- Choose the Help menu and click on Check for Updates. Now QBWC will check for available updates for QWC.
- QWC will prompt you to download and install updates if updates are available.
- To finish the installation procedure, adhere to the on-screen directions.
- Close QWC and open it again when the installation is finished to ensure the updates are applied.
Recommended To Read: Fix QuickBooks Abort Error- Why QB Keeps Aborting or Crashing
Conclusion
In this write-up, we have discussed how to set up QuickBooks Web Connector and how to use it. It also covers the procedure of downloading QuickBooks Web Connector and its installation. If you have any type of query or any doubts, connect with an expert. They are available 24/7 to help you resolve issues with the web connector. Dial +1(855)-738-0359 and speak to a QB expert now.
Frequently Asked Questions
Yes, QBWC helps you to manage your application, whether you want to delete, add, work, or transfer.
To prevent the QBWC from starting automatically, click on its entry from the list and then press the Disable button from the Task Manager Windows bottom.
The QB Web Connector generates the QWC files that work as a bridge between the application and remotely hosted QBs.
1. Press the Windows + R keys on your keyboard.
2. Now, in the Run box, type in Control Panel and choose OK.
3. Then, choose Uninstall a program.
4. Click on Web Connector, then double-click to uninstall.
5. If you can’t find the Web connector, then delete the QBWC folder in these locations.
a.) C:/ProgramFiles(x86)/Common Files/Intuit/QuickBooks
b.) C:/ProgramFiles(x64)/Common Files/Intuit/QuickBooks

Oriana Zabell, a professional cloud engineer, has over three years of experience in desktop, online QuickBooks support and troubleshooting. She is currently working as a cloud hosting consultant with Asquare Cloud Hosting. She loves to read and write about the latest technologies such as cloud computing, AI, DaaS, small businesses, manufacturing. When not writing, she is either reading novels or is indulged in a debate with movie fanatics.
