Last Updated on April 15, 2026
Accounting data is crucial for any business, and one can’t risk losing it. When the QuickBooks application can’t access the company file data or your system crashes, you must use the backup file to regain the data. The QB software stores all the current data in a compressed backup file (.qbb). You can restore QuickBooks backup file from your company data backup.
Before you learn how to restore a company file, you need to understand when you can do so. To help you with the same topic, we created this guide to show which lists the right for restoring a backup file in Windows and Mac.
What is QuickBooks Backup File Restoration?
Sometimes, when you face any issue with your QuickBooks data files or company file, you need to restore QuickBooks backup file to access the lost data. This method will be very helpful when your computer crashes or you must undo recent changes; use a backup copy of the company file. However, if your backup company file is on an external device, such as a USB or a hosting service like Box, you will need to move it to the local hard drive first, and after that, you can follow the instructions outlined in this blog to restore the backup company file (.qbb).
Data that you can and cannot back up for restoring
While performing this task, it is very important to know what all things can be backed up and what all things can’t. So here is a list of both things.
| Data that can be backup up conveniently | Data that you won’t be able to create a backup of | ||
| Transaction data | List Data | Other data | |
| • Invoices • Estimates • Sales • Receipts • Payments • Deposits • Bills and bill payments • Credit memos • Vendor credits • Journal entries • Purchases and purchase orders • Refund receipts • Time activities • Transfers | • Accounts • Budgets • Classes • Currencies • Customers • Departments • Employees (except their SSN) • Items • Payment methods • Tax agencies • Tax codes and tax rates • Terms • Vendors (except the Tax ID field) | • Attachments • Company info • Entitlements • Exchange rates • Preferences • Intuit Payroll info backs up as journal entries • Inventory shrinkage and adjustments back up as journal entries | – QuickBooks Online Payments info – customer types and price rules – Delayed credits and charges (although associated invoices are backed up) – Recurring transactions – Bank feeds and their links to transactions and bank rules – Reconciliation reports – Account-based billable expenses – Item-based billable expenses with markup – Custom reports – Custom form templates – Audit log entries |
Under Which Conditions Can You Restore QuickBooks Backup File?
After getting aware of why data backup is necessary, you might be thinking about when to do it. Well, certain situations would ask you to restore your accounting data from a backup file. Below, we have mentioned all such reasons:
- Whenever the QuickBooks Company file is deleted accidentally.
- You need to restore the company files in QuickBooks Desktop when data gets damaged due to a virus or malware breach.
- When it becomes difficult to repair the corrupt company file using any of the available tools.
Factors to Consider Before You Restore QuickBooks Data File
Before you go ahead and understand how to restore QuickBooks backup file, there are certain factors that you must take into account. Here, we have mentioned all such important points:
- You must use QuickBooks in single-user mode.
- Update your company file by re-entering all the transactions you have from the date you created the backup.
- Keep your financial data secure by logging in using the password for the Administrator user. It keeps your critical data such as credit card numbers, social security numbers, or FEIN information safe.
Now, let’s go ahead and learn the restoration process in detail. We have categorized it into two parts:
- Restore Company Files in QuickBooks Desktop through Backup in Windows
- Restore QuickBooks Backup File in QuickBooks Desktop for Mac
Below we have discussed the steps for both in detail.
How to Restore QuickBooks Company File From Backup in Windows?
You no longer need to worry about lost data, as you can restore it through the backup of your company file. Complete the restoration process on the QB desktop by following the below-given steps:
Note: In a case when your backup data file is on an external device like a USB or a hosting service like Box, you’ll need to move it to your local hard drive first. Then, carry out the steps below:
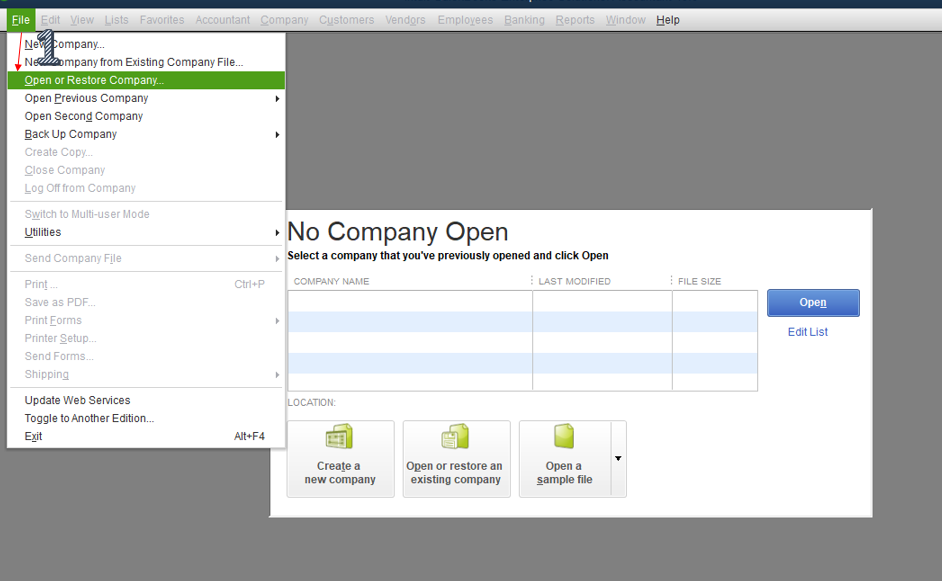
- Firstly, open QuickBooks.
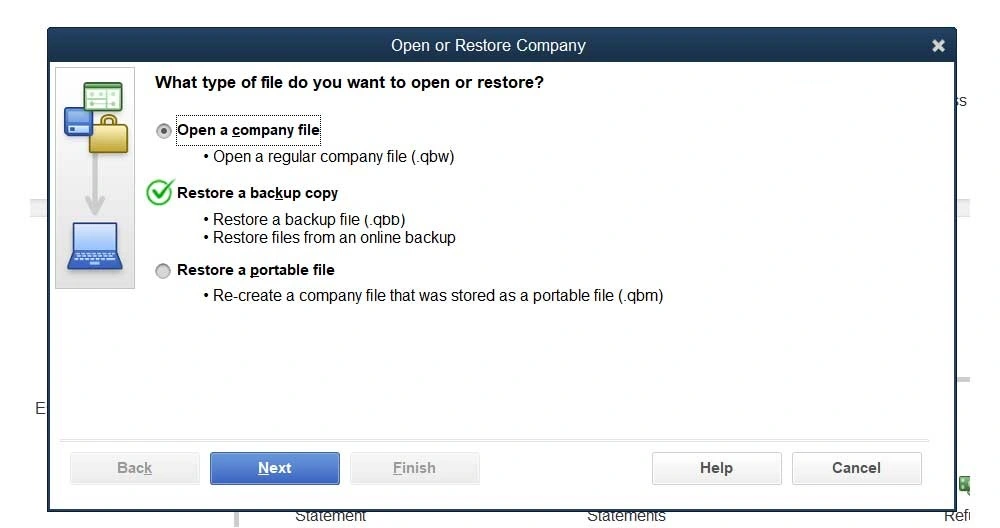
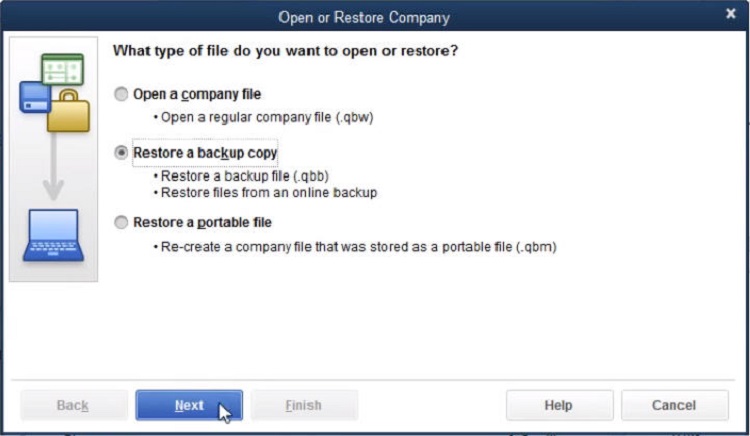
- Navigate to the File menu and select Open or Restore Company, followed by Restore a backup copy. Then, click on Next.


- Now, select the Local Backup option and then Next.

- After that, browse for the company file backup on your hard drive. It will appear as [Your company name].qbb.
- Choose a folder to decide where to save the restored company file, and then choose Open
Important: If QuickBooks finds a company file with the same name in the specified folder, it asks whether you want to replace the existing file. If you click on Replace, QuickBooks deletes the existing file and replaces it with the restored file. Further, if you’re not sure about replacing the file, click Cancel and give the file you’re restoring a different name. It converts it to a regular company file with a .qbw extension. The company file and all the associated files are stored in this particular location.
- Once you are ready, choose Save. If you find any messages about possibly overwriting the data, choose the option that best fits your requirements. Don’t overwrite anything unless you know you wish to
However, you may follow the below-given steps to overwrite the data:
- Go back to the Open or Restore Company dialog box. There, select the folder to save the Company File and click on Next.
- Now, go to the damaged company file via Save Company File as Window.
- Select the required company file and give permission to overwrite the data. And then, click on Yes.
- Further, give your confirmation by writing YES in the dialog box that pops up on your screen and selecting OK.
- Enter the administrator username and password on the QuickBooks Login page once the overwriting is done.
- Lastly, re-enter all the transactions that you have from the time of backup until the present time.
Note: It might be possible that you wouldn’t have created any Administrator password earlier. Hence, in that case, go to the QB signup page and follow the below-given steps.
- Firstly, enter a unique username in the given field.
- Then, enter the Password in the Sensitive Data Protection Setup window and confirm it.
- Further, you will be asked to select a specific question and an answer for the same.
- After signing up, you can re-enter all your transactions.
How to Restore a Backup Company File in QuickBooks Desktop for Mac?
There are certain ways that can help you find and restore company files in QuickBooks Desktop for Mac. You can restore your accounting data even when you want to undo the recent changes made in the company file. The process becomes easier if you have data backup in QuickBooks for Mac application. Here are the detailed steps, following which you will be able to restore the QuickBooks Backup File on Mac:
Step 1: Browse your backup company file
You need to browse your backup company files to restore the recent backup in QuickBooks for Mac. However, your company file’s copy is stored in the DMG file that QB for Mac creates while creating the backup. If you still are unaware of the backup file location, then follow the below-given steps to find it:
- Open QuickBooks and go to Preferences.
- Then, select backup followed by the Reveal backup folder option.
- Double-click the folder in which you have saved the backup files and Select the Date Modified option to check the most recent backup.
Note: The year of the QuickBooks version that you are using currently is also displayed in the name of the backup company file. For instance, say you are using QuickBooks for Mac 2020, then, the name of your company file will appear as: “Your business name.qb2020.”
Alternatively, you can also use the magnifying glass feature to search for your backup file. Click on the magnifying icon in the QB menu and search for .dmg in the search bar. Then, click on Show all in Finder.
Now that you have located the backup file, you must go ahead and try restoring the backup company file.
Step 2: Restore the backup company file
Follow the below-given steps to know how you can restore QuickBooks backup file:
- First, double-click the backup file. It will open a new window that displays a copy of your company file. You may also see the Attachments Library folder whenever your backup has attached documents.
- Move this file to the QuickBooks company file folder. You may also drag it to the same location as the Attachments Library.
Note: If you don’t want to overwrite the existing company file, you must move the copy to a different folder.
- Now, open the QuickBooks for Mac application.
- Click on Browse and go to the folder where you have saved a copy of the company file.
- Select and open the file.
- Click on Continue when a prompt window pops up.
- Enter the name of your company file and click on Save> OK.
Step 3: Restore the attached documents
- Open QuickBooks and select the Preferences option followed by Attachments.
- Now, select the Attached library dropdown menu> Select Existing.
- Choose the Attached library folder that you located before and then click on Open.
- At last, close the Preferences window.
Once done, follow the next step to enable online backup.
Step 4: Turn on the online Backup and restore app on QB online advanced data
The online backup and restore app in Quickbooks is an amazing feature that helps automatically back up the data. Once this is complete, it will automatically detect any changes and perform the tasks accordingly.
So here is how you can do it. Just follow the steps accordingly.
- Navigate to the “settings tab” in the Quickbooks Software.
- Then you will have to choose “Backup company”
Note: There is a chance you might need to sign in to your Intuit Account. After that, authorize the account to move ahead.
To turn this off, you don’t have to worry much. Here is what has to be done.
- Click on the “Settings” tab on the window of your QB software.
- Then just click on “backup company.”
- Then just locate the company with the auto backup that has to be turned off.
- Choose “Action drop-down” and then select “Disable backup” from the option.
After that, you need to manually create a one-time backup. For that, follow the steps provided in the next section.
Step 5: Manually creating the one-time backup
This can be possible too, but you will have to follow these steps along, to execute the solution.
- Head to “settings” and then choose “backup company”
Note: There is a chance that you might have to sign into your Intuit Account. And then authorize the account to move ahead.
- Next, you need to choose “add company” and then choose “search for a company.” There will be a drop-down menu in which you will have to choose the company you want to create a backup of.
- Then just click on “next” followed by “connect.”
Note: If there are multiple companies that have to be backed up, then just repeat the steps from 1 to 3.
- Now, just find the company you want to create a backup one and then choose the “Action drop-down menu” after which you will have to choose “run a full backup.”
These were the instructions: you need to recover the backup QuickBooks files to retain the lost data. We hope that these methods will help you restore the QB company file.
The following blogs can help you: Setting Up Multiple Companies in QuickBooks: A Detailed Guide
Restore QuickBooks Backup File – A Quick Overview
The table below will show you the condensed version of the information from this blog on Restore QuickBooks backup file restoration. You must go through it once to see the methods at a glance.
| QuickBooks backup file | A QuickBooks backup file is an extension (.QBB) that saves everything currently in your company file in a compressed version. |
| Conditions for restoring the backup file | 1. If your company file is deleted mistakenly 2. If your QB data gets damaged 3. If you can’t repair the company file |
| Steps to restore the QB backup file | Search for the backup company file, restore the backup company file, restore attached documents, enable the online backup, and create the one-time backup. |
Conclusion
This was all on when and how to restore QuickBooks backup file. We hope this blog has helped you get all the information you need, regardless of whether you are on Windows or Mac. Additionally, we discussed the scenarios in which you need to do so. It is advised that you follow the steps in the given order to avoid any technical issues.
Frequently Asked Questions (FAQs)
How do I restore a QuickBooks backup file?
To restore the QB company file, you first need to head to the File menu and choose Open or Restore Company. Choose Restore a backup copy and then Next. Now, choose Local Backup and then Next. Search on the computer for the backup company file.
Where is my QuickBooks backup file?
The default location for your QB Desktop company file is: C:\Users\Public\Public Documents\Intuit\QuickBooks\Company Files. If you are a Sage user, then the path is: C:\ProgramData\Sage\Accounts. You can locate your files and select the version/year of the software your file is using.
For how long does QuickBooks keep your data?
If you cancel the QuickBooks Online subscription, your data will be available in read-only access for 1 year from the date of cancellation. However, when you cancel the QB Online during the trial period or if your trial expires, the data will be available in read-only access for 1 year from the date of cancellation.
Can I make adjustments to the backup settings in QuickBooks?
Yes, you can make adjustments to the backup settings in QuickBooks. To start making changes in the backup settings on the QB software, the instructions below should be followed:
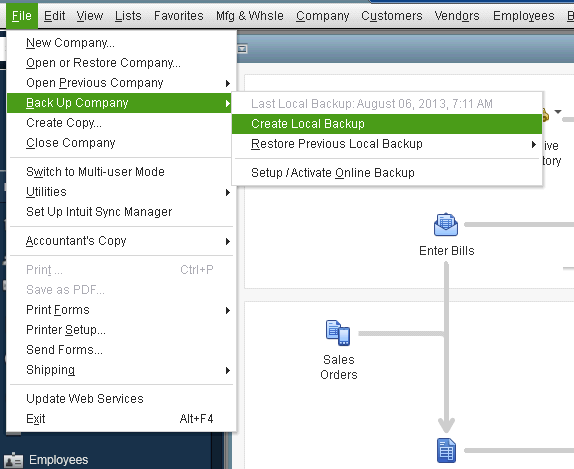
1. Start by opening QuickBooks and heading to File
2. Next, take the cursor to Back up Company
3. Now, select Create Local Backup
4. Choose the preferred options
5. Do the modifications accordingly as you wish to
6. Lastly, choose OK to complete

Oriana Zabell, a professional cloud engineer, has over three years of experience in desktop, online QuickBooks support and troubleshooting. She is currently working as a cloud hosting consultant with Asquare Cloud Hosting. She loves to read and write about the latest technologies such as cloud computing, AI, DaaS, small businesses, manufacturing. When not writing, she is either reading novels or is indulged in a debate with movie fanatics.