Last Updated on March 5, 2026
QuickBooks is known for its unique tools, features, and benefits that simplify accounting processes. One of the essential QB tools is the migration utility in QuickBooks, designed to facilitate seamless data transfer from one desktop to another. This tool is particularly advantageous for individuals who want to move QuickBooks to another computer.
There are two common ways to migrate QB company file data – one is manual transfer, and the other is using the QuickBooks data migration tool. The latter is an easy way and automates the process.
If you want to learn how to use QuickBooks migrator tool, this blog is for you. Here, we have described how to move the data from QuickBooks Desktop to QuickBooks Online and vice-versa. Therefore, explore the blog and scroll down to the section that best fits your query.
Some Good Reasons to Use QuickBooks Desktop Migration Tool
The QuickBooks migration tool offers great convenience, data security, and ease—as much as possible when moving from one computer to another or from Desktop to Web version or vice versa. Take a look at some quick benefits of the tool.
- You keep getting all the updated features and tax rates, whatever is important and needed.
- The automated data backup process keeps you covered even while on the go.
- Now, you will have to do fewer data entries on your software, making it much smoother to work.
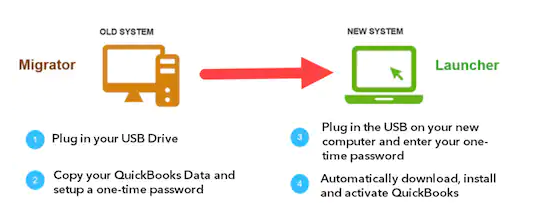
How Does the QuickBooks Migrator Tool Work?
Below, we have listed, stepwise, the whole process of the QuickBooks Migrator Tool. Go through these pointers to get a brief idea of how exactly the QuickBooks migration tool works.
- Firstly, you need to create a strong password to unlock the data copied to your new computer. Write down the password so you do not forget it; you will need it only once while using the migrator tool.
- The tool will copy the last 3 company files opened, along with all supporting files, to a USB flash drive.
- You will need the USB drive to move the files, but the Migrator Tool will do all the technical work.
- The Migration Tool automatically downloads the compatible version of QB Desktop on your new computer and sets it up with your company files.
- After complete transfer, the QB migratory tool won’t erase any data from your drive.
Note: If the files on the USB are from the 64-bit QuickBooks Desktop 2022 or 2023 version and you are running the migrator tool on a 32-bit Windows system, it may stop unexpectedly. QuickBooks can only be migrated in similar operating system versions.
Related Post: Is the QuickBooks Migrator Tool Not Working? How to Fix That
Who Can Use The Data Migration Tool?
Anyone with the QB Desktop can use this tool to do the migration for you. You just need first to check the points given below to use QuickBooks data migration services conveniently.
- If you are using QuickBooks Enterprise, pro, premium, and desktop versions for Mac files.
- The data can be moved from your QB company files (.QBW), backup files (.QBB), portable files (.QBM), and QB Desktop for Mac files if you have saved a backup for Windows (.qbb).
- Also when you are an accountant who doesn’t have its own QuickBooks desktop but wants to help a client move to QuickBooks online.
- You do not have a QuickBooks Desktop, but you have a QB Desktop file that you want to move to QB Online.
- If your QuickBooks desktop file is the 2011 version or later, you can use the tool. However, if you are using files from 2010 or earlier versions, you need to follow some other steps first. Contact our technical assistance team for help in that case.
Basic Requirements for Running QuickBooks Migration Tool
Here, we have mentioned certain things that you must consider while transferring a QuickBooks desktop to a new computer:
- You must connect your new computer to the Internet.
- You need a USB flash drive with enough free space to store your QuickBooks files. The Migrator Tool informs you beforehand about the amount of space required. In general, it’s between 150 and 250 MB.
Top Things to Do Before Using QuickBooks Migration Tool
Before you use the tool, go through the points below and ensure these things.
- Ensure that the chart of accounts balances is up to date and accurate.
- Make sure your balance sheet is balanced after your latest tax return.
- Reconcile your bank and credit card statements.
- Categorize the open transactions.
- Pay any outstanding invoices in your account.
- Finish all the outstanding payroll runs or payroll tax payments.
Read More: What To Do If QuickBooks Balance Sheet Out of Balance.
Data That Can and Can’t be Copied Using the QB Migration Tool
When you switch from desktop to online, you can automatically transfer a lot of the info from your company file. However, some information or data won’t convert or transfer using the migration tool. In that case, you will need to re-add that info after migration.
A. Data that the QuickBooks Desktop Migration Tool Copies:
Here is all the information or QuickBooks data that copies when you run the migration tool.
- QuickBooks Desktop detail includes the version & other information you need to install QB Desktop on the new computer.
- It also copies the last 3 company files that you opened on the old computer and may include the sample files.
- Related files, custom templates & forms
- QuickBooks letters and templates
- Scheduled & memorized reports
- Local attachments
- Printer Setting (PrintEng.ini, wpr.ini, and QBPrint.qbp)
- Spell Checker (spell.ini and UserDictionary.tlx)
- Financial Statement Designer (FSD clients, FSD data)
- Cash Flow Projector (.cfp)
- Business Planner (.bpw)
- Loan Manager (.lmr)
- Statement writer (for QuickBooks Accountant)
- Advanced reports (for QuickBooks Enterprise)
B) Data that QB Migration Tool Doesn’t Copy:
However, there is much that QuickBooks migrator tool doesn’t copy such as:
- Multi-user setup: You won’t be able to copy your new computer’s configuration if you’re using QuickBooks Desktop in a multi-user setup.
- Payroll & payment setup: If you have set up payroll or payment services on your old computer, you have to log in again on the new computer. It will make sure that your data is protected.
- Intuit Data Protect (IDP): If you have IDP, uninstall it on the old computer, sign in again on the new computer and repeat the setup process.
- Older Company Files: The QB Migrator tool will copy only the last 3 company files you have opened. If there are other such files, then they will be moved manually or restored from IDP.
- Backup files: If you have created any manual backups, they won’t be copied either.
Section 1: How to Use QuickBooks Migrator Tool to Move QB to Another Computer
Now, let us go through detailed steps on how to move QuickBooks to another computer using migrator tool. We will tell you what steps you need to follow on your old computer where QuickBooks is currently installed and the new computer where you want to move QuickBooks to.
Step 1: On the Old Computer
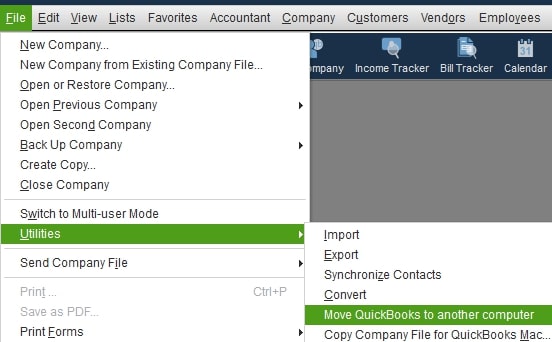
- Firstly, open the QuickBooks desktop and navigate to the File menu.
- Then, click on Utilities and select Move QuickBooks to another computer.
- After that, click on the option I’m Ready and make a strong one-time password.
- Follow the instructions on your screen to choose the USB flash drive you wish to use. Now, wait till the files get copied.
Read Also: How to Reset QuickBooks Password Manually & With Tools?
Step 2: On the New Computer
- Plug in the USB flash drive. At times, due to Windows security restrictions, the Migrator Tool may not launch automatically.
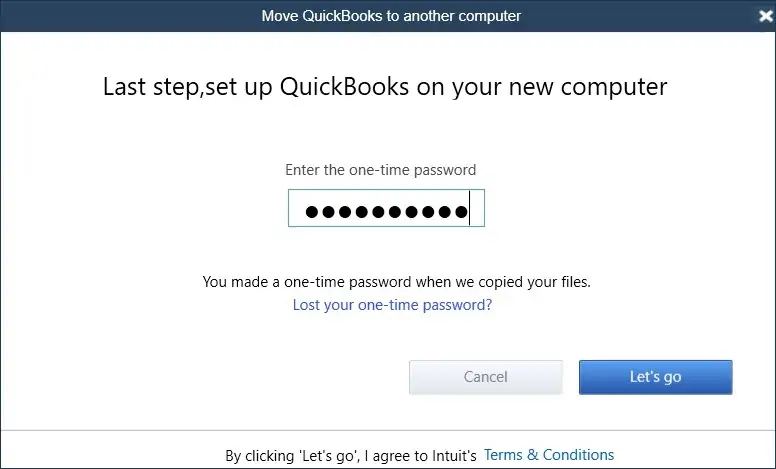
- Open the flash drive to view files on it and double-click on the Move_QuickBooks.bat file to begin the migration.
- Now, enter the password that you just created and click on Let’s go.
- Wait till the Migrator Tool finishes the migration process. The time may vary depending on your computer & internet speed and the size of your company file.
Note: If the migration process doesn’t start after selecting and running the company file, you must update Windows 10.
Read Also: What to do if QuickBooks won’t Backup to Flash Drive.
Important: After Migrating QuickBooks Desktop to A New Computer
Not all the information is copied by the QuickBooks data migration tool. Therefore, you need to perform a few more steps to keep QuickBooks up and running on the new computer. The steps may vary depending on the data that you have on the old computer:
- First, you need to sign in to your payroll & payment services.
- Then, sign in to Intuit Data Protect (IDP) and set up your backup schedule.
- After that, you need to transfer any of the additional company files from your old computer to the new computer.
- You are always advised to make a backup of your company file.
Also Read:- How To Fix Intuit Data Protect Has Stopped Working Issues?
How Can You Manually Move Or Reinstall QuickBooks?
Additionally, let us give a brief idea of how to move QuickBooks Desktop manually or install it on a new computer.
- You must have the product and license info with you.
- Before you try to reinstall, you must uninstall the existing QuickBooks program.
- You must download the installation files or insert the CD on the system where you want to install QuickBooks Desktop.
- Now, you can Install QuickBooks Desktop like you usually do.
Section 2: How to Migrate from QuickBooks Desktop to QuickBooks Online
Let us show you how to migrate from QuickBooks Desktop to QuickBooks Online and keep all your data intact.
A. Before You Convert from QuickBooks Desktop to Online
Before you start the conversion process, follow the steps below to ensure everything is ready to migrate and your information is migrated properly.
1. Back-Up Your Company File
Before you migrate your data to QB Online, you need to back up your company file. Creating regular data backups is considered a good practice for QuickBooks Desktop users. This is different from QB Online, where your data is stored on the cloud, so you do not need to back it up manually.
2. Update QuickBooks Desktop
You need to download and install the latest updates for QB Desktop before beginning the migration process. However, make sure to switch to the Single-user mode before updating the application. Then, you can update the application by going to the Help tab < Update Now, and then select Get Updates. If you use the Payroll, you can run it now.
3. Verify and Rebuild Company File
To ensure that you don’t run into unexpected results when migrating QuickBooks data or after that, let us check for data damage. Run verify and rebuild utility on your company file to find and resolve data damages.
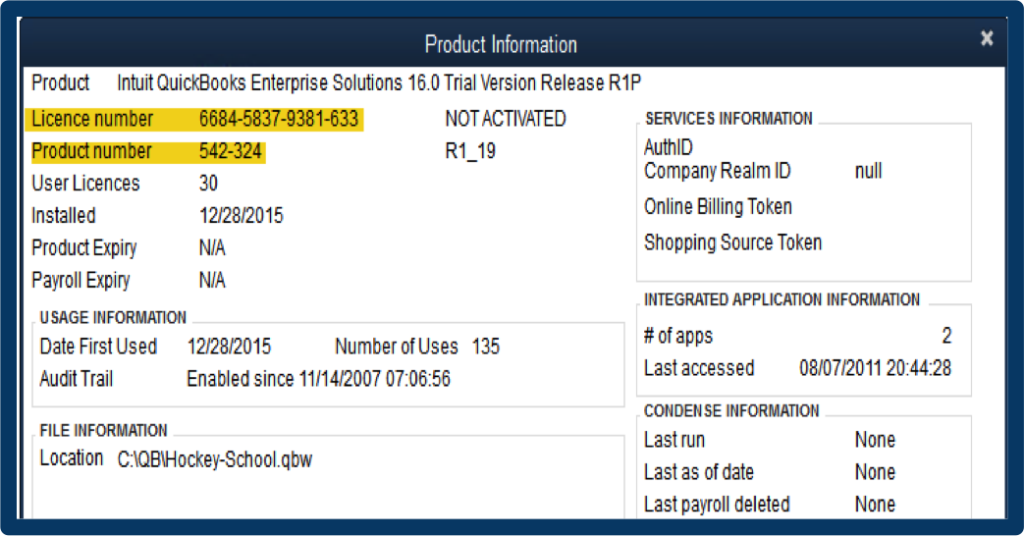
4. Check Your Total Targets
Check the number of total targets in QuickBooks Desktop by pressing the Ctrl + 1 keys and opening the Product Information window. You will get the Total Targets in the File Information section.
The target limit is 750,000 for QuickBooks Desktop, and thus, the total target count must be less than that.
5. Consider Removing Ministere Du Revenu (Companies Outside of Quebec Only)
Here is how you can remove Ministere Du Revenu by following the simple steps below.
- Navigate to Suppliers and then Supplier Centre.
- Identify Minsitere du Revenu and then open the supplier.
- Navigate to Sales Tax Settings and then Uncheck all boxes.
Mark the supplier inactive and hit OK to close the window.
6. Turn off Payroll In the QuickBooks Desktop File
To avoid any post-migration payroll issues, you need to turn off-payroll in the QuickBooks Desktop file before starting the migration process. You can turn it off by following the simple steps below.
- Go to the Edit tab, then select Preferences from the dropdown menu to open the Preferences window.
- From the left-hand side pane, select Payroll & Employees.
- Go to the Company Preferences tab in the Preferences window and select No Payroll.
7. Save the Sales Tax Liability report
Before migration, save or print the Sales Tax Liability report. It will help you enter the adjustment entries after you migrate the data. Here is how you can save or print the Sales Tax Liability report by following the simple steps below.
- Go to the Reports menu and select Suppliers & Payables in the top menu bar.
- Select Sales Tax Liability, and from the Dates dropdown, select All.
- At the top, from the Print dropdown, select Save as PDF, and then choose the folder in which you want to save it.
- Name the file, and hit Save.
- Once you have saved the file, you can print it anytime if you want a hard copy of the file.
8. Export Your Reports And Lists
Note: This is an optional step, but it generally needs to be completed if the company has more than 750,000 targets. Otherwise, you can skip this part and move to the next step.
Exporting the lists before migration has a crucial advantage. It saves you from having to set up the items from the lists one by one when you start using QuickBooks Online. Learn how to export the reports and lists from a QuickBooks Desktop company.
- Open QuickBooks Desktop, move to Reports, and select Report Centre.
- Find & open any report, then select the desired date range from the Dates dropdown menu.
- Choose Excel on the toolbar. Alternatively, you can select Print or Email to save the report as a PDF.
- Choose Create New Worksheet to create a new Excel workbook from the Excel dropdown. In order to update an existing workbook with the data in the open report, choose Update Existing Worksheet.
- Choose Export and locate the workbook on the computer.
- Select Advanced if you want to format the data in a specific way. However, it is optional.
- Select Advanced if you see a message that says the report has too many columns. Select and uncheck the Space between columns checkbox, and then hit OK.
- Hit OK when you’re ready to export.
Read Also: Do this if QuickBooks export to Excel not working
Consider repeating these steps for each report or list you’d like to export.
9. Create Your QuickBooks Online Account
Get a QB Online subscription before you start the migration process. Check the available subscription plans, review the basic system requirements, and select a plan that suits your needs and provides the best QuickBooks Online experience. When you are asked to sign in to QBO, use the same credentials you used to sign in to the QB Desktop account.
Note: You can only move the company files within 60 days of signing in to QuickBooks Online. So, ensure you convert within the given timeframe when subscribing to QBO.
B. Detailed Steps for QuickBooks Desktop to Online Migration
Now, you can export the QBDT files to QBO. Follow the steps below for the QuickBooks Desktop edition you use.
Note: You need to use a trial version of QB Desktop to convert the files if you use QuickBooks version 2021 or older.
Migrate From QuickBooks Desktop Pro or Premier
- In the QB Desktop, log in as an admin to the company file you want to import.
- Go to Company < Export Company File to QuickBooks Online.
- Select Get Started, followed by Select Destination.
- Lastly, sign in to the QuickBooks Online account to conclude.
Migrate From QuickBooks Desktop Enterprise
- First, open QuickBooks and log in as an admin to the company file you want to import.
- Press F2 to open the Product Information tab.
- In the Product Information window, press CTRL + B + Q and hit the OK at the bottom of the page to begin.
If you track inventory in QB Desktop, then do the following:
- Click Yes to bring them over and specify the starting date.
- Click No if you want to set up new items later in QuickBooks Online.
- When the conversion process is completed, you will get an email. Select the Complete your setup button in the email.
- Sign in to the QB Online account and select the company file you want to open.
- The QB Online dashboard will open.
Move Your Lists To QB Online
After the QB Online dashboard opens, you need to import the lists you exported from the QB Desktop. You can move these lists to QB online manually.
- Chart of Accounts
- Products and Services
- Customer
- Supplier
Set Up Inventory
Enable inventory tracking in QB Online as it calculates the inventory costs from the inventory start date using the First-in-First-Out method. However, if you do not prefer to use FIFO or enable inventory in QuickBooks Online during setup, click No, don’t turn on inventory, and don’t track the quantity on hand. Let’s see the steps below on how to turn on inventory tracking:
- Move to Settings and select Account and Settings.
- Select Sales and then select Edit in the Products and Services section.
- Enable the Show Product/Service column on sales forms.
- Consider enabling “Track quantity and price/rate” and “Track inventory quantity on hand.”
- Select Save and then hit Done.
Section 3: Migrate from QuickBooks Online Data to QuickBooks Desktop
Things will look different after exporting the data to QuickBooks Desktop. Here is how you can move the data from QuickBooks Online to QuickBooks Desktop for Windows.
Step 1: Download QuickBooks on the System
- Firstly, download and install QuickBooks Desktop on the system.
- Open QBDT, move to the File menu, and select Close Company. Consider leaving QuickBooks Desktop open while you finish the rest of the steps.
Note: The first thing to remember is that you can only move data from QuickBooks Desktop for Windows. After moving it to Windows, you can convert to QuickBooks for Mac.
Step 2. Sign in to QuickBooks Online to Download the Migration Tool
- Sign in to the QuickBooks Online account you want to convert using the Intuit account credentials with a browser Intuit supports.
- Select the URL and replace everything after /app/ with exportqbodatatoqbdt. The URL should look like this: https://app.qbo.intuit.com/app/exportqbodatatoqbdt. Then, hit Enter. Another key point is that other support task links won’t work during this process.
- “Export Overview” will be visible on the screen. You can read it, or you can also print it out if you would like to.
- Select Get Started and then select Download tool to download the QuickBooks Desktop migration tool.
- After downloading the tool, launch the tool to install it and hit Next.
- Also, you must accept the terms in the license agreement and hit Next again.
- Choose Complete as the type of setup, then hit Next once again.
- Lastly, select Install, then hit Finish to conclude.
Step 3: Prepare the File for Export and Select the Data in QuickBooks Online for Export
- Go back to QB Online. Hopefully, you should be on the “Step 1:Prepare to export” window. Then, hit Continue.
- Choose the data you want to export to the desktop. You can export all data with transactions or just the list and balances. After choosing the suitable option, select Continue.
- Select Learn about the limitations of converting data for QuickBooks Desktop to know more about limitations that can potentially impact the migration and hit Continue.
- Type in the name and email address. You will receive the migration confirmation email after migration using the same email. Then, hit Continue.
- Choose the Close option to return to the QBO file and wait for the confirmation email, as it may take some time. The confirmation depends on the amount of data you have chosen to migrate.
- Get back to the export screen in QuickBooks Online again. Then, repeat the previous steps in Step 2 to get back to the export page and hit Get Started.
- Hit Continue on the Prepare to Export page.
- Select the same option you selected previously on the Select Your Data page and hit Continue again.
- On the Exporting from QuickBooks Online page, you’ll see a message saying you already have a file to download. Hit Continue to download the file.
- Select Download QBXML file and then choose an easy-to-find location to save the file if QuickBooks prompts you. Lastly, select Continue.
- Open QBDT and move to the “No Company Open” screen. Then, move to the File menu and tap Close company if you have a company open. Then, see the reports to compare the data before and after the export.
Step 4: Let’s Run the QuickBooks Desktop Migration Tool
- Ensure QBDT is open at the No Company Open screen.
- Double-click the QuickBooks Desktop migration tool app icon you downloaded from Step 2 to open it.
- Browse to the QBXML file path and select Import.
- Pick a location and choose a name for the new QuickBooks Desktop file.
- Search the QuickBooks – Application Certificate. It may be hidden behind other screens if QBDT is in the background. Choose read/modify rights if you want to allow personal data access. Then, select Continue and Done on the confirmation screen.
- Lastly, select Done once the data has been imported successfully.
Note: This process may take some time to conclude. Another key point is that it may seem frozen even if it’s working. Wait for a few minutes to see the progress bar moving again.
What If the Status Bar Doesn’t Appear to Move
If the status bar doesn’t move, check QuickBooks Desktop for an Application Certificate again. Here is how you can check for the application certificate:
- In the Windows Taskbar, select and open the QuickBooks desktop. The Application Certificate will appear on the screen.
- Select Yes, prompt each time in the Application Certificate.
- Lastly, select Continue and Done on the confirmation screen.
Step 5: Check Whether the info is Exported Correctly
After exporting the company, use the Profit and Loss report to ensure your books match. Run one in QB Online and compare it to the same report in QB Desktop.
Note: While comparing reports, consider running them on an accrual basis so that they can match.
- Open QuickBooks Desktop, click the File menu, and select Close company.
- Go back and try converting the file again. Sometimes, converting a second time fixes this problem.
- Lastly, review the Profit and Loss reports again after it finishes. If they still don’t match, you need to enter manual adjustments to fix the issue.
What Does and Doesn’t Export from QuickBooks Online to Desktop
When you move the company data from QuickBooks Online to QuickBooks Desktop, you may notice differences in how the books appear. See how the books move below:
Features
| Moves to QuickBooks Desktop | Don’t move to QuickBooks Desktop |
|---|---|
Multi-Currency • Your move may fail, leading to an empty QuickBooks Desktop file. • Transactions not in United States Dollars (USD) will be copied as USD. | |
Payroll • Once you set up a payroll subscription or manual payroll in QuickBooks Desktop, you can create paychecks. | |
| Reconcile • All reconciled transactions will have a bold checkmark in the cleared column. • All cleared transactions will have a light checkmark in the cleared column. | Budgets • Reconciliation reports won’t move. |
| Sales Tax • Sales tax is listed as line items on invoices. • Sales tax items and rates move as service items. • Sales tax payments and adjustments won’t move. | |
| Projects • Projects move to QuickBooks Desktop as Customer Jobs. |
Lists
Since you are moving to QuickBooks Desktop, it is essential to know that it has list and field limits. Whenever lists or fields exceed these limits, they’re shortened. If you want to review the limits, check this out below
- Maximum number of list entries (list limits and custom fields)
- Character limitations for fields in QuickBooks
| Moves to QuickBooks Desktop | Doesn’t move to QuickBooks Desktop |
| Chart of accounts • Account detail types don’t move. • Account numbers only appear if you turn on the account number preference. • Deleted accounts move as inactive accounts without account numbers. | Chart of accounts • Inventory Shrinkage account doesn’t move |
| Class list Deleted classes move as inactive classes. | |
| Customers • Full name and Company name are both limited to 41 characters. • Billing Address and Shipping Address are both limited to three lines of 41 characters each. • E-mail addresses are limited to 81 characters. • Deleted customers move as inactive customers. | Customers • Customer credit card information doesn’t move due to PCI compliance. • Customer notes • Preferred delivery method • Mobile number • Pager number • Is Taxable |
| Vendors If you have 1099 vendors, you need to edit and remove the 1099 status before you move your books. • Full name and Company name are both limited to 41 characters. • Print on Check As is limited to 41 characters. • Addresses are limited to three lines with 41 characters each. • E-mail addresses are limited to 81 characters. • Deleted vendors will be exported as inactive vendors. | Vendors • Vendor Notes • Mobile number • Pager number |
| Employees • Full name is limited to 39 characters. • Deleted employees are moved to inactive employees. | Employees • Employee notes |
| Other lists The following lists don’t exist in QuickBooks Online. You’ll see general items on them in QuickBooks Desktop. • Customer type • Job type • Memorized reports • Other names • Payroll item • Price level • Sales rep • Ship via • Templates • To do • Vendor types | |
| Payment method list | |
| Terms |
Products and Services
| Moves to QuickBooks Desktop | Doesn’t move to QuickBooks Desktop |
| Bundle | |
| Inventory • Inventory Asset account • Cost of goods sold account • Purchase account • Sales account • Quantity on hand • Asset values Important: QuickBooks Online and QuickBooks Desktop have different calculation methods. Make sure to check the Cost of Goods Sold and Inventory asset accounts after you convert. | |
| Categories • Categories move to QuickBooks Desktop as Parent items. • Categories will become the same item type as the Products and Services listed under them in QuickBooks Online. |
Preferences
| Moves to QuickBooks Desktop | Doesn’t move to QuickBooks Desktop |
| Company info | |
| Users | |
| Location list |
Reports
As discussed earlier, accrual basis reports in QB Online will match QB Desktop reports. Cash basis reports may not match.
| Moves to QuickBooks Desktop | Doesn’t Move |
| Audit log | |
| Reconciliation | |
| Memorized reports |
Transactions
| Moves to QuickBooks Desktop | Doesn’t move to QuickBooks Desktop |
| Cash purchases • Cash purchases move as checks | Estimates Purchase order Recurring transactions |
| Time Tracking • All-time activity moves except locations. QuickBooks Desktop doesn’t track locations. • Activities will move, but physical timesheets won’t. | |
| Checks • Checks with blank number fields are auto-assigned a number. | |
| Credit Memos Sales Receipts Received payments Bills Bill Payments Invoices Refund receipts | |
| General Journal Entries • Transactions with multiple accounts receivable or accounts payable lines move to multiple journal entries. | |
| Deposits | Deposits • Billable status on deposits doesn’t copy. |
| Transfer Funds • Transfer funds copy as journal entries. | |
| Paychecks • Paychecks move over as checks. | |
| Liability adjustments • Paychecks move over as checks. | |
| Inventory Adjustments |
What To Do After Migrating Data
After you have migrated your data, you need to perform a few steps before using QuickBooks Online. Make sure to perform the below-given steps before changing the data or entering new transactions.
- Check your data by comparing reports.
- Confirm your company settings.
- Configure your sales tax settings.
- Connect your bank and credit card accounts
- Clean up any bank reconciliations
- Link payments and credits to open invoices
- Review the detailed types of your accounts.
- Complete the payroll setup
- Link your Payments accounts
- Add users to your QB Online
- Invite an accountant
The following blogs can help you: QuickBooks Conversion Tool (Download & Setup)
Conclusion
This article will help you move QuickBooks from one computer to another computer and from Desktop to Online using the QuickBooks Migration Tool. However, if you face an issue moving data or need assistance, reach out to a QB expert.
Frequently Asked Questions (FAQ’S)
Can I use the QuickBooks Migration Tool to migrate from QB Online to Desktop?
Yes, the QuickBooks migration tool can be used to migrate from QB Online to Desktop. Alternatively, You can utilize the tool from moving QuickBooks from one computer to another.
How long does it take to migrate QB using the QuickBooks data migration utility?
Migrating QuickBooks Desktop using the migration tool can take up to two hours once the data is uploaded.
Where can I download the QuickBooks Migration Tool?
You can access the QB Migration Tool by changing the URL for QuickBooks Online in your browser. Just sign in to QB Online using a supported browser. Then, replace anything after /app/ with exportqbodatatoqbdt in the URL. Now, in the Export Overview screen, click the Get Started button. Then, download the tool.
How should you transfer QuickBooks to a new computer
To transfer QuickBooks to a new computer, first, ensure both computers have QuickBooks installed. Then, back up your company file from the old computer, transfer it to the new one via a USB drive or cloud storage, and finally, restore the backup file in QuickBooks on the new computer.
How should you backup your company file in QuickBooks?
To back up your QuickBooks company file, open QuickBooks, go to the “File” menu, select “Back Up Company,” choose “Create Local Backup,” and follow the prompts to save the backup file to your desired location.
What is the migration utility in QuickBooks?
The Migration Utility in QB is a tool designed to help users easily and accurately transfer their data, including company files, settings, and preferences, from an older version of QuickBooks to a newer version.

Oriana Zabell, a professional cloud engineer, has over three years of experience in desktop, online QuickBooks support and troubleshooting. She is currently working as a cloud hosting consultant with Asquare Cloud Hosting. She loves to read and write about the latest technologies such as cloud computing, AI, DaaS, small businesses, manufacturing. When not writing, she is either reading novels or is indulged in a debate with movie fanatics.