Last Updated on February 26, 2026
Are you trying to send a sales form, invoice, or statement in QuickBooks as a PDF but failing due to errors? If Yes, this troubleshooting guide is all you need to resolve the issue.
One feature that most QuickBooks users benefit from is converting the documents into PDF format for sharing with customers and clients. Sometimes, you might notice QuickBooks save as PDF not working and throwing different error messages. These error messages indicate issues with QuickBooks Desktop and Windows and PDF components. In this guide, we will discuss why QuickBooks stops saving documents as PDFs and what actions you need to take to handle the situation quickly.
Therefore, you need to fix it as soon as possible. To help you with that, we have listed all the possible effective methods later in this article. But, before that, let’s have a look at all the reasons that trigger this issue.
Leading Causes Behind QuickBooks Form To PDF Error
Different reasons why QuickBooks save as PDF not working include:
- The PDF reader might be damaged.
- Conflicts between the latest Windows release and QuickBooks may trigger this problem.
- PDF Components might be damaged or missing.
- Problems connecting to the default printer can trigger this issue.
- Not having permission to access the system’s TEMP folder.
- Incorrect printer settings can also be a reason for issues saving PDF files.
Do this Before Fixing QuickBooks Unable to Save as PDF Issue
Before applying these solutions, make sure the following requirements are fulfilled:
A. Update QuickBooks Desktop
Ensure you have an up-to-date QB version for the latest advancements and bug fixes to avoid getting issues saving documents as PDFs.
- Close QuickBooks.
- Hold down the Ctrl key and double-click the QuickBooks Desktop icon. Keep the keys pressed until QuickBooks opens, displaying the “No Company Open” window.
- Navigate to Help and select Update QuickBooks Desktop.
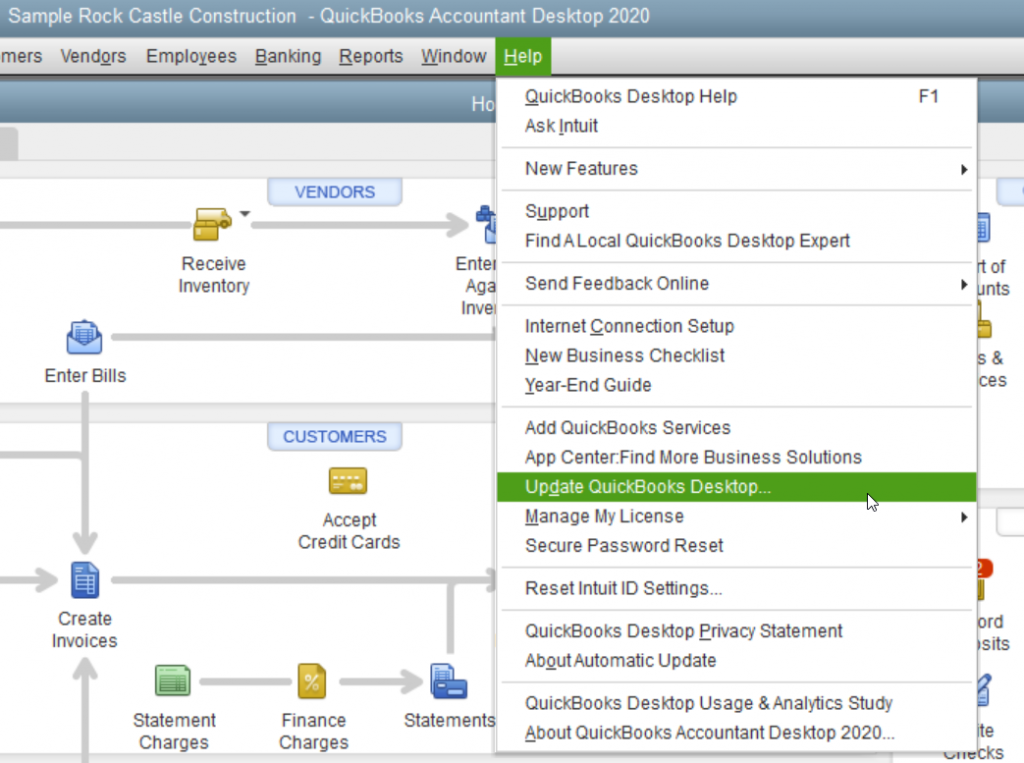
- Click the “Update Now” tab at the top.
- Select “Get Updates.”
- Once the QuickBooks update is successful, click Close.
B. Create a Company File Backup
Protect your files from accidental loss by creating a secure backup as follows:
- Open QuickBooks.
- Go to File, click “Back Up Company,” then choose “Create Local Backup.”
- Follow the on-screen instructions to create a backup of the company file.
What To Do When QuickBooks Could Not Save Your Form As A PDF File?
The reasons vary, and so do the resolution methods. Below we have listed all the effective solutions that can help you fix QuickBooks save as PDF not working error on your system.
Solution 1: Run the QuickBooks PDF & Print Repair Tool
You no longer need to worry if you ever end up with PDF and printing errors while using QuickBooks. Wondering why? That’s because it’s easier to resolve them by using the QuickBooks PDF & print repair tool. However, one has to install the QuickBooks tool hub on their system to run the utility. Do so by downloading it from this QuickBooks tool hub.exe. Once installed, you may proceed with the below-given steps:
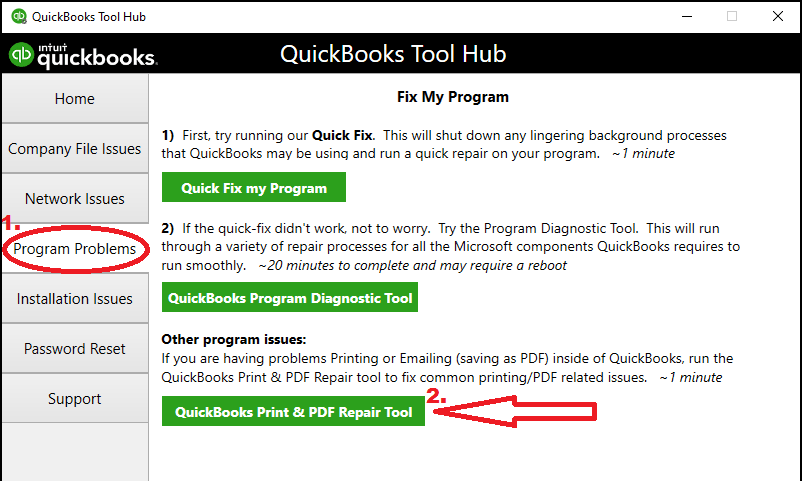
- Open QuickBooks tool hub in the first place.
- Go to the Program Problems tab and click on QuickBooks PDF & Print Repair Tool to run the utility.
- Let the PDF repair tool begin the scan to detect and fix the issues.
Note: Make sure you don’t close the Print & PDF repair tool manually and let it close automatically.
Once the tool closes down on its own, try to save any document as a PDF again and check if the error is resolved. If not, follow the next solution.
Solution 2: Restart the Computer and Change the Permission of the TEMP Folder
Firstly, reboot your system and check if QuickBooks can save a document as PDF now. If not, you must change the permissions of the TEMP folder by following the below-given steps:
- To begin, close the QuickBooks desktop application.
- Now, press Windows + R Key simultaneously to open the Run window.
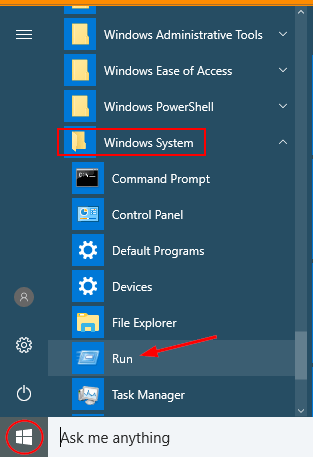
- Enter %TEMP% in the text space and click on OK.
- Right-click somewhere on an empty space within the temp folder and click on Properties.
- Then, go to the Security tab and ensure that each user name and group has Full Control or not. If not, set the permissions to Full Control and click on Save.
- At last, click on OK to exit from the window and try to save the file as a PDF in QuickBooks.
If QuickBooks fails to save the document as a PDF, follow the next troubleshooting solution.
Solution 3: Troubleshoot Issues with XPS Document Writer
QuickBooks utilizes XPS Document Writer, a Microsoft Windows product, for working with PDF files. Check if you can print to the XPS Document Writer using the following steps. This will help ensure if the problem is with the printer settings or QuickBooks Desktop.

- Close the QuickBooks application in the first place.
- Go to Notepad and type TEST PRINT.
- Now, click File and select Print, followed by the XPS Document Writer.
- Click on Print and enter a name for your file.
- Save the file on the desktop and open it to check if it is correct.
- If you’re unable to open the file, it signifies that there is some issue with the Microsoft XPS Document Writer.
If you encounter difficulties printing to your XPS printer (or actual printer) outside of QuickBooks, seek assistance from your IT professional or contact Microsoft for support.
If you are successful with the TEST PRINT outside of QuickBooks, ensure you have selected the right printer in QuickBooks Desktop.
You can try the following steps to resolve the QuickBooks save as PDF not working issue:
Step 1: Check if the XPS services are turned ON
- Go to the Control Panel from the Windows Start menu and select Programs.
- Select the Turn Windows features on or off option and locate XPS Service in the Windows feature.
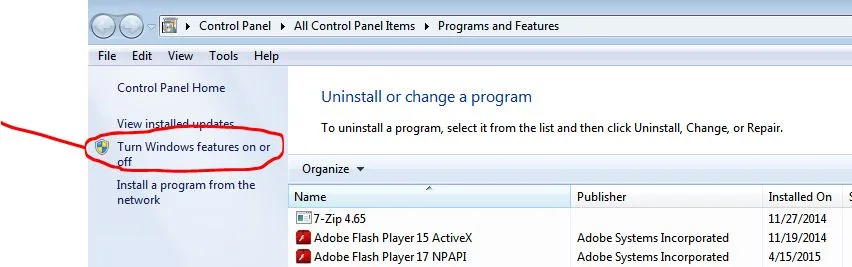
- Checkmark the XPS Service checkbox and click OK.
- Wait until the process is complete, and retry to save a PDF from QuickBooks.
If unsuccessful, try the following method.
Step 2: Reinstall Microsoft XPS Document Writer
- Press Windows + R for the Run window and type Control Printers in the text box.
- Press Enter and select the Add Printer option.

- Now click the The printer what I want isn’t listed option followed by selecting the Add a local printer or Network printer with manual settings option.
- Click Use an existing port and hit Next.
- From the left pane, select Microsoft.
- Click Next after selecting Microsoft xps document writer from the right pane.
Once XPS Document Writer is reinstalled, retry to save a document in PDF format using QuickBooks to check if this solution has resolved the error.
Step 3: Modify Security Software Configurations
Settings within your security software, such as Norton Antivirus or McAfee Firewall, can restrict you from creating .xps files. Go through the settings in your security software to ensure that .xps files are not being restricted.
Step 4: Modify Windows User Permissions for the XPS Document Writer
When a Windows user lacks the authorization to print to the XPS Document Writer, QuickBooks cannot convert the file into a .pdf. To adjust these permissions, logging in with Admin Rights may be necessary.
If you still can’t save documents as a PDF in QuickBooks, follow the advanced troubleshooting solutions below.
Read more: How To Print Bank Reconciliation QuickBooks? [Updated Steps]
Solution 4: Remove the Logo from the Invoice Template (For QuickBooks Online)
At times, the .jpg format of the company logo on the invoice creates an issue with the PDF tool, due to which QuickBooks could not save your form as a PDF file. In that case, you have two options: either replace it with a .bmp format file or delete the logo from the invoice design by following the steps below.
- Firstly, open the QuickBooks application and click on the Gear icon.
- Go to the Company menu and select Custom Form Styles.
- Now, search for the template you want to change.
- Uncheck the box ‘Use Logo’ on your template.
- You can utilize a background image for your invoice till then.
If QuickBooks save as PDF not working even after removing the logi, try creating a new template with the next solution.
Solution 5: Create A New Template
When you are unable to save as a PDF, try creating a fresh template for your form, allowing a customized template for transactions. After completing this, you can proceed to create a PDF using QuickBooks.
Here are the steps
- Navigate to the Lists menu.
- Select Templates and click the drop-down option next to Templates on the page.
- Select New and choose the Template Type.
- Click OK.
- To review the available details, click Additional Customization.
- After making the necessary modifications, click OK to save the template.
You can now retry to save the document as a PDF file to check if the error is resolved.
Solution 6: Change the Method of Saving the PDF
Rather than opting for “Save” and then “Save as PDF,” try the following steps:
- Go to “File.”
- Select “Print Invoice” and choose “Microsoft Print to PDF” as the printer.
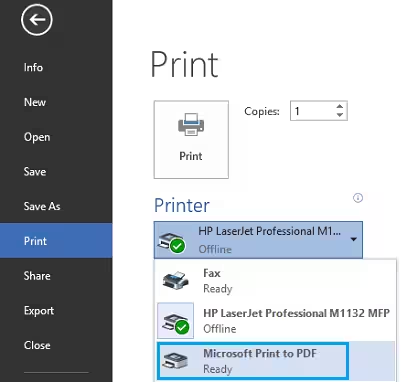
This alternate method of saving the document as a PDF has worked for several users and can also work for you.
Conclusion
We hope the troubleshooting methods mentioned in this blog have helped you resolve the QuickBooks Save as PDF Not Working issue. However, if none of the listed solutions work in your favor, then we would recommend you to get in touch with our experts. They will quickly analyze and identify the error’s actual cause and provide instant solutions to rectify it.
Frequently Asked Questions (FAQ’s)
How can I save a document as a PDF in QuickBooks?
To save a document in a .pdf format, follow the instructions below.
1. Open the document that you want to save as PDF.
2. Click the File tab and select Save as PDF.
3. Choose a location on your system where you want to save the PDF of the document and enter a name for the file.
4. Click Save
How do I fix the Save as PDF not working problem?
Fixing the save as PDF not working issue requires doing the following:
1. Running the Print & PDF repair tool
2. Restarting the system and resetting TEMP folder permissions
3. Removing any logo on the invoice template or replacing it with a .bmp file
4. Reconfiguring XPS Document Writer settings
5. Fixing Windows printer settings
6. Creating new templates

Oriana Zabell, a professional cloud engineer, has over three years of experience in desktop, online QuickBooks support and troubleshooting. She is currently working as a cloud hosting consultant with Asquare Cloud Hosting. She loves to read and write about the latest technologies such as cloud computing, AI, DaaS, small businesses, manufacturing. When not writing, she is either reading novels or is indulged in a debate with movie fanatics.