Last Updated on February 25, 2026
There is no denying that data safety is essential for businesses and their customers. Modern accounting software like QuickBooks understands the risk and knows the whole business depends on it. Update Intuit Data Protect for QuickBooks aims to provide your data with much-needed security and disaster prevention. It schedules automatic backups, allows you to backup manually, and keeps your data free from malware or viruses. All that comes at no added cost to the users of QuickBooks Desktop Pro Plus, Premier Plus, and QuickBooks Enterprise Subscriptions.
Therefore, you must only install Intuit Data Protect on your desktop and update it regularly. For enhanced performance and improved security, the tool has system requirements that you should check out.
Here’s Why You Must Install Intuit Data Protect & Update It To The Latest Version
After setting up the IDP, you might be looking for ways that can help you with Intuit data protection services. But before that, you need to understand why it is required and what benefits it offers. Below we have listed all such factors that signify the importance of the update process:
- Data safety is assured, and thus, you no longer need to worry about data loss.
- No matter whether you are using Operating systems or web browsers, stability is guaranteed.
- Enhanced security features to keep your business data safe.
- The performance of the application and the associated tools is improved.
What Requirements Must You Fulfill To Install Intuit Data Protect (IDP)
There are certain system requirements that one needs to fulfill to install IDP on their system. It can vary from Operating systems, internet browsers, and system hardware. All these will help run IDP smoothly on your system. Below, we have listed a detailed description of the system requirement that would further help you with the Intuit data protect update:
- Ensure that your Operating system is Windows 7, 8.1, 10. IDP is also compatible with Windows Server 2008 R2 SP1, Windows Server 2011, Standard and Essentials, Windows Server 2012 R2, and Windows Server 2016.
- Make sure to store your company file on the local area network.
Note: IDP doesn’t support Box, Google Sheets, and OneDrive.
- Update the Norton Life lock certificate every six months.
- You must install one of the following internet browsers on your system: Google Chrome, Mozilla Firefox, Safari, or Internet Explorer.
- One requires RAM of a minimum 4 GB.
- Screen resolution must be 1280 x 1024.
- The speed of the processor must be 4 GHz with a minimum of 5GB of free space.
- It doesn’t support Network drives; thus, you have to use a local file path on the computer.
- Follow the below-given steps to provide access to the secure sites of Intuit Data Protect in Internet Explorer:
- Open Internet Explorer and click on the gear icon, and select Internet options.
- Now, open the Security tab and click on Trusted sites, followed by Sites.
- Lastly, add all the IDP secure websites and click on Close.
After getting aware of all that you need, you must try to set up the IDP. To know how you must move to the next section.
Related Post: Set Up Folder and Windows Access Permissions for QuickBooks
How To Setup Intuit Data Protect?
Before you begin to set up IDP, you need to sign up for it. In case you haven’t; then you need to follow the below-given steps:
- Sign up for IDP (It provides you an online backup service)
- Then, set up IDP on your computer
To sign up, you need to follow the below-given steps:
- Firstly, go on the sign up page by clicking here.
- Click on the signup option and select either of one option: Sign up as a customer or Sign up as a Developer.
- Then, enter your email id and password, and it’s done.
Once signed up, you can go ahead and set up IDP by following the below steps:
Steps you must follow to setup IDP:
- Firstly, open the QuickBooks application on the computer or server on which you have stored your company file. However, press the F2 key if you aren’t aware of the location of your company file.
- Click on the File menu and select the Backup company option followed by Set up/ Activate online backup.
- Now, sign in to your Intuit Data protect account using the same email you entered while signing up.
Note: This email is not the same as your QuickBooks login.
- After signing up, the application will get installed automatically, and then click on Continue.
- Now, select the QB company file that you want to back up and click on continue. You may also select an entire folder for backup in place of a company file.
- Mark the checkbox Backup local selected documents and click on Continue.
- Select the files that you want to create a backup for and click continue.
One must know that the first backup may take some time, approximately some hours, depending on the number of files and their size. However, it may not take this long when you start creating backups after this.
Important: If you’re unable to set up Intuit Data Protect by following the above steps, then you can get in touch with our experts. They’re available round the clock for your assistance.
Here’s How You Can Create & Manage Backup With Intuit Data Protect
With Intuit Data Backup, your company files are backed up on a regular basis. If required, you can back up your data manually at any time. However, if you are struggling a lot with how to create and manage data backup with IDP, the below-mentioned steps will help:
Manually Backup your company files
- Firstly, right-click on the IDP icon (it looks like a green padlock on the Windows toolbar) and select the open Intuit Data Protect option followed by Back up now.
- Now, select the files that you want to create a backup for and click on Continue. And then, choose the Backup now option.
- Then, a message appears stating that the backup is successful, and click on OK.
You might be looking for a way that can help you check the backup status. For that, you need to follow the below-given steps:
1. Open Intuit Data Protect
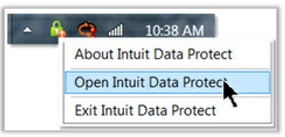
- Firstly, search for the IDP icon (green padlock) in the Windows system tray.
- Right-click on the IDP icon and select Open Intuit Data Protect.
2. View Backup History
After clicking on View Backup History, the Backup Details page opens up with your backup list from oldest to newest backup file. Search for the required backup entry by going through the history. There, the date and timestamp would help. After that, follow the below-given steps:
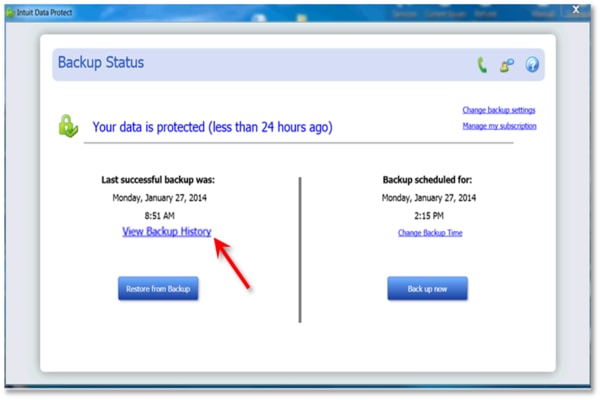
- Open IDP and select the View Backup History option from its main window.
3. Change Backup settings
Once you select the Change Backup settings option, it will enable you to add or remove files from your backup folder. In addition, you can also change the email notification preferences.
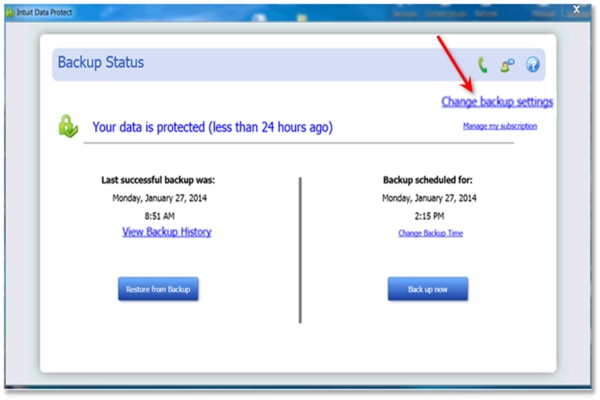
- Open IDP and select the change backup settings option.
- Select the files that you want to create a backup for on the QuickBooks Data window and click on Continue.
Note: For Entire PC Users, select the additional folders that you want to backup on the Select other folders to back up the window after clicking on Continue.
- Select continue and then from the Notifications Email Settings window, select whether you want to get notified or not.
- Click on Continue again and then, select your backup time.
- Save the changes by clicking on continue. Then, exit from the settings Window.
Read more: QuickBooks Email Setup – Configure Outlook & Webmail in QB Desktop
How To Update Intuit Data Protect To The Latest Version?
Now, you’re all ready to update the IDP. To know how you update Intuit data protect inbuilt with QuickBooks desktop, follow the below-mentioned steps.
Step 1: Download the latest update for Intuit Data Protect (IDP)
- Open QuickBooks desktop application.
- Go to the Help menu and select the Update QuickBooks option followed by Update Now.
- Click on Data Protect from the list that opens up, and then select the Get Updates option.
Step 2: Install the update

- Click on the up arrow icon (^) on the desktop toolbar.
- Now, right-click on the Intuit Data Protect icon (a green padlock icon) and select About Intuit Data Protect.
- After that, click on Update.
- Click on OK once you have installed all the updates.
Read More: Want to update QuickBooks Desktop to latest version
Conclusion
We have mentioned all the steps that you must be aware of to set up and update Intuit Data Protect for QuickBooks. If you still come across any query of intuit backup service while following the above-listed steps, we would suggest you give us a call on Asquare Cloud Hosting Helpline Number. Our IDP helpline is available round the clock to provide immediate assistance.
Frequently Asked Questions (FAQ’S)
What files can I back up using Intuit Data Protect?
You can back up QuickBooks company files (.QBW), financial documents, and other important folders stored on your system. The service allows you to customize backup selections to ensure essential accounting and business data is protected automatically.
How often does Intuit Data Protect back up files?
Backups can be scheduled daily or at specific times based on your preference. Once configured, the system automatically runs backups without manual intervention, ensuring your latest financial data is consistently protected and recoverable.
How do I restore files from Intuit Data Protect?
To restore files, open Intuit Data Protect from QuickBooks, select Restore, choose the backup date, and specify the destination folder. The system will download and restore the selected files to your computer safely and securely.

Oriana Zabell, a professional cloud engineer, has over three years of experience in desktop, online QuickBooks support and troubleshooting. She is currently working as a cloud hosting consultant with Asquare Cloud Hosting. She loves to read and write about the latest technologies such as cloud computing, AI, DaaS, small businesses, manufacturing. When not writing, she is either reading novels or is indulged in a debate with movie fanatics.