QuickBooks Desktop allows you to set up email in the application. Sending emails directly from QuickBooks saves a lot of time and effort. This enables you to send and receive reports, send invoices to clients, and perform other transactions with the help of Outlook or Webmail ID.
However, this requires the QuickBooks email setup first. Although configuring Outlook, Gmail, Yahoo, and secure webmail in QuickBooks might seem difficult, this guide will help you do it almost effortlessly. Therefore, continue reading this blog till the end and follow the instructions given to configure email clients.
Reasons Why You Must Setup Email in QuickBooks
We have listed down some of the spectacular advantages of configuring email in QuickBooks. Go through these to learn why you must set up and configure email services in QuickBooks Desktop.
- It makes it possible to set payment reminders for customers via email.
- This allows the users to fetch information from customers and vendors.
- You can send customers direct email invoices and estimates via email setup.
- This facilitates the sharing of reports within the office and department.
- One can import the company data from the spreadsheet and insert attachments up to 2MB.
- Proper email setup helps you prevent delivery server downtime error in QuickBooks.
These are some benefits of setting up emails in QuickBooks Online and Desktop. Moreover, the QB provides several email options.
What are the Different Ways to Setup Email in QuickBooks?
There are three primary options for setting up email in QuickBooks Desktop
- Webmail: The Webmail feature of QuickBooks was launched in 2011 to facilitate sending emails using Yahoo, Gmail, and other email providers.
- Outlook: If you have MS Outlook already installed on the system, you can send emails via Outlook. It is the most preferred email client because it is easier to use.
- QuickBooks Email: Alternatively, you can send emails using QuickBooks emails.
There are possibilities that you might be unable to find the option to set up a particular email at QuickBooks Desktop. This could be because you might be using an unsupported or outdated version of QuickBooks, or the system doesn’t show every option. It is recommended that you upgrade to the latest version of QuickBooks Desktop.
3 Ways for QuickBooks Email Setup and Their Steps
QuickBooks offers you three different options to configure emails, after which you can easily send transactions, invoices, reports, and more. Let us review these alternatives for QuickBooks email setup and learn how to configure email clients with detailed steps.
However, before you begin configuring email for QuickBooks, update your QB software to the latest release.
Option #1: Setup Outlook Mail in QuickBooks
If you want to send QuickBooks email through Outlook, update Microsoft Office to begin with. If you haven’t installed Outlook on your system and logged in it, please do so. Moreover, you will need your Outlook email profile details before you go ahead with the QuickBooks email setup.
Step 1: Before Setting Up Outlook, Keep the Following Info Ready
Before setting up Outlook in QuickBooks, you must have the following information ready.
- Username
- Password of Email
- Incoming email server type
- Outgoing email server address
- Incoming email server address
After that, move to the next step.
Step 2: Set up QuickBooks Email Via Outlook
- Open QuickBooks and go to the Edit menu.
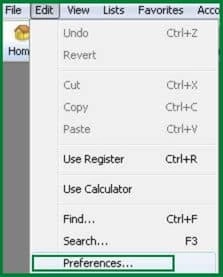
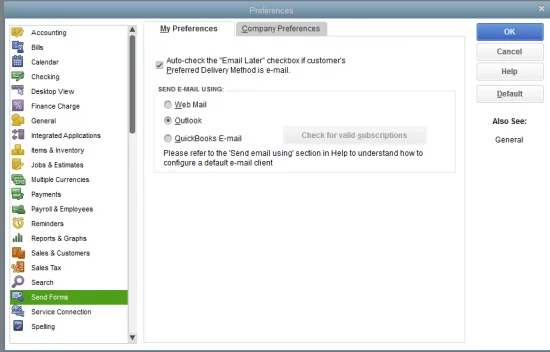
- Then, choose Preferences and then click on Send Forms.
- Now, select Outlook and click on OK.
This will setup Outlook in QuickBooks so that you can start sending invoices and documents via email. Another way to set up email in QuickBooks is via secure webmail. Let us discuss that now in the upcoming section.
Option #2: Setup Secure Webmail for QuickBooks
There are some things you need to know before setting up secure webmail in QuickBooks.
Points to Remember Before QuickBooks Webmail Configuration
- Only the recent version of QuickBooks can use secure Webmail. This allows an easy and secure connection for your email.
- When you link your Intuit account to your webmail account, ensure secure webmail works appropriately.
- QuickBooks is capable of auto-filling details for the typical email providers.
- After linking, you don’t need to enter the password whenever you send the email.
- For extra security, your webmail service providers will need you to enable two-step verification in your account.
Now, let us take a look at the QuickBooks Desktop versions that work with secure webmail.
QuickBooks Desktop Versions Compatible with the Secure Webmail
Here are different QuickBooks Desktop versions that are compatible with secure webmail.
These versions are suitable for Yahoo Email, Gmail, Hotmail, AOL, and Windows Live Mail. For Mozilla Thunderbird Email Client, it only supports the plain text version in Mozilla.
This version is only available for Gmail and Hotmail/Live users in the UK, USA, and Canada.
Gmail users in the USA only can use R5 and newer versions.
QuickBooks secure webmail is not available for these versions.
Now that we are all set, let’s proceed to the QuickBooks email setup via webmail.
Steps for QuickBooks Email Setup Via Secure Webmail
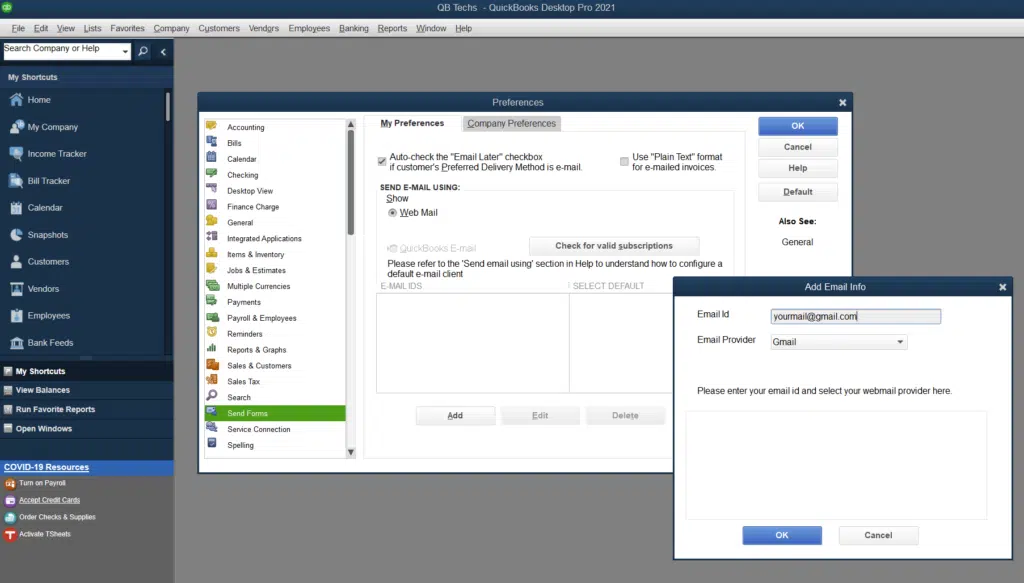
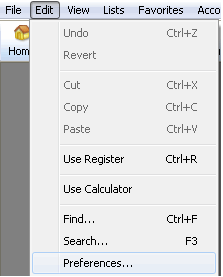
- Launch the QuickBooks application and go to the Edit menu.
- Then, choose the Preferences and click on Send Forms.
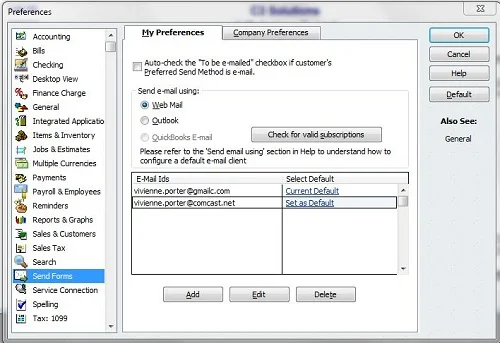
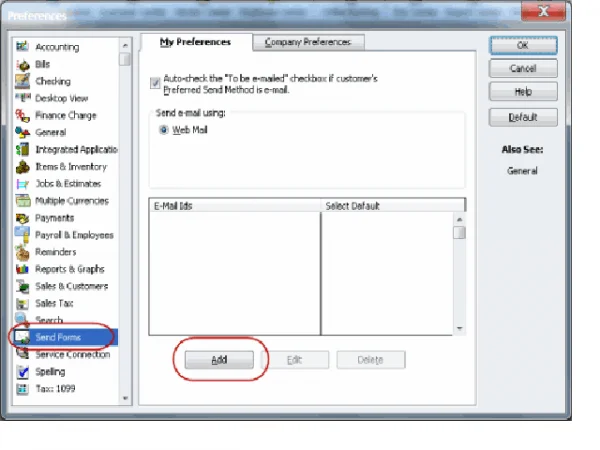
- Now, you must select WebMail and then Add.
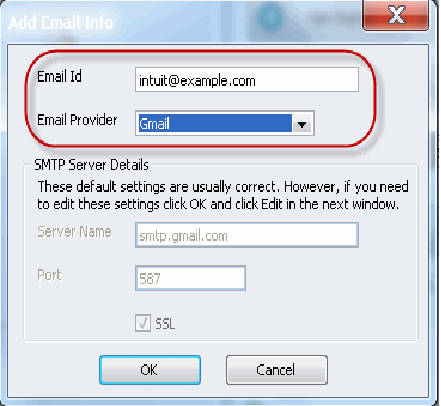
- After that, choose your provider from the drop-down menu and provide the email address.
- Here, choose the “Use Enhanced Security” checkbox and click OK. (You can unmark the box if the “Network Error. Please try again” error message occurs)
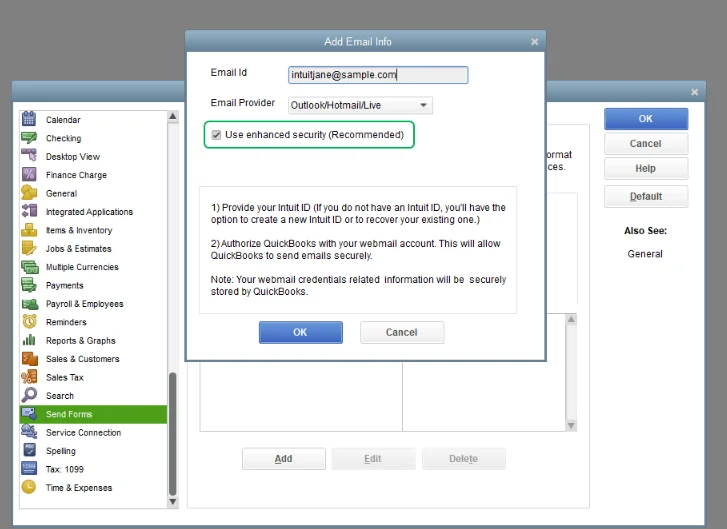
- Now, Log in to your Intuit account.
- After that, a webmail provider login wizard will appear. Sign in and choose to grant Intuit access.
Things to Know After Secure Webmail Setup in QuickBooks
- If you set up Secure Webmail for your Company file, you need to create a complex password for your file to secure the file.
- If you’re using a Hosted Environment, then you need to sign in every time you want to send mail.
- QuickBooks will ask you to provide your Webmail password while sending the first email using Webmail.
- If QuickBooks rejects your password, contact your Webmail providers (Yahoo, Gmail, etc.) to execute the two-step verification and ask users to check the account settings.
If you are a Cox and CableOne user and can’t find any solution for QuickBooks Desktop Email Setup, then the below section is for you.
(i) For Cox Users
While sending emails Cox’s standard settings do not use the SSL or the Sign-in details. The QuickBooks Desktop uses the SSL connections and asks you to enter the Sign-in credentials. Thus, using the SSL Connection and port 25 will not function with the QB desktop. You can use the SSL with port 465 or 587.
(ii) For CableOne Users
The CableOne users can follow the given details to set up QuickBooks emails since they use Google servers.
- Email Provider: Gmail
- Email Address: Your User ID
- SSL: Yes
- Port: 465 or 587
Users are also confused with the different port information and internet service providers. In the next section, we present to you the table which contains the data. If you need an alternative to Webmail, you can connect QuickBooks with MailChimp.
Option #3: Setup QuickBooks Email Services
To ensure that QuickBooks email services continue to work, you must update your QuickBooks Desktop. You should note that Intuit doesn’t provide email services in the discontinued version of QuickBooks Desktop. Therefore, make sure to upgrade to the latest QuickBooks Desktop version. Now, let us show you how to set up QuickBooks email services in easy steps.
- Firstly, choose the “QuickBooks Email” option from the Send email using section.
- Then, check whether you have a valid subscription or not. QB email features only process when you have an Intuit services active subscriptions like Accountant’s Copy File Transfer, QuickBooks Payroll, QB Enterprise Full Service, IMS (Intuit Merchant Service), or QB Billing Solution.
- Now, follow the on-screen instructions for QuickBooks email setup.
- In the end, you have to fill in some required information such as email address, username, password, incoming & Outgoing email settings, and server details.
After providing the above options, we hope that you can easily set up QuickBooks Email services. It is essential to know the port information and internet service providers. In the next section, we present the table containing this data.
Table for Port Information and Internet Service Provider (ISP)
Go through the table below to find the exact codes and information regarding the port, servers, and ISP.
ISP (Internet Service Provider) | SMTP Port | SMTP Server |
| ADELPHIA | 110 | mail.adelphia.net |
| COX EAST | 465 or 587 (see Note) | smtp.east.cox.net |
| COMPUSERVE | 110 or 587 | smtp.compuserve.com smtp.aol.com |
| BELL SOUTH | 110 | mail.bellsouth.net |
| COMCAST | 587 | smtp.comcast.net |
| AOL | 465 or 587 (see Note) (SSL enabled for incoming and outgoing mail servers) | smtp.aol.com |
| COX Business | 465 or 587 (see Note) | smarthost.coxmail.com |
| COX CENTRAL | 465 or 587 (see Note) | smtp.central.cox.net |
| COX WEST | 465 or 587 (see Note) | smtp.west.cox.net |
| NETSCAPE | 25 (SSL enabled) | smtp.isp.netscape.com |
| 1AND1.com | 587 (SSL enabled, with password) | smtp.1and1.com |
| EARTHLINK | 25 (with password) | smtpauth.earthlink.net |
| MICROSOFT OUTLOOK 365 | 587 (SSL enabled) | outlook.office365.com |
| LYCOS | 25 | smtp.mail.lycos.com |
| PRODIGY | 25 (SSL enabled) | smtp.prodigy.net |
| VERIZON | 465 | outgoing.verizon.net |
| VERIZON YAHOO | 465 | outgoing.yahoo.verizon.net |
| ROADRUNNER | 587 | smtp-server.sc.rr.com |
| SPRINT PCS | 25 | smtp.sprintpcs.com |
Conclusion
We explored the procedure for QuickBooks email setup for Office 365, Gmail, Yahoo, and other service providers. Hopefully, you were able to set up and start sending emails in QuickBooks. However, if you face a problem or need an expert’s assistance to configure QuickBooks email, contact them at +1(855)-738-0359. They will get in touch with you right away and help you set up the email client in no time!
Frequently Asked Questions
QuickBooks Desktop has a feature called Scheduled Reports. It allows the user to send or email reports at a daily and recurring scheduled time.
QuickBooks’ default email address when sending invoices, reports, and transactions is the email account you configure QB emails with.
The QuickBooks 2019 and later versions work with secure webmail services such as Gmail and Yahoo email.
It is very easy to set up email in QuickBooks using secure webmail. In this blog, we have discussed the various methods for setting up an internet or email provider and secure webmail in QuickBooks.
To perform a QuickBooks email setup, you need to configure the email settings within the application. Here is the breakdown of what you need to do:
1. Figure Out Your Preference: Launch QuickBooks Desktop, open the Edit menu, go to Preferences, and from the left pane, tap on Send Forms.
2. Select the Email Method: You can either choose QuickBooks Email or webmail, such as Gmail, Outlook, Outlook Express, Windows Mail, and Mozilla Thunderbird
3. Configure the Email Details: Finally, enter your email address, provider, server name, and port information.
4. Enable Security Settings: Optionally, you can enable settings like two-factor authentication for a secure experience.
Usually, the QuickBooks Desktop utilizes Outlook or Outlook Express by default. However, you can easily modify the email preferences. To do so, click on Edit and choose Preferences. This will allow you to edit the email preferences in QuickBooks.
Let’s go through the steps to set up QuickBooks email with Gmail.
1. Firstly, Open an existing invoice or create a new one.
2. Now, fill in the required fields and move on to the preview window.
3. From the dropdown list of the items, click on Add Gmail address and proceed to connect the Google account.
Let us walk you through the steps and show you how to set up QuickBooks to email invoices.
1. To start with, open QuickBooks Online and navigate to Get Paid and Pay
2. Now, click on Invoices that you want to send through emails
3. Fill in the information, and once done, add any contacts you wish to send the invoice to.
4. Fill in the email information and click on Send.

Oriana Zabell, a professional cloud engineer, has over three years of experience in desktop, online QuickBooks support and troubleshooting. She is currently working as a cloud hosting consultant with Asquare Cloud Hosting. She loves to read and write about the latest technologies such as cloud computing, AI, DaaS, small businesses, manufacturing. When not writing, she is either reading novels or is indulged in a debate with movie fanatics.
