Last Updated on October 30, 2025
Are you intrigued by the idea of using a multi-user network where all users work simultaneously on one company file? Use this blog post to understand how QuickBooks Database Server Manager makes it possible. QuickBooks Database Server Manager in QB Desktop makes it easy to share your company files with other computers on the network. All workstations connected with a single server can access the company files, making it a mandatory multi-user component. You can also keep an eye on your multi-user network with this tool. Users require a different Database Server Manager for each QuickBooks Desktop version. This utility stores the company file on the host computer and creates Network Data (.ND) files. The Database Server Manager does not have a separate download link. Since it’s a part of the QB Desktop file, you’ll have to install
System Requirements for QuickBooks Database Server Manager
The system requirements for QuickBooks Database Server Manager are the same as QuickBooks Desktop. Use any of the following operating systems for your database server manager on Windows (natively installed):

- AfterWindows 11 and 10, 64-bit
- Windows Server 2022, Standard and Essentials
- Windows Server 2019, Standard and Essentials
- Windows Server 2016, Standard and Essentials
- Windows Server 2012 R2, Standard and Essentials
- Windows Server 2012, Standard and Essentials
Windows 10 S and Linux modes aren’t supported.
How To Install QuickBooks Database Server Manager?
Here, we have listed the steps that you need to follow to install the QB Database Server Manager:
Step 1: Download QB Database Server Manager
Database Server Manager comes along with the QB Desktop(Pro, Premier & Enterprise) versions. Therefore, when you download the QuickBooks Desktop, the QuickBooks Server Manager comes as a part of the package. Further, you may follow the below-listed steps to install QB Desktop.
- Firstly, you have to visit the QuickBooks Product Updates Download Page.
- Tap Change and pick your QuickBooks edition under the Products column.
- Pick the year mentioned in the Version column.
- Hit the Download button.
Step 2: Install Intuit QB Database Server Manager
You have to Install QuickBooks Database Server Manager on the computer that hosts your company files.
Important: If you are somebody who hosts multiple versions of QuickBooks Desktop on your network, you must install them in a specified order i.e., from the oldest version to the recent one.
- First, close all the programs running on your server computer.
- Then, search for the Setup_QuickBooks.exe file and follow the on-screen installation instructions.
- When asked, select the install type from Custom or Network.
- Now, click on Next without selecting Express.
- After that, choose the best option for network setup and click on Next. Both options will install the Database Server Manager. If you have installed QuickBooks Desktop on your server computer, it won’t overwrite any existing company data.
- For those who want to use both Database Server Manager and QuickBooks Desktop on the server computer, select the option: I’ll be using QuickBooks Desktop on this computer, AND I’ll be storing.
- If you only want a Database Server Manager on your server computer, select the option: I will NOT be using QuickBooks Desktop.
- Lastly, follow the onscreen instructions and click on Install.
Be aware that QuickBooks generates a new Windows user for every Database Server Manager version. For instance, Database Server Manager 2023 will be identified as QBDataServiceUser33.
Grant permission to QBDataServiceUserXX (where XX represents the user number) to access the directories containing your company files. These users might appear when configuring system-level permissions.
Undertake Database Server Manager Configuration
If you prefer to utilize the default configurations, you may proceed to Step 3 without following this section.
- Firstly, click on the Windows menu.
- Then, type Services in the search bar and open it.
- Now, select and open QuickBooksDBXX.
- Navigate to the General tab and search for the Service status section. If it’s set at Started or Running, change it to Stop.
- Select Automatic from the Startup type dropdown menu.
- Now, go to the Logon tab and select the option Local System account.
- Go to the Recovery tab and select Restart the Service option for all of these dropdown menus: First, Second, and Subsequent failures.
- Lastly, go back to the General tab again and select Start to restart Database Server Manager.
Step 3: Set Your Firewall Permissions
For detailed troubleshooting, follow Method 4 of the article QuickBooks Error H505.
Step 4: Update QuickBooks Desktop Database Server Manager
You don’t need to update the QuickBooks Enterprise Database Server Manager separately. The updates are installed automatically while updating the QuickBooks Desktop. The steps involve:
- Tap Help and the Update QuickBooks Desktop option.
- Choose Update Now, then the Get Updates button.
- Exit and re-access QuickBooks to install the update again.
How To Setup & Use QuickBooks Database Server Manager?
After you install the Database Server Manager, you need to scan your company files. After that, try accessing the company files from other computers on your network. This allows multiple users on your network to work simultaneously in QuickBooks Desktop from multiple computers.
Step 1: Scan your folders
You need to scan the folders storing your company files before you begin sharing them:

- Open the Windows menu on your server computer.
- In the search bar, type in Database and open QuickBooks Database Server Manager.
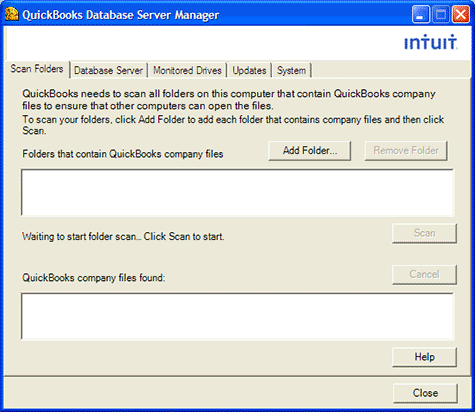
- Then, navigate to the Scan Folders tab.
- Now, select Browse and select the folder in which your company file is stored.
- Click on OK after selecting the required folder and then select Start Scan.
- When the scan completes, the folder will display in the “QuickBooks company files found” section. You will be able to access the company files in these folders from other computers on your network.
Step 2: Monitor your Drives
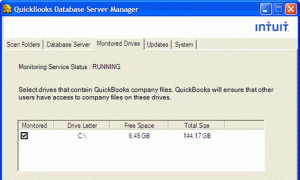
The scanned folders are stored in the drives that appear under the Monitored Drives tab. Monitoring your drives will ensure that you don’t need to rescan if you move or change your company files in them.

- Navigate to the Monitored Drives tab in the first place.
- Select the checkboxes for the hard drives in which your company files are stored.
- Monitoring won’t be needed for mapped drives.
Step 3: Administering Database Server Manager
Database Server Manager has additional tabs crucial for ensuring seamless operation.
- System Tab: Provides information about the installation location of Database Server Manager on your computer.
- Database Server Tab: Offers real-time status updates on the tool and displays the current connections.
How To Fix Errors Related To Database Server Manager?
You must restart Database Server Manager on your server computer if you cannot open it or come across an error. For that, you may follow the below-mentioned steps.
If you installed QuickBooks Desktop and Database Server Manager:
- Open QuickBooks Desktop on the host computer> File menu> Open or Restore Company.
- Then, click on the option Open a company file and then open it.
- Click on Next and checkmark Open file in multi-user mode.
- Select open and log in to your company file.
- After that, go to the File menu and select Close Company/Log off. It will close the company file located on the server.
- Afterward, open the Windows menu and type Database to open the QuickBooks Database Server Manager.
Note: Encountering the “QuickBooks Database Server Manager Network Diagnostics Failed” error? It usually occurs due to network or firewall issues. Resolve it quickly by following our complete guide
If you only installed Database Server Manager:
- At first, open the Start menu followed by the Control Panel.
- Then, select the Administrative Tools to choose the Services from the list.
- Right-click on the QuickBooksDBXX service and select Restart.
- If the Database Server Manager doesn’t restart, then you can try restarting your server computer. You may follow the same steps again.
Conclusion
We have tried our best to give all the information regarding QuickBooks Database Server Manager. If you need any further assistance, feel free to give us a call at our Asquare Cloud Hosting Helpline Number +1(855)-510-6487 Our experts are available round the clock to help you.
Frequently Asked Questions (FAQ’s)
It is the QuickBooksDB23 for QuickBooks Desktop 23.
You need the QB database server manager if you want access to your company file in the multi-user network. Without it, you won’t be able to open it.
You need to fulfill the following requirements for QBDBSM:
Windows: US version of Windows.
Processor: 2.4 GHz minimum
RAM: 4GB minimum, 8GB recommended for 1-5 users
Disk Space: 2.5GB of disk space
At first, click on the Windows icon.
Then, select the Control Panel.
After that, double-click on Administrative Tools followed by Services.
Now, you have to select the correct data manager as per your business need:
QuickBooksDB28(QuickBooks 2018)
QuickBooksDB27(QuickBooks 2017)
QuickBooksDB26(QuickBooks 2016)
Lastly, you can restart your system.

Oriana Zabell, a professional cloud engineer, has over three years of experience in desktop, online QuickBooks support and troubleshooting. She is currently working as a cloud hosting consultant with Asquare Cloud Hosting. She loves to read and write about the latest technologies such as cloud computing, AI, DaaS, small businesses, manufacturing. When not writing, she is either reading novels or is indulged in a debate with movie fanatics.