Last Updated on November 20, 2025
QuickBook Desktop stores years of critical information in the company file, and there’s no way you can risk losing that. Company file backup protects you from potential data loss that can result from accidental deletions, virus attacks, human error, power outages, or hardware failures. This is why you should regularly back up your QB file.
In this guide, let us show you how to backup QuickBooks Desktop company file in easy steps. Alright then, let us get started.
Section A: Backup QuickBooks Desktop Company File
Let us first show you what you can save when you backup the QuickBooks Desktop company file and what you can’t.
What Can You Backup in QuickBooks Desktop?
When you create a QuickBooks company file backup, you store almost everything in your current company file. This includes:
- Logos
- Accounting data
- Templates
- Letters
- Images
- Related files (Loan Manager, Cash Flow Projector, QuickBooks Statement Writer, and Business Planner)
What QuickBooks Desktop Doesn’t Backup
However, when we say almost everything, you should note QuickBooks Desktop backup doesn’t save everything. What it leaves out are payroll forms, but we will tell you how to save them later.
Also See: Learn How to Save QuickBooks Desktop Backup to Cloud
How to Create Company File Backup in QuickBooks Desktop Manually
There are two ways to backup company file in QuickBooks Desktop – manually and automatically. Firstly, we will tell you how to create a company file backup manually and then also guide you with scheduling automatic backups.
Here is how to backup the company file manually:
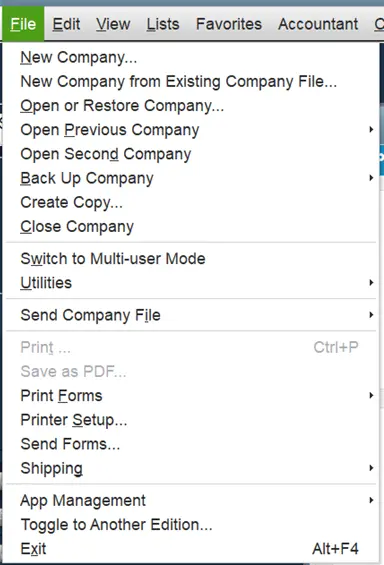
- Open QB and launch the File menu. Choose Switch to Single-user Mode. If you are already in the single-user mode, you won’t see this option.
Note: Don’t switch to multi-user mode; you should be in single-user mode to backup the company file.
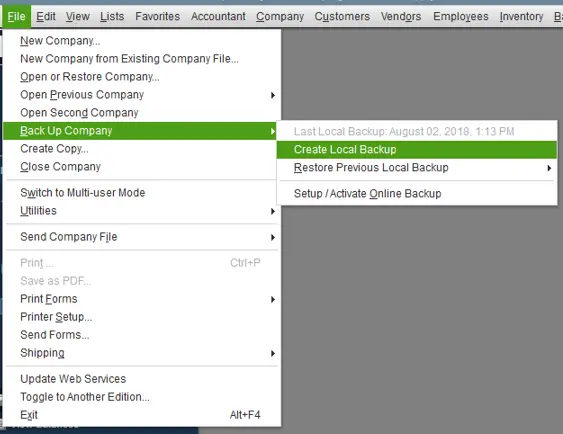
- Launch the File menu again, keep your cursor over the Back up Company option, and choose Create Local Backup.
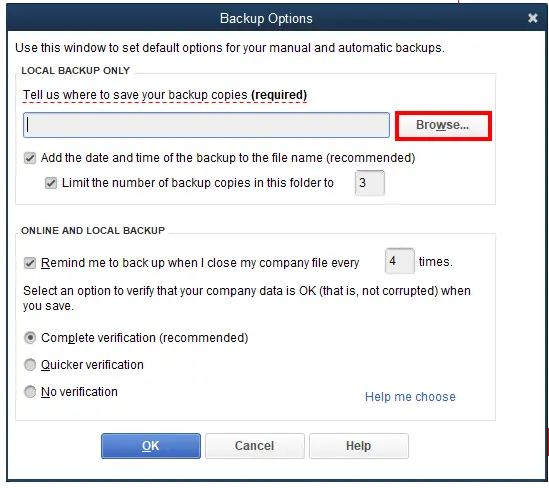
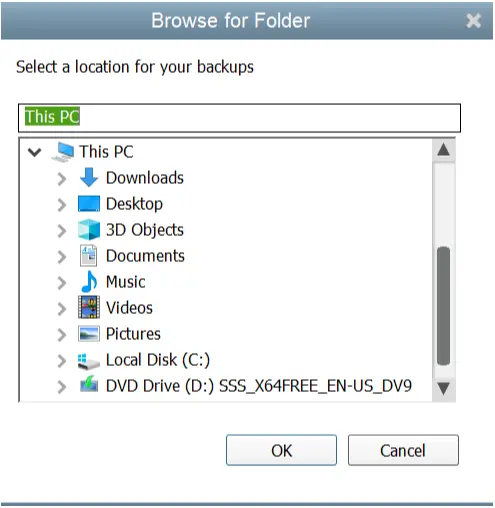
- Now, tap on Local Backup, followed by Next, and then Browse, and choose where you will be storing the backup.
- Optionally, you can choose how many backups you want to create.
Tip: If you wish to be reminded to save backups, you don’t need to mark them in the calendar. You can set backup reminders in the Online and Local Backup section or schedule automatic backups.
- QuickBooks will now run a check to ensure that the company file is free of data issues and is fit for backup.
- Once done, choose OK, followed by Save it Now and Next.
QuickBooks will store a company file backup in the selected location, and once it is done, it will let you know.
How to Schedule Automatic QuickBooks Backup
Automatic backups take the tedious job of saving a company file backup off your shoulders and ensure that you save company backups periodically. Thus, data protection is taken a notch up. Here is how you can schedule automatic backups in QuickBooks Desktop.
- Open QB and launch the File menu. Choose Switch to Single-user Mode. If you are already in the single-user mode, you won’t see this option.
Note: Don’t switch to multi-user mode; you should be in single-user mode to backup the company file.
- Launch the File menu again, keep your cursor over the Back up Company option, and choose Create Local Backup.
- Now, tap on Local Backup, followed by Next, and then Browse, and choose where you will be storing the backup.
- Optionally, you can choose how many backups you want to create.
Tip: If you wish to be reminded to save backups, you don’t need to mark them in the calendar. You can set backup reminders in the Online and Local Backup section or schedule automatic backups.
- QuickBooks will now run a check to ensure that the company file is free of data issues and is fit for backup.
- Once done, choose OK, followed by Save it now and schedule future backups and Next.
Note: If you don’t want to save a company backup right now and only want to schedule future backups, choose Only Schedule Future Backups.
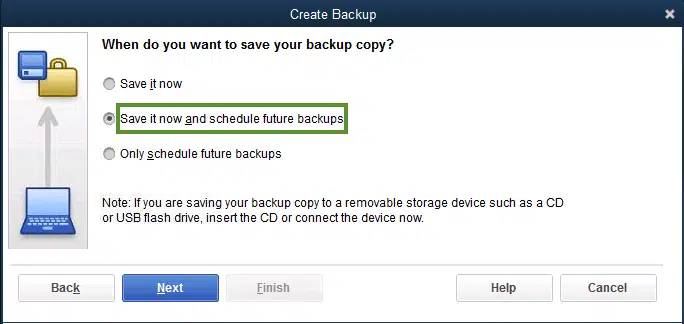
- Now, choose the checkbox to Save backup copy automatically when I close my company file and then choose the number of times between backups.
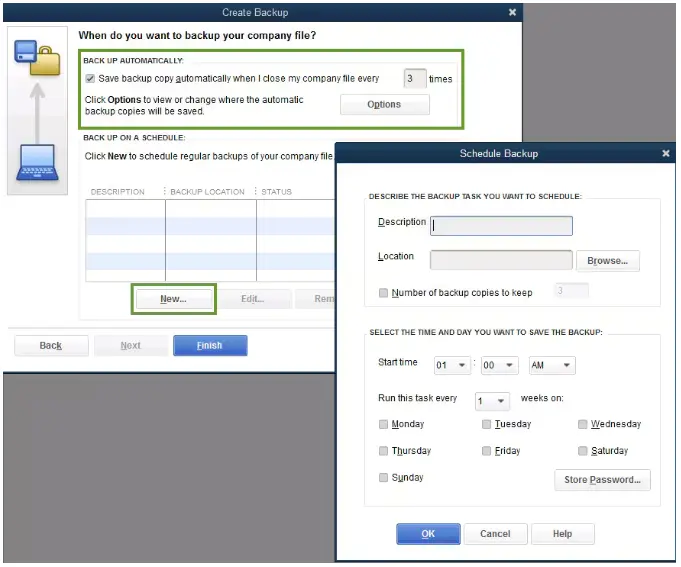
- To create a new schedule, tap on New and then enter the data in the fields to configure a backup schedule. The schedule can be a specific time of week or day.
- Tap on OK once you have created the schedule and enter the Windows login credentials to give QuickBooks permission to run backups.
- Finally, tap on Finish.
Now, QuickBooks Desktop will backup your company file as scheduled. If you choose the option to save the backup now and schedule it for the future as well, it will give you a confirmation message when it is done saving the backup now.
Here’s How to Backup Payroll Forms in QuickBooks Desktop
QuickBooks Desktop doesn’t backup the payroll tax forms along with the company file. However, let us show you how you can back up the tax forms in QB Desktop.
- Launch the Start menu and then open File Explorer.
- Now, go to where your company data is usually stored and look for a folder like this: [your company name] Tax Forms. This is the folder that stores all the payroll data.
- This is the folder that you need to save and share along with the company file to the accountant.
- Once your accountant restores the company file backup, copy and paste the tax forms into the same folder as the company file to open and review it.
- After the accountant has reviewed the tax forms, let your accountant know that they need to copy the Tax Forms folder and send it to you. Copy the tax forms and paste them into the same folder containing the company file to open it in QuickBooks Desktop.
Restore QuickBooks Company File Backup
When you come across recurring QuickBooks errors, or there was some mistake, you often might want to restore your company file backup. A dedicated guide on the same will help you learn how to restore QuickBooks company backup.
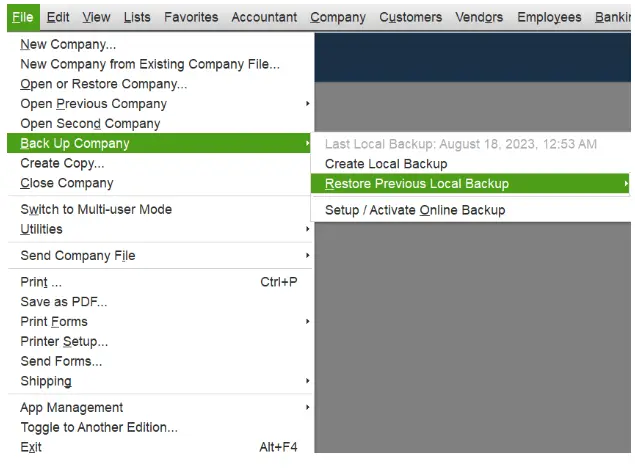
Always restore a recent backup because you will lose the progress you made since the backup was created.
How to Set Up Intuit Data Protect and Back up QuickBooks Files
Intuit Data Protect ensures that your crucial QuickBooks data stays safe. It allows you to back up data which can be a few files or even the whole computer. Learn how you can set up Intuit Data Protect and backup QuickBooks files.
Section B: Backup QuickBooks Online Advanced Company
In this section, we will show you how to back up QuickBooks Online Advanced company data.
Creating a company file backup saves a copy of the chart of accounts. Moreover, if you ever make unwanted changes to settings, vendors, customers, and other data, you can undo it by restoring the backup.
However, before you proceed to backup your QuickBooks Online data, let us show you what you can and can’t back up.
What You Can Backup in QuickBooks Online Advanced
Here’s what you can backup in QuickBooks Online Advanced company.
| List data | Transaction data | Other data |
| Tax agencies | Purchases and purchase orders | Exchange rates |
| Accounts | Refund receipts | Preferences |
| Budgets | Time activities | Inventory shrinkage and adjustments back up as journal entries |
| Classes | Payments | Attachments |
| Items | Transfers | Company Info |
| Payment methods | Invoices | Entitlements |
| Tax codes and tax rates | Deposits | Intuit Payroll info backs up as journal entries |
| Terms | Bills and bill payments | |
| Vendors (except the Tax fields) | Credit memos | |
| Currencies | Vendor credits | |
| Customers | Journal entries | |
| Departments | Estimates | |
| Employees (except their SSN) | Sales | |
| Receipts |
Now, let’s move to what you can’t back up.
What You Can’t Backup in QuickBooks Online Advanced
Here’s what you can’t save in QuickBooks Online Advanced company file backup.
- Bank feeds and their links to transactions and bank rules
- Reconciliation reports
- Customer types and price rules
- Item-based billable expenses with markup
- Custom reports
- Custom form templates
- Audit log entries
- Account-based billable expenses
- QuickBooks Online Payments info
- Delayed credits and charges (however, linked invoices will be backed up)
- Recurring transactions
What Data You Can’t Restore When You Restore Backup
When you restore QuickBooks Online Advanced company backup, there are some things you can’t restore, like inventory history and adjustments, budgets, and data backed up using the personal cloud archive feature.
- To save budgets and use them later, you need to export them as a CSV file.
- The backup doesn’t include the inventory history and inventory adjustments.
- Tax rates using expense accounts are restored in the liability accounts by the Online Backup and Restore app.
- The data backed up using the personal cloud archive feature is saved in .cab format on a cloud account like Google Drive, for example. One cannot restore data from cloud storage in QuickBooks Online.
Enable the Online Backup and Restore App for Data
QuickBooks data can be automatically backed up with the help of the Online Backup and Restore app – all you have to do is enable it. Once done, it will start tracking all the changes made to company data.
Here is how you can turn on Online Backup and Restore App to automatically backup QBO data:
- Login to QBO company and go to Settings.
- Now, choose the option to Back up company. If prompted to sign in with an Intuit account to proceed, please do so.
- Locate the company for which you want to enable automatic backup.
Note: If you can’t see the company, choose Add company.
- Tap on the three-dot menu from the Action column, and choose Turn on Backup.
This will turn on automatic QuickBooks Online company backup for you.
Disable Automatic Backup
When you decide you don’t need to backup QBO Online data anymore, here is how you can turn it off:
- Login to QBO company and go to Settings.
- Now, choose the option to Back up company. If prompted to sign in with an Intuit account to proceed, please do so.
- Locate the company for which you want to disable automatic backup.
- Tap on the three-dot menu from the Action column, and choose to Turn off Backup.
- Finally, choose Agree, followed by Turn off backup.
This will turn off automatic QuickBooks Online company backup for you.
How to Create Company File Backup in QuickBooks Online Manually
When you need to, you can also create a one-time manual backup in QuickBooks Online Advanced.
- To do so, log in to QBO company and go to Settings.
- Now, choose the option to Back up company. If you are asked to sign in with an Intuit account to proceed, please do so.
- Tap on Add Company followed by the Search for a company or firm dropdown menu.
- Now, choose the company you wish to create a backup of and then tap on Next.
Note: If you wish to back up multiple companies, you will need to repeat these steps.
- Locate the company you wish to back up, click on the three-dot menu in the Action column, and choose Run backup.
How to Save QuickBooks Backup to Google Drive
You can also link your Google Drive and save QuickBooks Online Advanced backup to it. Let us guide you on how to do so step by step.
Important Note: Setting up Google Drive to back up QBO data might take more than ten miniatures, and the data saved using a personal cloud archive won’t be able to be restored via the Online Backup and Restore utility.
- Log in to QBO company and tap on the Settings or Gear icon.
- Choose a backup company. QuickBooks might ask you to enter your Intuit account to proceed.
- Tap on the User menu and choose where to save your backup, followed by Link Google Drive.
- Follow the on-screen instructions to configure QB to create backups.
How to Restore QuickBooks Online Advanced Company Backup
When you wish to restore backup, it might usually take less time, but it can often take up to an hour – depending on how much data the company file has. Therefore, you will need to be patient with the restoration process.
Here is how you can restore QBO Advanced backup company:
- Login to QBO Advanced and go to Settings.
- Now, choose the option to Back up company. If you are asked to sign in with an Intuit account to proceed, please do so.
- Locate the company for which you want to restore the backup.
- Tap on the three-dot menu from the Action column and choose Restore.
- Choose the date you want to restore from the Date field and the time you want to restore from the Time field.
- Tap on Next and follow the instructions you see. Finally, tap on Start Restore.
Wait while QuickBooks restores your company data.
Conclusion
In this blog, we learned how to back up QuickBooks Desktop and online company data. Moreover, we also saw how you can schedule automatic backups and even set up Intuit Data Protect.
However, if you face an issue while creating or restoring QuickBooks, you can always speak with an expert. Dial +1(855)-510-6487 and connect with a QB expert now!
Frequently Asked Questions
How can I backup QuickBooks to an external hard drive?
It is not difficult to backup your QuickBooks Desktop data to an external drive like a USB flash drive. When you are creating a backup, you can choose where you want to save the company file backup, and you can save that external drive. Moreover, you can copy and paste the company backup created on your local disk to the flash drive.
How do I export company data from QuickBooks?
You can export company data from QuickBooks Online using the Export option in the settings menu. If you are using QuickBooks Desktop, go to the Reports menu instead, tap on the Transaction History, and then export it to a CSV file.
How to create a QuickBooks backup?
If you need to create a QuickBooks backup, open the application and then the File menu. If you are in multi-user mode, choose to Switch to Single-user Mode. Tap on the File menu again, hover the cursor over the Back up Company, and choose Create Local Backup.

Kate is a certified public accountant (CPA) with expertise in various accounting software. She is technically inclined and finds passion in helping businesses and self-employed people carry out bookkeeping, payroll, and taxation without worrying about errors. Every once in a while, Kate loves to travel to far-off places and relax in the lap of nature.