Last Updated on November 20, 2025
You may be installing a newer QuickBooks version or simply updating your current one and run into QuickBooks Error 1310. This might occur due to a problem with the Microsoft Windows installer or damaged files or components.
Here are some error messages, one of which you might see on the screen:
“Error writing to file C:\Program Files\Intuit\QuickBooks 20xx\BusinessObjectProvider.dll”

or

“Error 1310: Error writing to file: C:Config.Msi..."
In this guide, we will take you through five concrete solutions to resolve the error 1310 in QuickBooks Desktop. Therefore, continue reading.
Possible Reasons for QuickBooks Install Error 1310
Here are some reasons you encounter error 1310 when installing or updating QB software.
- There is damage or corruption in the QuickBooks installation files and components.
- The Microsoft Windows installer is unregistered or lacks the permission required.
- The installation source is damaged
- There is not sufficient storage on the hard disk.
- Windows registries are invalid or damaged.
- The user is not permitted to access the folder where you are installing the software or update.
This list is not exhaustive and sometimes, error 1310 writing to file QuickBooks might arise because of other reasons.
Solutions for QuickBooks Error 1310: Writing to File
Let us see how to resolve QuickBooks install error 1310. Follow the instructions below, and if you face an issue, do not think twice about contacting us.
1. Update Windows
QuickBooks and other programs need specific components to work. The Windows update ensures that you have the latest components and reduces the chances of errors.
Therefore, the first update Windows to the latest release. Once you are done, try installing QuickBooks Desktop or its update again.
2. Sign into Windows as an Administrator
If you find an error while updating or upgrading QuickBooks Desktop, you first need to ensure that you are signed into Windows as an admin.
If not, sign out of Windows and sign in as administrator.
3. Run QuickBooks Install Diagnostic Tool
To begin with, you will need to download and install QuickBooks Tool Hub. Once done, open the Tool Hub and follow the instructions below:
- Go to the Installation Issues tab.
- Click on QuickBooks Install Diagnostic Tool.
- Allow the tool to repair the damaged components and installation files.
Once done, restart the computer and run QuickBooks Desktop. Check if the error 1310 while writing to the file has been resolved.
4. Toggle UAC (User Account Control) Settings in Windows
Turning UAC on or off might help resolve several issues in QuickBooks, such as error code 1310.
- Press the Windows + R keys on your keyboard to open the Run command.
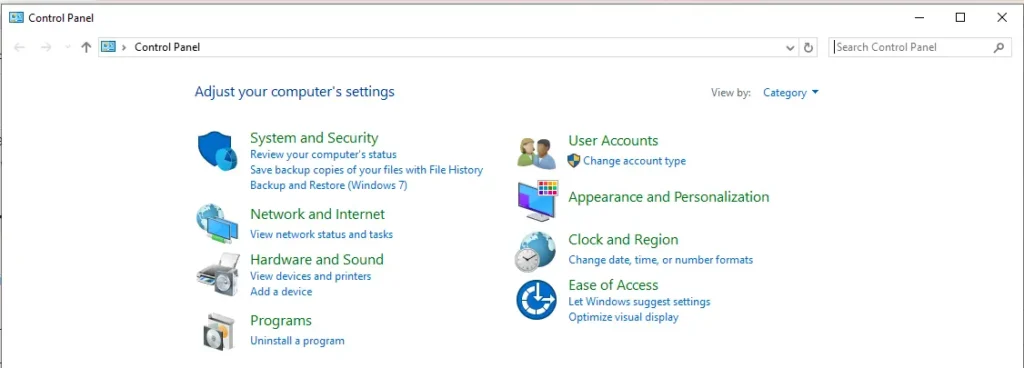
- Enter Control Panel and choose OK.

- Tap on User Accounts followed by User Accounts (Classic View).
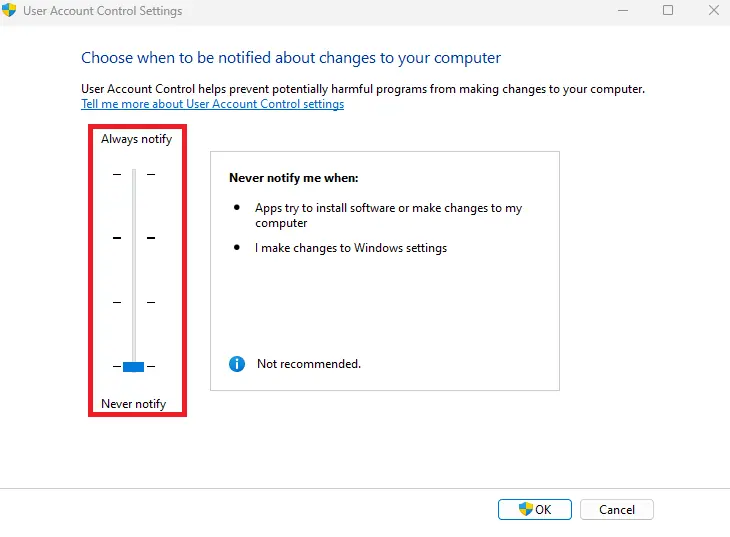
- Now, tap on Change user account control settings. (Note: If prompted by UAC, choose Yes).

- Move the slider to turn the UAC on or off as required.
- You can choose Never Notify and click OK. This will turn UAC OFF.
- You can select Always Notify and click OK. This will turn UAC ON
- ( Note: If prompted by UAC, choose Yes)
- Restart the PC.
Important: Turning the UAC on and off might help resolve QB errors. However, do not forget to turn it back on for your computer’s security.
Related Post: How to Fix QuickBooks Error 1311: Source File Not Found
5. Re-register the Microsoft Windows installer
Let us re-register the Microsoft Windows installer to resolve QuickBooks error 1310.
Choose the Windows Start menu.
Enter msiexec /unreg in the search field. Hit Enter.
Choose the Windows Start menu.
Enter msiexec /regserver in the search field. Hit Enter.
Now, install QB Desktop.
6. Run the Command to Assign Full Admin Access to the Installer Manually
You can manually assign full admin access to the installer by running the command prompt.
However, Consider This Before Following the Step Below (Important)
- The steps below can get complicated if you don’t have basic technical proficiency. If you are not confident, we suggest you consult an IT person or System Administrator.
- The steps given below will use “Config.Msi” only for illustration. But, instead of that, you will need to use the name of the folder mentioned in the error message received.
Once you are ready, follow the steps below:
- Click on the Windows Start menu, and go to All Programs.
- Scroll to Command Prompt and right-click on it.
- Choose Run as Administrator.
- Now, when the Command Prompt window opens, type this: icacls “C:\Config.Msi” /T /C /grant administrators:F
Important Note: Instead of Config.Msi, use the folder mentioned in the error message.
- Press Enter.
- Close the command prompt.
- Finally, install QuickBooks Desktop.
However, if you still get QuickBooks error 1310, proceed to the next step.
7. Repair Windows Components Manually
QuickBooks Install Diagnostic Tool is meant to repair Microsoft components like Microsoft .NET Framework and Microsoft MSXML. However, if it doesn’t work, you must fix them manually.
A.) Repair .NET Framework
- Download the Microsoft repair tool to repair the .NET Framework.
- After installing the tool, launch it to repair the .NET Framework on your computer.
- Once done, restart your computer and proceed to the next step.
B.) Register the MSXML DLL files
For the 64-bit operating system, here is how you can repair MSXML:
- Choose the Start menu and type cmd.
- Right-click cmd and tap on Run as Administrator.
- In the C: prompt, type in cd\windows\syswow64.
- Enter regsvr32 MSXML6.dll.
Finally, restart your computer and install QB Desktop or its update.
For the 32-bit operating system, here is how you can repair MSXML:
- Press Windows + R. This will launch the Run window.
- Enter cmd.
- Enter regsvr32 MSXML6.dll.
Finally, restart your computer and install QB Desktop or its update.
Read More: Download QuickBooks Component Repair Tool/ Fix Quickbooks Missing PDF Component.
8. Install QuickBooks or its Update in Selective Startup
Sometimes, another application or service may interfere with QuickBooks installation. To prevent that from happening, boot your system in Selective Startup mode.
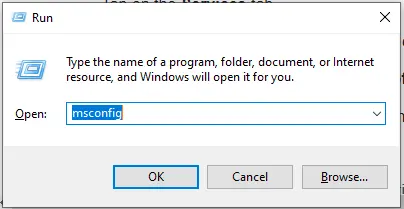
- Launch the Run window by pressing the Windows + R keys together.
- Type in msconfig and click on OK.

- Go to the General tab.
- Choose Selective startup and Load system services.
- Tap on the Services tab.
- Click on Hide all Microsoft Services and choose Disable All.
- Unmark the checkbox to Hide all Microsoft services.
- Tap on Windows Installer among the many services you see.
- Click on OK.
- Choose Restart on the System Configuration window.
Now, try installing the QuickBooks Desktop’s update or newer version.
Summing It Up
This was all on how to resolve QuickBooks Error 1310 while updating QuickBooks Desktop or installing a newer version. However, if you continue to see the QuickBooks 2017 update error 1310, reach out to a ProAdvisor. They are experts with years of proficiency in resolving QuickBooks issues.
Frequently Asked Questions
How do you fix the ‘QuickBooks error 1310 writing to the file’?
To resolve QuickBooks install error 1310, download and install QB Tool Hub and run the QuickBooks Install Diagnostic Tool. If that doesn’t fix the issue, toggle the UAC settings.
What is error 1310 on Turbotax?
Error 1310: Error writing to file in Turbotax means a problem accessing the directory or you are trying to overwrite a program already installed. Perhaps the Windows installer doesn’t have access to write to the directory in context.

Kate is a certified public accountant (CPA) with expertise in various accounting software. She is technically inclined and finds passion in helping businesses and self-employed people carry out bookkeeping, payroll, and taxation without worrying about errors. Every once in a while, Kate loves to travel to far-off places and relax in the lap of nature.