Last Updated on July 8, 2024
QuickBooks is one of the leading accounting software trusted by millions of business owners. It helps to manage business processes almost effortlessly. Undoubtedly, it’s a highly innovative software, but like any other software, this one also has multiple errors that are common. QuickBooks Error 6144-82 is one of the most common issues that QB users come across.
What is QuickBooks Error 6144 82?
QuickBooks Error Code 6144 82 is an unrecoverable error that occurs due to an issue with the company file. A damaged or corrupted file, incorrect system settings, or a problem with the software installation typically causes it.
Mostly, It takes place whenever you try opening a company file that is used by a different application. Another reason is incorrectly configured system settings or if there are any inconsistencies in the Windows registry. Whenever it takes place, an error message displays:
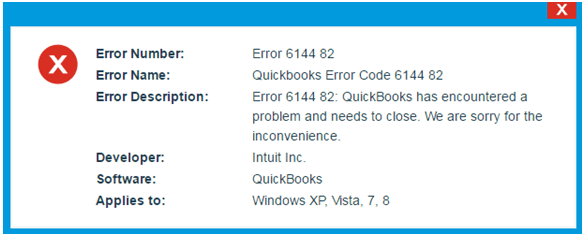
“Error 6144 82: QuickBooks has encountered a problem and needs to close. We are sorry for the inconvenience.”
To help you eliminate the issue of QuickBooks Error 6144 82, we have discussed the possible causes followed by its troubleshooting methods in this blog.
What Triggers QuickBooks Error Code 6144 82?
Before you begin eliminating the QuickBooks error code 6144 82, it’s essential to know the possible causes. To make it easy for you, we have listed a few of them below:
- The QuickBooks 2011 error 6144 82 takes place due to multiple instances of QuickBooks on a single system.
- A problem occurred, and thus, Windows has been shut down to prevent damage.
- You might end up with the QuickBooks error 6144 82 if there is any damage in the QuickBooks.TLG or.ND files.
- You might not have set up user permission for sharing the company file.
- The folder where you have stored your company file is damaged.
- The name of your company file is too big.
- A firewall blocks the connection that has been developed between two computers.
- Another reason is that you might have inappropriately or incompletely installed QuickBooks.
- The Windows registry has corrupted due to the installation or uninstallation of any program.
- Your computer is infected with malware or virus attacks. It might have removed some of the imperative QuickBooks or Windows files.
- An essential QuickBooks or Windows files might have been deleted due to some other computer program.
- There might be some damage to the hard disk or RAM of your computer, and that leads to data loss.
How To Identify QuickBooks Enterprise Error 6144 82?
QB Error 6144 82 is an error that usually occurs when QuickBooks is unable to open or access a company file. This error can occur due to a variety of reasons, such as a damaged or corrupt file, an incorrect file path, or an incorrect Windows user account. The signs of QuickBooks error 6144 82 are as follows:
- An error message flashes on your computer screen whenever the issue takes place.
- The active program window crashes when you come across error 6144 on QuickBooks desktop.
- Windows starts to run sluggishly.
- Your system might freeze at regular intervals due to the occurrence of the issue.
- Windows has been shut down to prevent damage to the system.
- The PC frequently crashes with QuickBooks Enterprise Error code 6144 82 while running the same program.
6 Points You Must Remember Before Resolving QuickBooks Error 6144 -82
You must keep in mind several facts before you begin resolving the QuickBooks error 6144 82. Below, we have listed most of them:
- We suggest you perform all the steps on the host (server) system.
- Ensure that you perform a full malware or virus scan on your computer.
- Use disk cleanup to clean the junk off your system.
- Make sure that you have properly shut down all the systems, including the host & others.
- You must keep the system device drivers updated.
- Don’t forget to turn off the system security software.
How To Troubleshoot QuickBooks Error 6144 82?
Here, we have listed all the effective methods that will help you get rid of QuickBooks error code 6144 82 at the earliest:
1 Method: Repair Your Windows Registry
If your Windows registry has got corrupted due to the changes you have made in QuickBooks recently, you can follow the below steps to repair it.
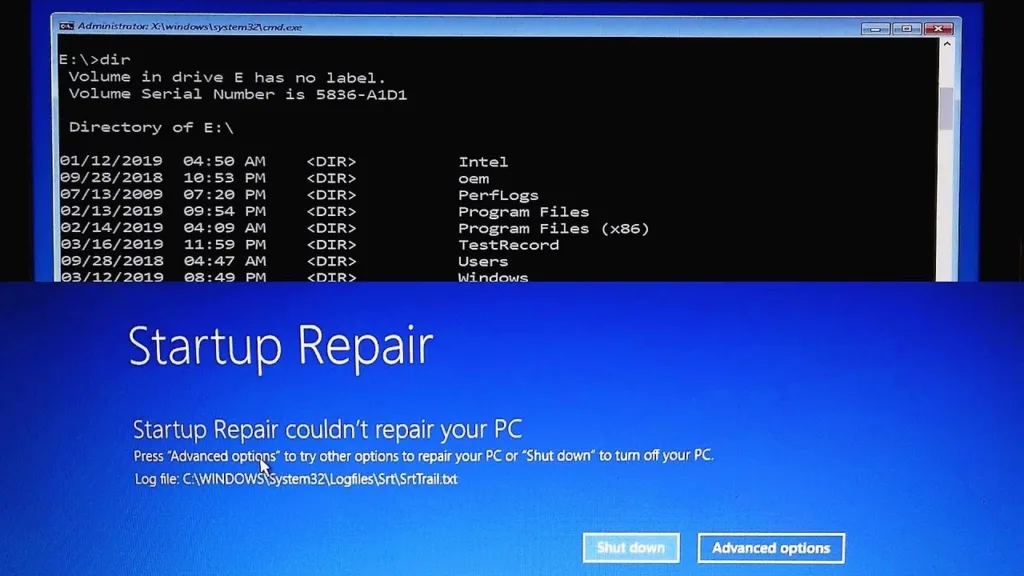
- Firstly, click on the Start icon.
- Enter Command in the search box, but don’t press the Enter key.
- Then, simultaneously hold CTRL + Shift keys on your keyboard and then press the Enter key.
- It will open a permission dialog box on your screen; click on Yes.
- After that, a black box with a blinking cursor will open up.
- There you have to type “Regedit” and press the Enter key.
- In the Registry Editor, select Error 6144 82.
- Now, navigate to the File menu and click on Export.
- Further, select the folder where you want to save the QuickBooks backup key.
- Name that folder, and click on the option ‘Selected Branch’ from the ‘Export Range Box‘.
- Save all the changes that you have made with the .reg file extension.
- Lastly, you will have the QuickBooks-related registry entry backup.
Hopefully, this method helps in eliminating QuickBooks Error 6144 82. If not, then jump to the next method.
2 Method: Rename The Files .TLG and .ND Extensions
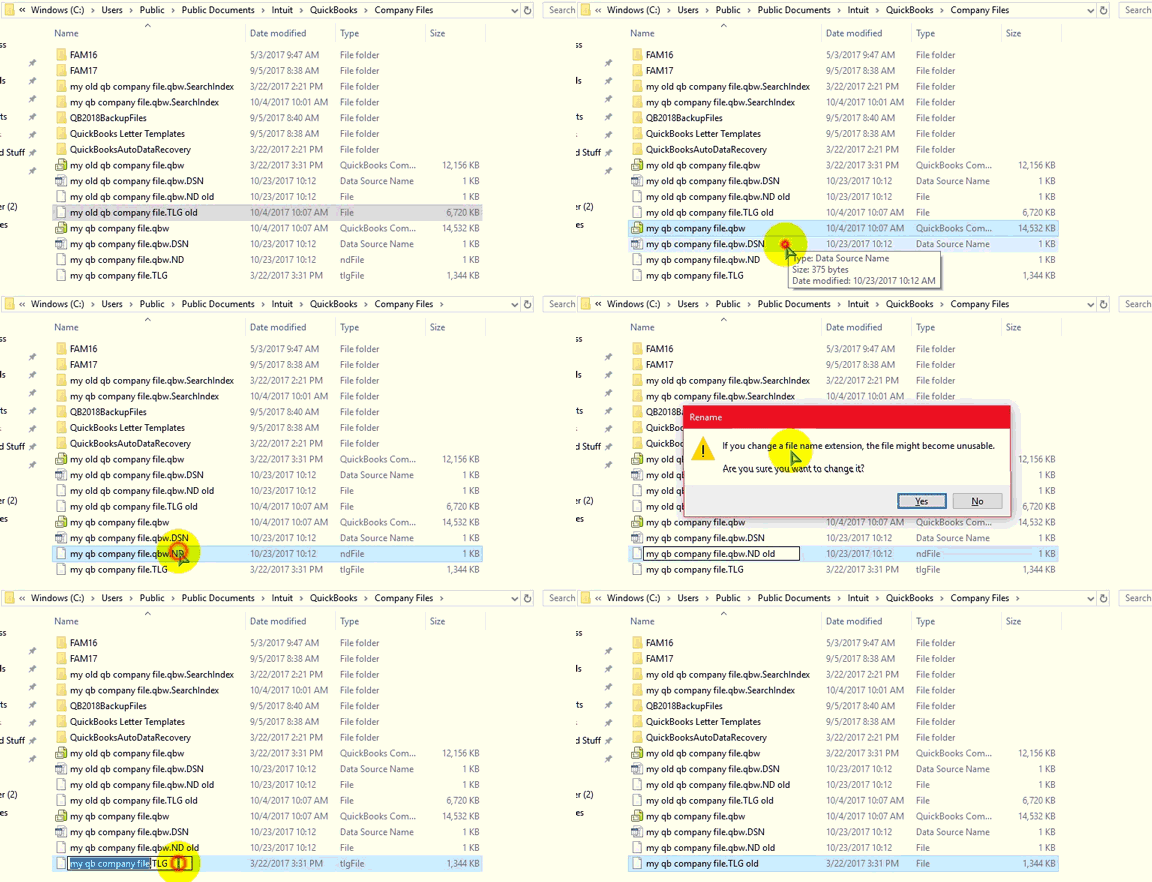
The .TLG and .ND file plays a vital role when it comes to QuickBooks. If you come across any issue with these two files, then you have to rename the files by adding .old at the end. Further, you have to follow the below steps to resolve QuickBooks2014 error code 6144 82:
- To begin, you have to install the QuickBooks Desktop application.
- For the file information, press the ‘F2’ key from the keyboard.
- Then, you will have the location details of the company files. Accordingly, choose the folder that contains all the company file.
- After that, choose all files that end with the extension .ND and .TLG.
- Right-click on either of the file (.ND or .TLG), select the Rename option, and change it by adding.OLD extension.
- Repeat this step for all the .ND and .TLG files.
- Once done, you can try logging into the QuickBooks company file.
3 Method: Set User Permissions
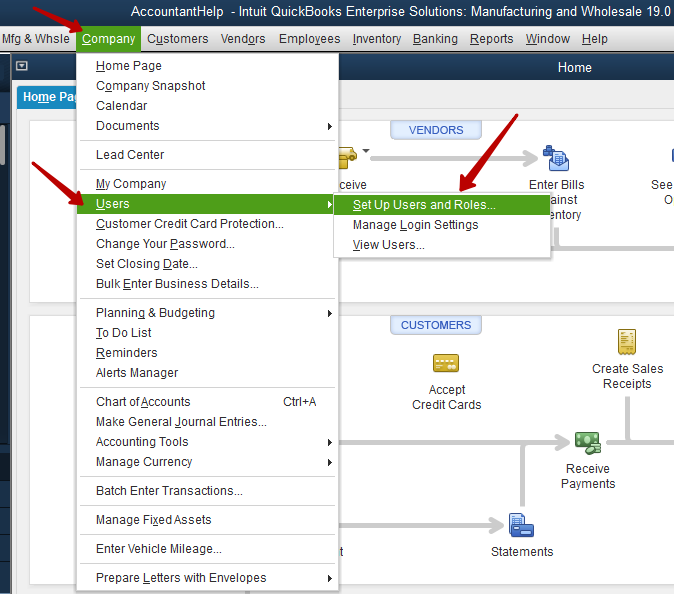
- Initially, open QuickBooks and go to the Company tab, and search for the users.
- Then, select the option Set Up Users and Roles.
- Enter the password for accessing the information.
- After that, you have to choose the username from the user list.
- Based on the specification, you can modify your role.
4 Method: Windows Error Repair Tool to Fix Quickbooks Error 6144 82
The tool helps you fix issues like registry permissions, file permissions, system files, Windows Firewall, Internet Explorer, host files, Winsock & DNS cache, proxy settings, and Windows updates issues. Hence, it might turn out to be an effective method that can help you get rid of the QuickBooks error 6144 82 in no time.
- First of all, download the Windows application tool.
- Then, you need to install and run the tool.
- Once the installation process completes, click on ‘Scan Now’ so that you can begin the scanning process.
- If you encounter any error while scanning, click on the ‘Repair’ option to fix it.
5 Method: Start the QuickBooks Monitor Service Option
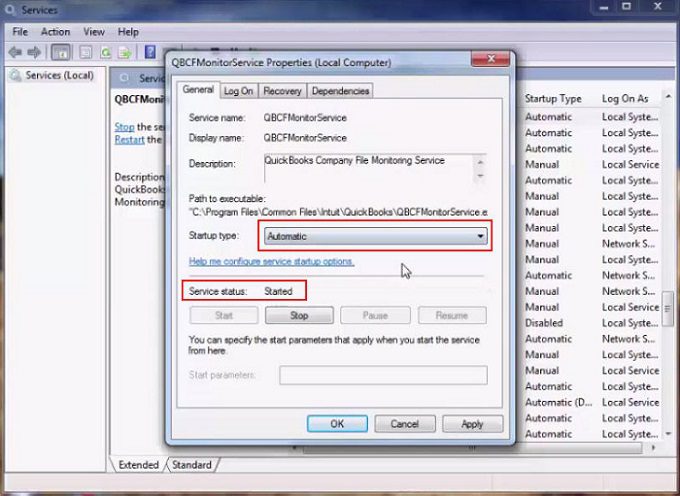
- In the first place, go to the Start icon and click on the Services tab.
- There, in the “Services” list, click on the “QBCFMonitoringservice” icon.
- After that, you need to verify that the services are started and are set up in ‘Automatic Mode.
- If not, then verify the “Radio” button and click on Apply, followed by OK.
Also Read: How to fix QBCFMonitorService not running issue?
6 Method: Alter the Account Type
If none of the above methods have helped you fix QuickBooks error 6144 82, then you must try this one.
- Firstly, click on the “Start” icon.
- Then, navigate to the “Control Panel” and then click on the “User Account” icon.
- After that, click on the “Add/Remove User Account” tab.
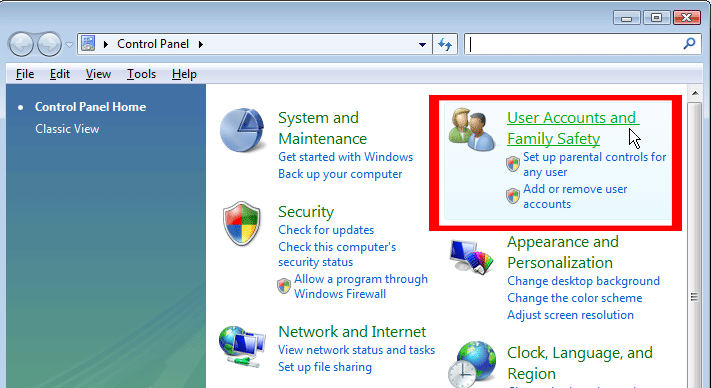
- Further, click on the “QBDserviceuser23” icon and modify the account type depending on your requirement by verifying the “Administrator User” icon.
7 Method: Create the Folders in C Drive
- Initially, you have to create a new folder with the name of QB.
- Then, you have to choose the “Read/Write” options for all the created folders.
- Further, create the following folders on Drive C:
- Administrator
- Add System
- QBDataServiceuser23
- Add User
- Everyone
- For all the folders, permit Read/Write permission.
- Lastly, click on the Share icon to share the entire folders on all the systems.
8 Method: Copy the Company file into New Folder “QB.”
At times, you might have seen that the files might corrupt due to an issue in the file size. Thus, it restricts you from opening it in QuickBooks.
- In the system ‘C Drive’, go to Users> Public> Public Documents> Intuit> QuickBooks> Company Files. Here, the default location of your company files will be visible.
- Further, copy & paste the QB file into the newly created folder named “QB.”
- Ensure that you do not cut–paste the QB file in the folder as it may lead to damage.
9 Method: Setup the Inbound & Outbound Firewall Rules
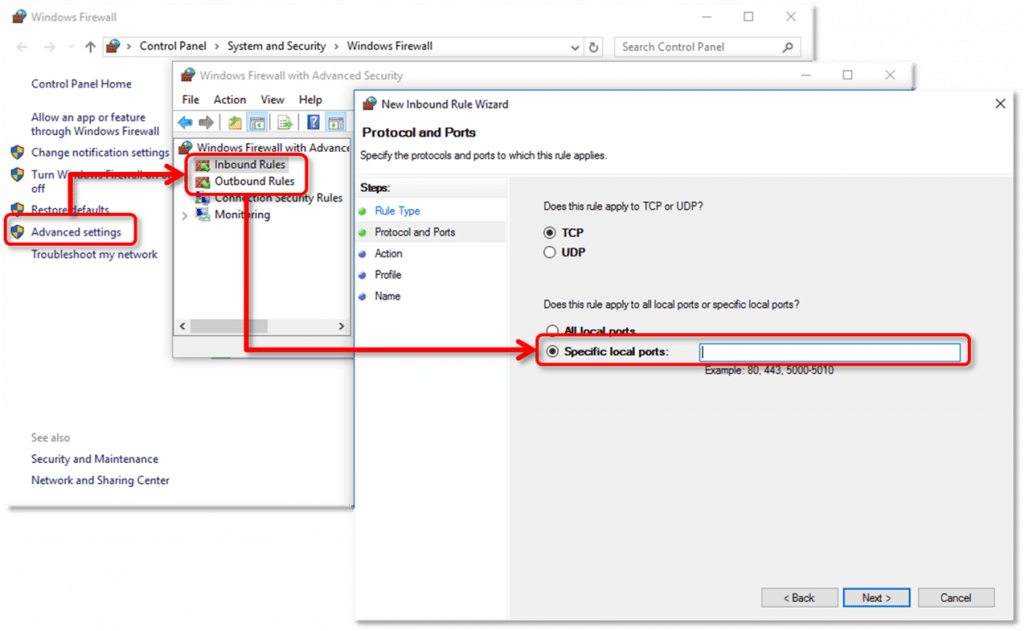
- Click on the Windows Firewall option from the Firewall tab.
- In the “Advanced Settings” tab, navigate to the Inbound Rules> New Rule> Port icon.
- Then, click on Next.
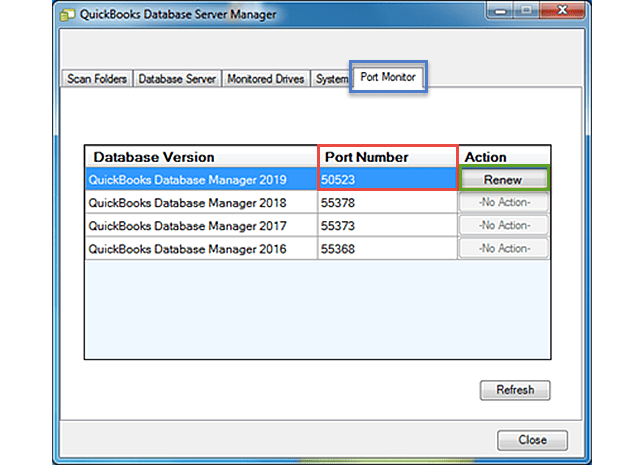
Below we have listed the port numbers for different versions:
10 Method: Run QuickBooks Database Server Manager
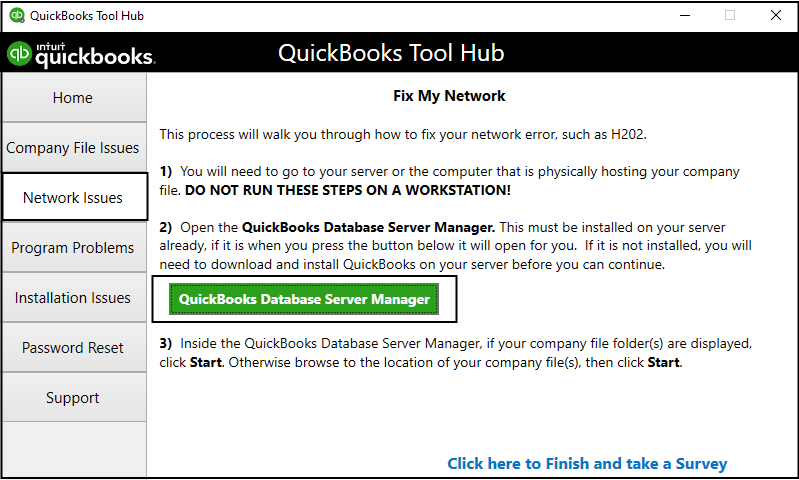
- Firstly, go to the Programs list and click on the “QuickBooks” icon.
- Choose QuickBooks Database Server Manager from the drop-down list.
- Then, click on the “Add Folder” tab.
- In the system C Drive, you have to search & add the QuickBooks folder. Once done, minimize this tab.
- In the end, click on the “Scan Now” icon. It will begin the scanning process of the QuickBooks company file.
11 Method: Proceed To Restore the QuickBooks Company Files
- Open/access QuickBooks in multi-user mode on the server computer.
- Then, select the “Open & Restore Company File” option.
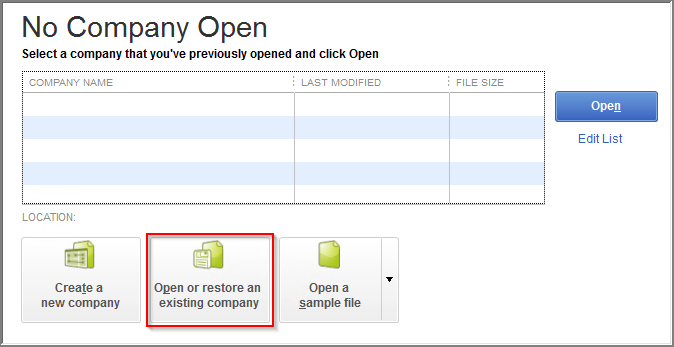
- Choose the QB Company file “Get Back to Business.” After that, choose to open/access the files in the Multi-user mode.
- Make sure that the hosting is enabled, and then, go to the File menu.
- After that, click on the Utility option.
- Afterward, click on the “Stop Hosting multi-user access” option. It will help you access the QB Company files on the server computer.
12 Method: Starts Renaming the company file
There are certain restrictions posed on naming your company file. Like it should be under 65 characters, there shouldn’t be any special characters, and so on. If you have the issue of 6144 82 in QB, it might be because of the wrong company file name. And then this turns out to be an apt solution. Keep following the solution steps:
- Open windows explorer and then head to the “Quickbooks company file folder.” You can also simply browse it on the search bar.
- Next, you will have to spot and then right-click on the company file having .QBW extension.
- From the list of options that open in front of you, just select “rename.”
- You will then have to make the required changes, which means you need just to follow the company file parameters.
- And then try to access the company files; you might not find the error anymore on your desktop.
13 Method: Moving the company files to the original location
If you have recently copied your company files to a different location. Or you have recently moved the folder- this issue can be a reason for that as well. In such cases, you will have to follow a certain set of steps to fix it. Here you go!
- First of you will have to press the “F2 Key” on your keyboard, which will open the product information window on the screen.
- Then you need to take note of the location of your company file folder.
Note: The location can be found under the “File Information” section on the screen. Just search for it quickly!
- Next, head to the “company file folder” location and then just recheck whether your company files are saved there or not.
- If you are unable to locate the folder or files in the original location, then check whether the file is saved at some other place.
- By any chance, if you are not able to find the company file in that location, which happens to be the original space, then you will have to search for the field.
- What you can do is simply go to the window search bar that will be on the top right. Just punch in “.QBW” there and hit the enter button.
- As soon as you do this, your window will display all the files having the “.QBW” extension.
- And then, when you are able to find the folder and files, just copy and paste them to the company file folder’s original location.
- Once you are done with this, just try to open the company file and check whether you are still getting the error message or not.
14 Method: Use your anti-virus to check for any malware
If you think a virus or malware is attacking your desktop, we suggest you should get it scanned. Even if you do not feel the urge to do it, we suggest you must get this.
All you need to do is open your anti-virus and then run a complete PC scan so that if there is any critical or high threat; it can be fixed. Don’t forget that malicious files or viruses are counted as one of the main reasons causing the QB error 6144 82.
Contact QB Expert to Get Rid of QuickBooks Desktop Error 6144 82 Instantly.
We hope the resolution methods mentioned in this blog have helped you resolve the QuickBooks Error 6144-82 without any hassle. If you get stuck while following any of these, you can get in touch with our experts at Asquare Cloud Hosting Helpline Number Our professionals will assist you with the handiest solutions.
FAQ’s
Ans: Follow the given steps to successfully create a QB backup file.
1. Go to the File menu, then select Create Copy.
2. Select Backup Copy and then Local Backup.
3. Enter a file name for the backup file, select a location to save the file, and then click Save.
4. Enter a password to protect the backup file (optional).
5. Select the Advanced tab and then select Verify File Integrity.
6. Click OK.
Ans: To set up sync permission per user in QuickBooks, you will need to set up user roles and access.
1. Log into QuickBooks as the Admin user.
2. Go to the Gear icon in the upper right corner and select Manage Users.
3. Select the user you wish to set up permission for and click Edit.
4. In the Edit User page, scroll down to the Permissions tab.
5. Select the appropriate Role for the user.
6. Select the specific areas to give the user access to.
7. Scroll down to the Sync area and select the appropriate permissions.
8. Click Save and then Done.
The user should now have the correct sync permission in QuickBooks.
Ans. Setting up users and roles in QuickBooks Desktop is a very straightforward process. Here are the steps to follow:
1. Open QuickBooks Desktop and select the “Company” menu.
2. Click on “Set Up Users and Role”.
3. Enter the information for the new user such as name, email, and password.
4. Select the roles and permissions for the new user from the drop-down menu.
5. Click “Save” to save the new user and their permissions.
6. Repeat steps 3-5 for each additional user you want to add.
7. Once you have completed setting up all the users, click “Done”.

Oriana Zabell, a professional cloud engineer, has over three years of experience in desktop, online QuickBooks support and troubleshooting. She is currently working as a cloud hosting consultant with Asquare Cloud Hosting. She loves to read and write about the latest technologies such as cloud computing, AI, DaaS, small businesses, manufacturing. When not writing, she is either reading novels or is indulged in a debate with movie fanatics.