Last Updated on August 28, 2024
QuickBooks allows users to print reports, files, forms, etc., or export them to Excel. This proves useful for preserving important company data or modifying them using Excel before printing them. However, sometimes, users find QuickBooks export to Excel not working, which renders them unable to export their data files to Excel format.
Some users might see that the export option for Excel is greyed out or that Excel cannot open the QuickBooks data file etc. In this blog, we will explore the issues users face while exporting QuickBooks data to Excel and learn how to fix them. Therefore, continue reading.

Reasons Why QuickBooks Won’t Export To Excel
The problem remains the same for all users – they are unable to export the required data, although they might face the problem in a different form, such as

- QuickBooks crashes or freezes when exporting to Excel
- The export option for Excel is grayed out, or QB could not open the data files
QuickBooks won’t export to Excel files if there are issues with the computer or QB application. Here is the list of common reasons for exporting from QuickBooks to Excel problems.
- Your system is not compatible with the QuickBooks application.
- You are running an outdated QuickBooks version.
- MS Office or Excel application is corrupted.
- Window Users Account Control (UAC) settings are incorrect.
- The issue might stem from old or damaged cache files in your web browser.
Solutions When You Find QuickBooks Export to Excel Not Working
When you find QuickBooks Export to Excel not working you need to check your system and application and make the required changes to it. You need to change UAC (user account control) settings and update or reinstall QB Desktop to fix this. Let’s look at the step-by-step guide for the same:
1. Update QuickBooks Desktop
An outdated version of the QuickBooks desktop application is one big reason why is QuickBooks export to Excel not working. Simply just updating it and then running the reports can help you fix it.
- Close your company file and then run the QuickBooks Application as administrator by following the steps below.
- Tap on the Windows Start button and search for QuickBooks.
- Right on the QB icon and select Run As Administrator.
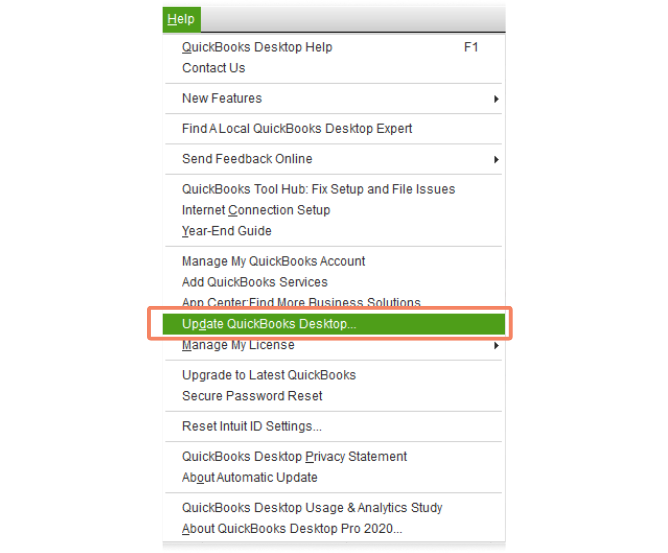
- Now, in the No Company Open window, click on the Help menu and choose Update QuickBooks Desktop.

- Tap on the Options tab, choose Mark All, and then click on Save.
- Go to the Update Now tab and tick the Reset Update checkbox.
- Click on the Get Updates button once you are ready.
- Now reopen the QuickBooks desktop application and tap on Yes to install the updates.
- Once the process is over, go to the Reports menu and open any report on the list.
- Click on the Excel button.

Now, you will see the export options. Check if you find QuickBooks export to Excel not working issue is resolved.
2. Check QuickBooks and Microsoft Office Compatibility
MS Excel and QuickBooks must be compatible with each other to work together. If they are not compatible, your QuickBooks won’t export to Excel.
Before you start exporting to Excel, let us check that you are using Microsoft Office compatible with your QuickBooks version. Go ahead and inspect the system requirements of ideal versions of Microsoft Office with each version of QuickBooks (such as 2021, 2022, 2023).
For example your Microsoft Office for QBD 2020 should be:
- Microsoft Office 2019 (Compatible with R3 and later).
- MS Office 2016 (including Outlook 2016) is available on both 32 and 64-bit.
- Microsoft Office 2010 SP2, Office 2013, and 365 (including Outlook 2010 and Outlook 2013) both on 32 and 64-bit.
Note: You need to install Office 365 locally as the web version won’t work.
- Estimates, invoices, and other forms can be emailed using Microsoft Outlook 2010-2016, Microsoft Outlook with Office 365, Gmail, Yahoo Mail, and Outlook.com, as well as other email clients that support SMTP.
- Microsoft Word 2016, 2013, or 2010 or Office 365 are required for letter writing (includes 64-bit)
- MS Excel 2016, 2013, or 2010 SP2 or Office 365 are required to export reports (includes 64-bit).
- Microsoft Outlook 2010 is required for contact synchronization (32-bit).
- QuickBooks Contact Sync for Outlook is required for synchronization with Outlook (the download is free).
Note: The Microsoft Business Contact Manager Outlook plug-in does not support Contact Sync. It’s possible that syncing will result in duplicate records.
Now, check if you can export QuickBooks reports to Excel now.
3. Repairing Microsoft Office
Damaged MS Office might be one reason Excel is greyed out in QuickBooks. You can simply fix it by repairing MS Office. Given below are the steps you can follow to repair MS Office:-

The given steps are for Windows 10.
- Right-click on the Window start button and choose Apps and Features from the list.
- Choose Microsoft Office Excel to repair and tap on Modify.
Note:- Even if you only want to repair one application, such as Word or Excel, these steps will repair the complete Office suite. If you have a standalone app installed, type its name into the search box.
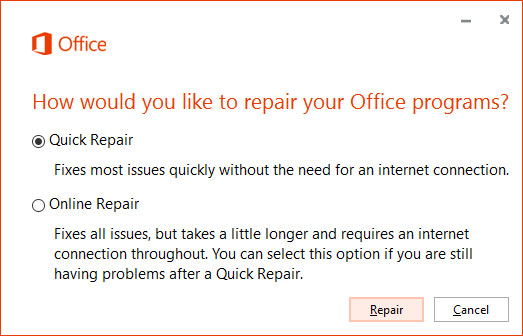
- You’ll get the following options to proceed with the repair depending on whether your copy of Office is Click-to-run or MSI-based. Depending on the type of installation, follow the instructions below.
- Click-to-run: “How would you like to repair your Office Programs” window will open. Choose Online Repair and then click on Repair to make sure everything is fixed correctly.
- MSI-based: Select Repair in Change your installation window and tap on Continue.
- Follow on screen instructions and complete the repair process.
Now, export the QuickBooks report to Excel and check if it works.
4. Change Windows User Account Control (UAC) configuration.
There is a possibility that QuickBooks won’t export to Excel because User Account Control is blocking this feature. You need to just toggle your Windows UAC settings to on and off in order to fix it:

Note: The given steps are for Windows 7,8, and Windows 10.
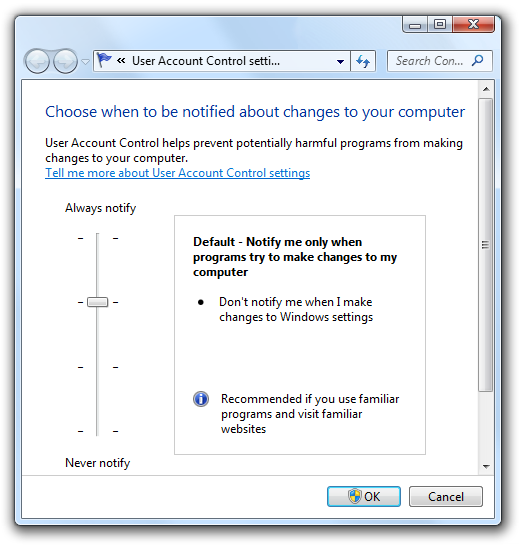
- Tap the Windows Start button, search for User Account Control Settings in the search bar, and then open User Account Control Settings.
- Choose and move the slider to Never Notify and then tap on OK.
- Now, restart your system.
Launch QuickBooks, open your reports and export them to Excel. If you find QuickBooks export to Excel not working, move to the next solution.
5. Clean Install QuickBooks To Export Reports To Excel
One should install Microsoft Office and Excel on your system before you install QuickBooks. You might find QuickBooks unable to export to Excel, possibly because you did not have Microsoft Office prior to QuickBooks.
If you doubt that you installed the QuickBooks application and then installed the current version of MS Office, clean Install QuickBooks Desktop.
Even if that is not the case, clean installing QuickBooks Desktop will rid our software of issues. Therefore, clean install QB application.
6. Clear Cache and Intuit-Specific Cookies
If you find QuickBooks Online export to Excel not working, it might be because of cache and cookies stored in the web browser. Whenever you visit websites, your web browser generates cookies and cache files to load the site faster next time. Old and damaged cookies and cache files can obstruct your QBO file from performing its functions.
Try using a different web browser to access your QBO company file and print a report. If that does not work, you can simply go back to your previous web browser and try to perform the same steps in the private window, which remains unaffected by damaged cookies or cache files. The shortcuts to access private windows are different for each web browser.
You should clear your cookies and cache if you find you can export QuickBooks Online reports to Excel using a private window.
Conclusion
These were all the solutions to try if you find QuickBooks Export to Excel not working. Follow the instructions given in this blog carefully to resume exporting reports to MS Excel. However, if the issue persists or you have a query, speak to our QuickBooks experts. They are available 24/7.
Frequently Asked Questions
When the Excel Add-In is installed, a new CData data access toolbar appears in Excel, which users may use to connect to QuickBooks data. From the toolbar, users can select the installed CData Add-ins and access live QuickBooks data from any number of companies.
There are a series of steps that you need to follow in order to export reports to Excel in QuickBooks Online. You need to have your QuickBooks file open and then follow these instructions:-
1- Click on Reports.
2- Look for the report you wish to export.
3- An Export icon will appear at the top of the report. Tap on it and select Export to Excel.
Save your file where it is easy to find, such as the Desktop or Downloads folder.
Note: If you can’t find any data when you open the file in Excel, it’s in a protected view. To see the entire report in Excel, you’ll need to enable editing.
You can simply export invoices from QuickBooks to Excel through the Reports tab. The step-by-step guide to do so is as follows:-
1- Tap on the Reports tab.
2- Enter the Invoice list in the search bar and then press enter.
3- Customize the report period as per your requirements and then tap on Run report.
4- Click on the Export button in the report page and tap on Export to excel.
You need to install the QuickBooks Import Excel and CSV toolkit in order to export item list from Quickbooks to excel. After that you need to follow these steps:-
1- Tap on the lists menu and then select the item list.
2- Click on Excel and then select Export all items.
3- In the Export window you need to select create a comma separate values(.csv) file.
4- Tap on Export.
5- Now you need to give a name to your file and then select the location where you want to save it.
6- Now On your system, open the file and edit it as per your requirements.

Alastor Moody is an Author at Asquare Cloud Hosting with experience in technical and functional writing. He loves travelling for adventure and fun.