Last Updated on July 8, 2024
Many times, while working on the Quicken application, you might end up with several issues due to varying reasons. Of these, Quicken Quicken window has stopped working is one of them. In general, it is a Windows generated error message which displays:
“It is a problem that has caused the Quicken program to stop working correctly or Windows is currently checking for a solution to the issue.”
However, when you try to open the Quicken application and it quits, then also it displays the same error message again. Sometimes, the error may not display any message and you might stay confused about why the issue has taken place. To avoid such situations, you must get aware of the possible causes that we have covered in the next section of this blog.
Why Has the Quicken Launcher Stopped Working?
Below we have listed some of the common reasons due to which you might come across Quicken window has stopped working error:
- The Windows operating system files might have been damaged.
- Quicken is not properly installed on Windows.
- Another reason behind Quicken Launcher has stopped working is damaged or corrupt sectors on your hard disk.
- The installation files of QB desktop are damaged.
- QBWUSER.INI file is damaged or is missing from Windows.
- The company file name is longer or has more characters than the specified criteria allowed by the Quicken.
How To Resolve Quicken Is Not Opening Problem?
Here, we have mentioned all the possible troubleshooting solutions by following which you would be able to fix Quicken window has stopped working error:
1 Solution: Damaged .NET Framework
- While opening the Quicken application, an error message appears on your screen for the installation .NET Framework.
- You have to download the .NET Framework. Also, ensure that you installed the correct version that is compatible with your system. For example: If you have a 32-bit operating system then you must install the 32-bit .NET Framework.
- Once installed, run the .exe file and install Quicken.
- Alternatively, you can update Quicken as per the latest available version so that .NET Framework will be automatically installed.
2 Solution: Compatibility Issues
- Right-click on Quicken and select the Properties option.
- From there, go to the Compatibility tab and mark the Run this program in compatibility mode checkbox.
- Further, select Windows Vista from the list and unmark the Run this program in compatibility mode checkbox.
- After that, click on Apply followed by OK.
- At last, open Quicken once again and check if the Quicken window has stopped working error still exists or not.
3Solution: Old Quicken Icon Association
Windows 8/10
- Firstly, go to the File Explorer and click on This PC.
- After that, click on Local Disc (C:)
- Now, go to Program Files and search for the Quicken folder.
- Click on the folder and double click on QW.exe from the list.
Windows 7
- Click on the Windows icon and then select Computer.
- Now, click on Local Disc (C:)
- Go to Program Files and search the Quicken folder.
- Click on it and double click on QW.exe
Solution 4: Enable Sufficient Permissions
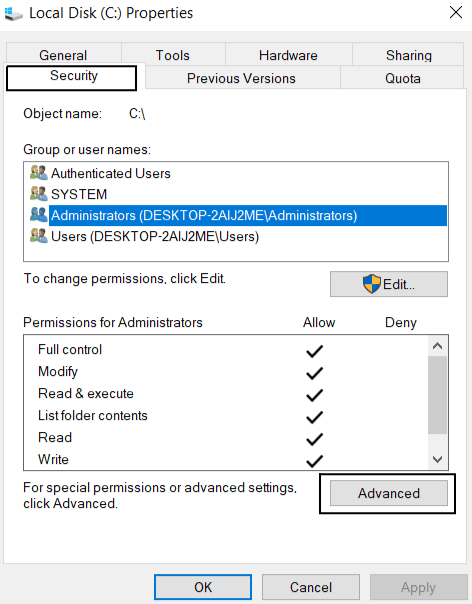
Note: Before you begin following the below-mentioned steps to fix Quicken window has stopped working error, make sure you’re logged in as Administrator
Windows 8/10
- Go to File Explorer and click on This PC.
- Now you have to click on Local Disc (C:)> Program Files.
- Search for the Quicken folder and right-click on it.
- Go to Properties> Security> Advanced> Change Permissions.
- Change it to Full Control.
Windows 7
- Go to File Explorer and click on This PC.
- Now you have to click on Local Disc (C:) followed by Program Files.
- Search for Quicken folder and right-click on it.
- Go to Properties> Security> Advanced> Administrator> Edit.
- Now choose Continue then click on Administrator.
- Click on Edit> Continue> Full Control> Ok and check if the Quicken window has stopped working or not.
Solution 5: Uninstall/Reinstall Quicken
Uninstall Quicken
Windows 10/8
- Firstly, press Windows + R keys together to open the Run dialog box.
- There, type Control Panel and click on Programs> Programs and Features.
- Select Quicken from the list and click on Uninstall from the menu bar.
- Click on Yes to confirm and follow the instructions that appear on your screen to proceed further.
Windows 7
- Click on the Windows icon and type Run in the text field.
- It will display the Run dialog box, there, type Control or Control Panel.
- Select Quicken from the list and click on Uninstall from the menu bar.
- Click on Yes to confirm and follow the on-screen instructions to proceed further.
Reinstall Quicken
- Open the official Quicken website and sign in to your account.
- After that, enter your Quicken ID and Password.
- Once you open the installation wizard, click on Let’s go.
- Now, click on Install now followed by Done.
- Enter your Quicken ID and Password.
- At last, proceed with the instructions that appear on your screen.
Find An Expert To Fix Quicken Won’t Opening Issues!
We hope the troubleshooting solutions mentioned in this blog would have helped you resolve Quicken window has stopped working issue without any hassle. However, there might be an instance where you would have got stuck with the above solutions or would have found them a bit complicated. If that’s so, we would suggest you reach out to our experts by giving us a call on Asquare Cloud Hosting Helpline Number.

Oriana Zabell, a professional cloud engineer, has over three years of experience in desktop, online QuickBooks support and troubleshooting. She is currently working as a cloud hosting consultant with Asquare Cloud Hosting. She loves to read and write about the latest technologies such as cloud computing, AI, DaaS, small businesses, manufacturing. When not writing, she is either reading novels or is indulged in a debate with movie fanatics.