Last Updated on October 7, 2025
Filing federal and state taxes is a crucial annual task for all businesses and their employees. Employers, at the end of each year, have to file several tax forms that summarize the year-end tax reporting for their businesses. Form W-2 is one of these forms that every employer must file to report the wages paid to employees and the taxes that are withheld from the paycheck. However, filing these forms can be a little tricky, but not if you are a QuickBooks user, be it QB Desktop or QB Online. QuickBooks allows businesses to file, view, and print W2 forms directly from the application. It allows you to enter and organize all the necessary employee information, including wages, taxes withheld, and other relevant details, so that you can generate and print W-2 forms in QuickBooks with a few clicks.
With QB, you can file and print the W-2 form both automatically and manually. We will walk through both the steps to print the w-2 form in QuickBooks Desktop and Online. But before that, let us understand what the W2 form is and what its significance is.
What is an IRS W2 Form?
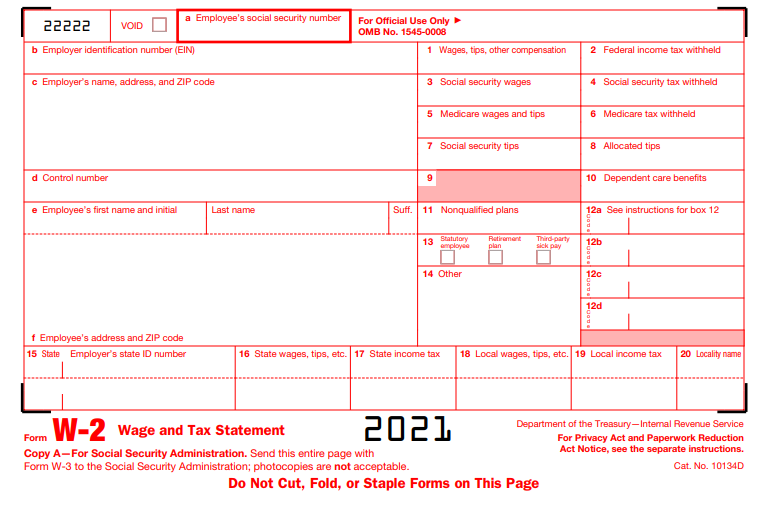
The W-2 Form is also known as the Wage and Tax Statement form that every employer engaged in business has to file and send to all his employees and the Internal Revenue Service (IRS) every year. It includes all the details of remuneration, including non cash payments of $600 or more for the year (all amounts, if any income, social security, or Medicare tax was withheld) for services performed by an employee. The employees can further use it to file their federal and state taxes.
Check The QuickBooks Payroll Service Before Filing and Printing W-2
QuickBooks offers different types of payroll services for both Desktop and Online versions. QuickBooks Online Payroll has three services: Core, Premium, and Elite, and QuickBooks Desktop Payroll has four services: Basic, Standard, Enhanced, or Assisted. You can check the payroll service you are using under the Subscription Statuses in the Payroll tab of the Employee section in the Payroll Center after signing in to Payroll as Admin.
Based on the payroll service you choose, the steps to prepare and print the form vary. Below, we have mentioned the steps to print W-2 forms for different QuickBooks Payroll services, so go through them accordingly.
However, if you want to print 1099 and 1096 QB tax forms, we have a comprehensive guide on how to do that.
How To Print W2 Form in QuickBooks Online Payroll?
The steps to print the W2 form in QB Online Payroll depend on the payroll tax setup. This setup allows you to choose how you want your payroll taxes and filings handled, whether you want to pay and file your federal taxes on your own or want QuickBooks to file them for you. Let us check out the steps to print the W-2 forms in both of these cases:
When You Have Enabled QuickBooks To Pay and File Tax Forms Automatically
If you have opted for manual methods to file and print W-2s, then you are required to mail them to the employees by January 31.
Note: You can not print Copy A from QB to file directly with SSA. You will need to e-file W-2s through QuickBooks.
The steps to manually print the W-2s form in QuickBooks Online are as follows:
Step 1: Purchase a W-2 Paper
You can directly order a W-2 kit from QuickBooks. It will ensure that your W-2 forms are printed correctly and that your employees do not face any issues while filing them. There are two types of forms available for printing W-2 forms:
- Blank 3-part perforated paper
- Blank 4-part perforated paper
To order a W-2 kit, including envelopes from QuickBooks, follow the steps given below:
- Go to the QuickBooks Check and Supplies section.
- Select the Tax Products option followed by Blank W-2 Kits.
- Then, follow the on-screen instructions to complete the order and make a purchase.
Step 2: Print W-2s and W-3 Forms
After you have got the papers to print the tax forms, you can print your W-2s from January 1st. You can print the W-2 form for the current year or for the previous year from when you started using QuickBooks Online Payroll.
Steps to Print Current Year W-2 Form
- Click the Taxes option followed by the Payroll Tax.
- Then, select the Fillings option. You will get a list of all the W-2 forms; you can file them from here.
- Click the Resources option, then choose W-2s and click the View option for the following:
- W-2, Copies A & D (employer)
- W-3 Summary Transmittal of Wage and Tax Statements
- To print the employee’s copies, that is, W-2 Copies B, C, & 2 (employee), check the following:
- If you need to report the company-paid group health insurance amounts or track a retirement plan outside QuickBooks, choose the Edit Box 12/13 option. Then, enter the amounts for insurance and check the retirement box.
- Now, select the Manage W-2s option.
- You also need to review the Form W-2 print setting. You can select the Change setting option if you want to change the paper type. Then, follow the first three steps to get back to the W-2 form.
- Now, check for the employees who want a printed W-2 form and those who want a paperless W-2. Those employees who want a paperless W2 form will not be selected and won’t get a printed copy. So, select the View and Print after this.
- Then, select the Print icon on the Adobe Reader toolbar, followed by the Print option.
Note: If you are reprinting a W-2 form because your employee lost it or didn’t get the original W-2, then make sure to mention REISSUED STATEMENT on the top. Also, include a copy of W-2 instructions with it.
Steps to Print Previous Years W-2 Form
- Start by selecting the Taxes option followed by the Payroll tax option.
- Then, select Fillings, then Resources.
- Next, click the Archived Forms and Filings option.
- Then, select the date range you want or search the forms you require.
- Now, click the View option on the W-2 form that you want to print.
- Lastly, hit the Print icon on the Reader toolbar and select the Print option again.
- After you have printed the W2 form, you can file it with the IRS.
How To Print W2 Form in QuickBooks Desktop Payroll Assisted?
QuickBooks files your W2 and W-3 forms with the Internal Revenue Service (IRS) and the Social Security Administration (SSA).
The steps to print the W-2 forms depend on how you choose to print them. You can either choose QuickBooks to print and send them to your employees or print and send them yourself using QB. Here’s how you can print current and previous years’ W-2 forms with the help of QuickBooks Assisted Payroll.
Steps To Follow When Intuit Prints W-2 Forms For You
QuickBooks will mail the W-2 forms to your employees between January 16 to January 31. However, you can reprint them on plain paper, if required, from January 10.
- Click the Employees option, followed by Payroll Center.
- Then, select the File Forms option and click View/Print Forms & W-2s.
- After this, enter the payroll PIN and hit OK.
- Now, select the W-2s tab.
- After that, choose the year, followed by all or individual employees.
- Hit Open/Save Selected.
- Then, select the appropriate reason for printing the W-2 forms.
- Lastly, select the File option on the Adobe Reader and hit the Print option.
Note: Make sure to mention REISSUED STATEMENT on the top of W-2s if you are reprinting them for any reason, and also include a copy of the W-2 instructions.
Steps to Follow When You Print W-2s By Yourself
If you are printing and mailing the W-2 forms to your employees, then make sure to postmark them by January 31.
Step 1: Buy the W-2 Papers From Intuit
You can order W-2 paper directly from Intuit. This will make sure that W-2s are printed correctly and that the employees do not face any issues while filing them. You have two types of papers to print the employee’s W2s copies on:
- Blank 4-part perforated paper
- Plain paper
- When Intuit QuickBooks Pays and File your taxes For you.
- When You Pay and File your taxes on your own.
Here’s how you can order the W-2 kit, including envelopes, from QuickBooks:
- Go to the QuickBooks Checks and Supplies section.
- Then, select the Tax Products, followed by Blank W-2 kits.
- After this, follow the instructions given on the screen to complete the order and make the purchase.
Step 1: Print the W-2 Forms (for Current and Previous Years)
- Select the Employees option, then Payroll Center.
- Now, click the File Forms tab, followed by the View/Print Forms & W-2s.
- After this, enter your payroll PIN and hit OK.
- Now, go to the W-2s tab.
- Select the year and then all or individual employees for whom you want to print the W-2s.
- Now, click the Open/Save Selected button and choose the appropriate reason to print W-2s.
- Lastly, hit the File option on the Adobe Reader and click the Print button.
Note: Remember to add REISSUED STATEMENT on the top of the W-2 forms if you are reprinting them for any reason. Also, add a copy of the instructions for W2s.
How To Print W2 Form in QuickBooks Desktop Payroll Enhanced and Standard?
- Make sure to print and send the W-2 forms to your employees by January 31. Follow the below instructions to print W-2s in QuickBooks Desktop Payroll Enhanced and Standard.
Step 1: Buy W-2 Papers From QuickBooks
- It is better to purchase W-2 papers from QuickBooks itself to ensure that the W-2s are printed correctly and the employees do not face any issues while filing them. There are two different types of papers that you can buy:
- Blank 3-part perforated paper
- Pre-printed 4-part perforated paper
The steps to order a W2 kit from QuickBooks are as follows:
- Go to the QuickBooks Checks and Supplies corner.
- Select the Tax Products followed by selecting Pre-Printed W-2 kits or Blank W-2 kits.
- Then, complete the order by following the on-screen instructions.
Step 2: Update QuickBooks Desktop Application
Steps to Download Updates for QuickBooks Desktop
- Here’s how you can download QuickBooks Desktop updates on Windows:
- First, check the version of QB that you have by pressing the F2 or Ctrl + 1 keys on the keyboard.
- This will open the Product Information window, check the current version and release.
- The latest releases available for different QuickBooks Desktop versions are as follows:
- QuickBooks 2024 R1_5
- QuickBooks 2023 R6_25
- QuickBooks 2022 R11_51
- QuickBooks 2021 R15_18
- Once you have checked the QuickBooks version that you are using, follow the below-given steps to update it:
- Click the Update available option on the status bar in the top right corner,
- Then, click the Install Now option to install the updates.
- Now, let the updates get downloaded and installed; it might take a while.
- After the updates are installed, open the QuickBooks Desktop application.
Steps to Download the Latest Updates for Payroll Tax Table
- Go to the Employees section and select Get Payroll Updates.
- Then, check the tax table version you have:
- For this, check the number written next to You are using the tax table version.
- To find more details of the tax table version, click Payroll Update Info.
- Now, to get the latest tax table, click the Download Entire Update option followed by the Update button.
- You will get an informational window on the screen when the download is complete.
- After you have downloaded the latest update for the QB Desktop application and the tax table, you can move on to the next step of creating and printing W-2 forms.
Step 3: Create and print W-2 Form in QuickBooks
- From the Employees dropdown menu, select the Payroll Tax Forms & W-2s option, followed by Process Payroll Forms.
- Then, from the File Forms tab, scroll down and select the Annual Form W-2/W-3 – Wage and Tax Statement/ Transmittal option.
- Choose the Create Form option and select all or the individual employees to file.
- Then, enter the year and hit OK.
- After this, select all or individual employees for whom you want to print W2s.
- Select the Review or Edit option to review the W-2 forms. All the reviewed W-2s have a checkmark in the Reviewed column.
- When you are done reviewing the forms, select the Submit Form option and follow the steps to print and file the forms.
Note: Remember to mention REISSUED STATEMENT on the top of the form if you are reprinting them because your employee lost it or didn’t get the original W-2. Additionally, include a copy of W-2 instructions with it.
How To Print W2 Form in QuickBooks Desktop Payroll Basic?
The QuickBooks Desktop Payroll Basic does not offer you the option to create and print the W-2 and W-3 forms. You are required to upgrade to the QuickBooks Desktop Payroll Enhanced version to do so.
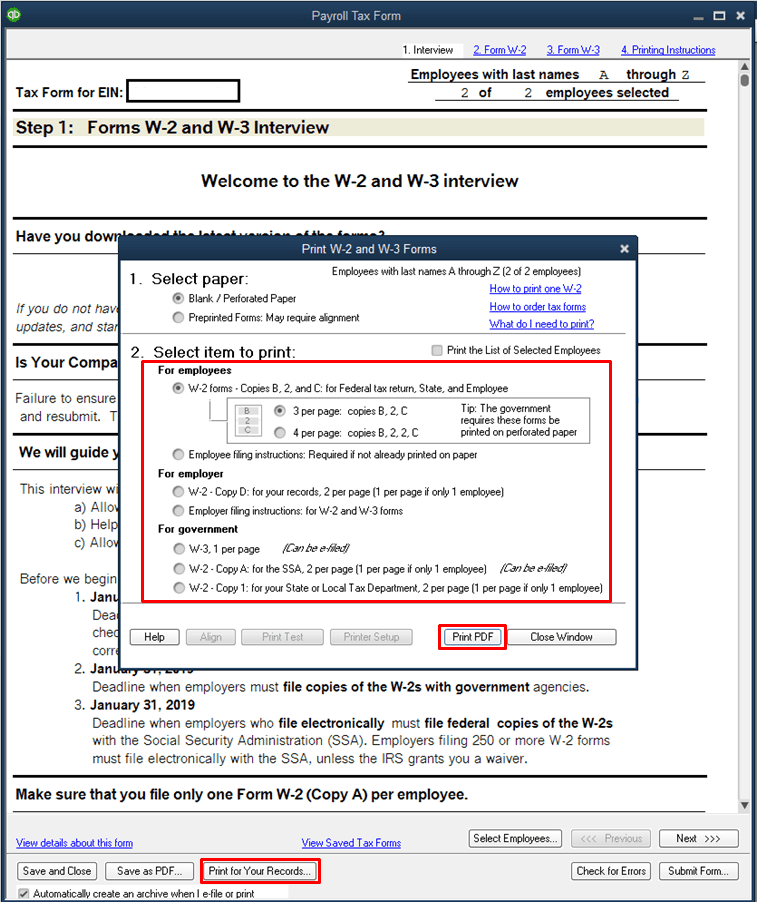
Step 1: Set Your Printing Preferences
You can change or set your printing preferences by following the below-given steps:
- Go to settings and select the payroll settings option.
- From the W2 print preference tab, click on Edit.
- Lastly, select your paper type and click on OK.
Note: However, this step varies for QuickBooks Desktop Payroll Enhanced and Standard service users. For these, you have to update QuickBooks desktop and payroll tax table as per the latest available version. It helps QuickBooks to calculate the correct tax amount as per the current tax rates.
Step 2: Now Print the Filed W-2 Forms in QB
If you have decided to file and pay the tax on your own, then you must reprint W2 In QuickBooks the start of January 1.
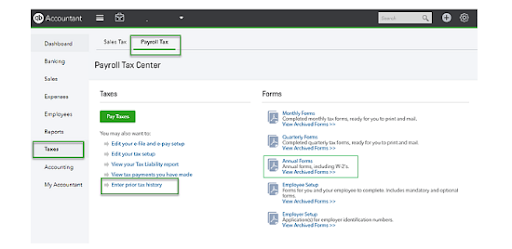
- Now, select the Filings option and then select Annual Forms.
- At this point, you will have the choice to print both employer and employee copies of your W-2s and W-3.
- Employer Copies: Form W-2 (W-2, Copies A & D), Transmittal of Wage and Tax Statements (W-3)
- Employee Copies: Form W-2 (W-2, Copies B, C & 2).
- A prompt will pop up stating Before filing this form; you must set up W-2 printing if you wouldn’t have set your W-2 printing preferences. Click on it and select your printing paper.
- Further, select the required filing period from the dropdown.
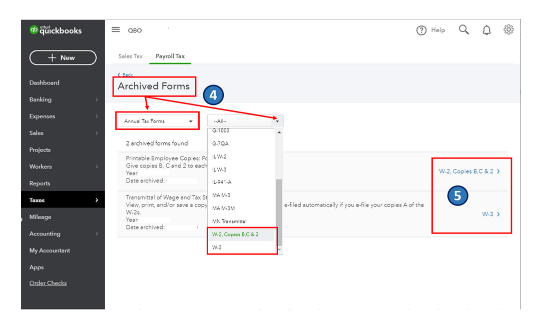
- Click on View to open the Adobe Reader in a new window. And then, select the print icon on the Reader toolbar.
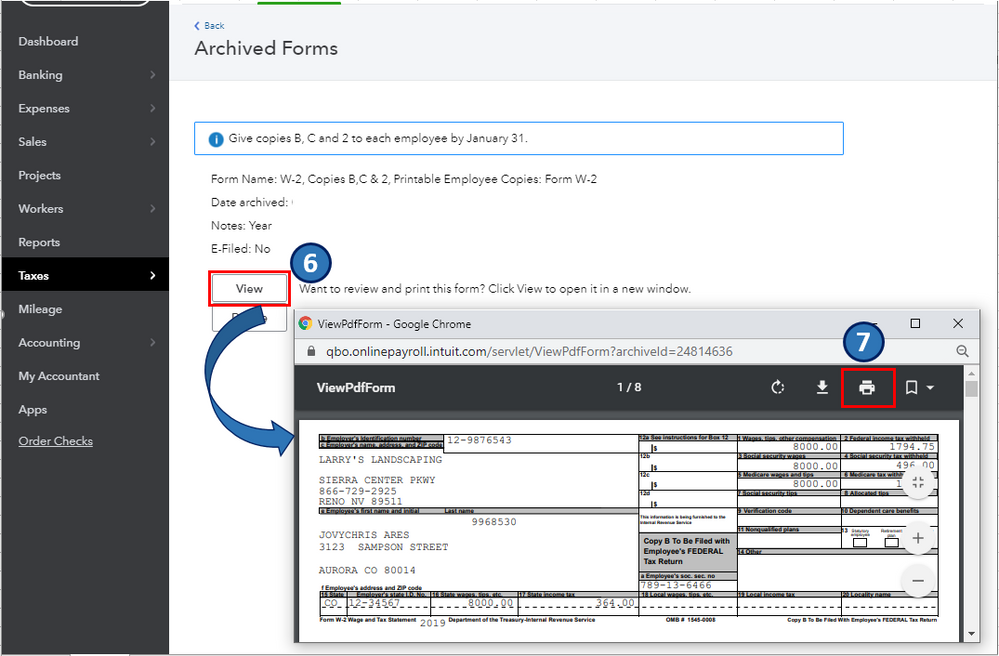
- Lastly, select the Print option once again.
Important: The last step slightly differs for the QuickBooks Desktop Payroll Enhanced, QuickBooks Desktop Payroll Standard version. For this service, you need to follow the below-given steps:
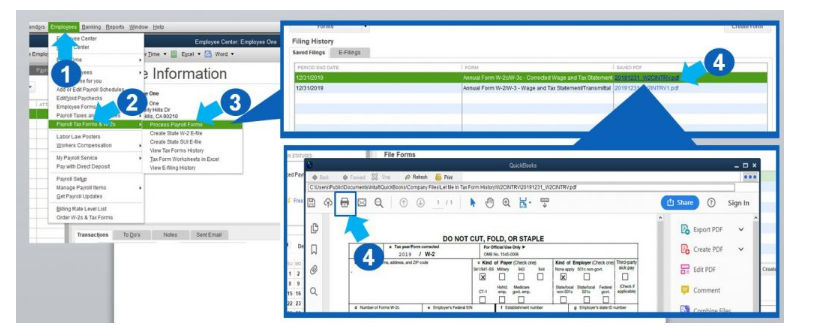
- Select Payroll Tax forms & W-2s followed by Process Payroll Forms from the Employees dropdown menu.
- Scroll down from the File forms tab and select Annual Form W-2/W-3 – Wage and Tax Statement/ Transmittal.
- Now, click on the Create form option and select all or individual employees to file.
- Mention the year and click on OK.
- Again, either select all or individual employees to print.
- Make sure to review each W-2 by clicking on Review/ Edit. A check mark identifies these W-2s in the reviewed column.
- At last, select the submit form option and print and file the form by following the on-screen instructions.
Note: As mentioned earlier, you have to write REISSUED STATEMENT on the top of your W-2 copy if your employee lost or didn’t receive the original W-2 form. Besides, make sure to attach the W-2 instructions copy.
How Can You Reprint W2 Form In QuickBooks Desktop Payroll Assisted With Self Print Option?
Wondering how to print the W-2 form in QuickBooks while using the Payroll Assisted version on your QuickBooks Desktop? It’s possible with the Self Print option by following the given steps.
- Follow the below-given steps to open the Payroll Tax center:
- Open QuickBooks and click on Payroll Center under the Employees menu.
- Click on the File Forms tab and select the View / Print Forms & W-2s option.
- Then, enter your payroll PIN.
- Now, click on the W-2 tab.
- If you want to print forms for all the employees, click on the checkbox against the Employee. Else you may select the specific employee names.
- Click on the Open/Save Selected option.
- Choose the specific reason for printing the W-2s when the Print Instructions window appears on the screen.
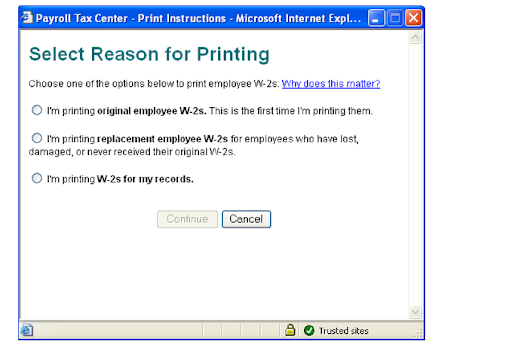
- Based on what you select in the last step, a message related to printing paper will appear on your screen. Thus, you have to load the correct paper into your printer.
- If the employee is receiving the W-2 for the first time, click on I’m printing original employee W-2s option.
- However, select the I’m printing replacement employee W-2s option if the W-2 form is lost or damaged.
- If you are printing the W-2 for the company records, select the last option I’m printing W-2s for my records.
Note: If you don’t have the perforated paper (it has the instructions for filing the W-2 forms on the back) at the time of printing W-2 form, you can print it on plain paper with the condition that you provide appropriate W-2 filing instructions to your employee.
- When the Adobe Reader file opens with your W-2 selections, click on the File menu and select Print to print the W-2s.
It highly depends on the product you are currently using. If it is an online payroll, there are different steps to follow, things are different for desktop payroll assist, and on. So, here are a few bifurcations that can help you.
If you are using the QuickBooks Online Payroll
There are basically two conditions in this that would majorly steer the functioning. So, you will have to follow the steps according to the condition you are in.
Condition 1: When you have automated things and QB pays for you
The W-2 form of this year or a year prior can be printed. So if you satisfy this condition, here is what you will have to do.
- First of all you will have to open the QuickBooks Desktop Online on your system.
- Then head to the “taxes” section and click on it.
- There will be a drop-down from which you will have to choose “Payroll Tax.”
- Now, in this section you will have to choose “filing” and once done, you will get the choice of employer and employee options. You can choose the W-2 copies for both.
- Then just choose “View” or “Manage” and:
- W-2, Copies A & D (employer)
- W-3 Summary Transmittal of Wage and Tax Statements
- W-2, Copies B, C & 2 (employee)
- When selecting the employees, you will get the names of people who require this copy. And the ones who want things to be paperless. To see the entire list you will have to select, “View.”
- Just follow the onscreen things to answer the questions and then choose “Yes” or “No” accordingly.
- Once done, just select “print icon” and then again choose “Print.”
While Printing the previous year’s papers
This is a comparatively easier and quicker process that has to be followed. Here is what you will be doing, so just follow the same.
- Start by opening your Quickbooks, clicking on “Taxes” and then choosing “Payroll Tax.”
- Next, you will have to choose “filing” and then “resources.”
- Once done, you will have to click on “archived forms and filings.”
- Then after this, you will have to just finalise the date range and search your needed form.
- Now, you will have to choose the option of “view” and then select the form.
- Click on “print icon” and then choose “print.”
Condition 2: When you have automated forms and taxes
When you have done this, that means, you are going to pay as well as file manually or electronically. In either case you will have to be following these sets of instructions.
Conclusion
The process to create and print W-2 form in QuickBooks Online and Desktop is a very straightforward process. Additionally, with this blog, we have tried to make it simpler for you. Hopefully, you can follow up with the steps and print W-2s for the employees. However, if you face any difficulty in the process, you can directly connect with our experts at the Asquare Helpline Number +1(855)-510-6487 Our QuickBooks experts will help you create, print, and file W2s in no time.
Frequently Asked Questions (FAQ’S)
You can reprint your 2018 W2 forms from the Archive Forms window if you have saved a copy for 2018 in your QuickBooks account. Follow the below given steps to reprint W2s:
a). Go to the Taxes menu and select the Payroll Tax option.
b). Then, in the Form column, click the hyperlink for View and Print Archived Forms under the Annual Forms section.
c). Now, in the Archive Forms window, you need to filter the Annual Tax Forms, then choose either W-2, Copies B, C &2, or W-3.
d). Then, locate and select the hyperlink for W-2, Copies B, C &2, or W-3.
e). Click the View button followed by the Print icon when ready to print.
No, you cannot preview and print W2s for 2023 this early. However, you can gather the information from QuickBooks with the help of payroll data or reports and then prepare the information outside the system. You can gather the data with the following steps:
a). Go to Reports < Standard.
b). Then, scroll down to the Payroll section and search for the report by name.
c). Open the report, filter the date range, and hit Apply.
If you are a QuickBooks Online Payroll Core, QuickBooks Online Payroll Premium, QuickBooks Online Payroll Elite, or QuickBooks Online Payroll Full Service user and have enabled the auto pay and file option, then you will need to contact QuickBooks to request a correction. QB will fix it and file a W-2C form with the SSA. However, if you have not opted for auto pay and file, then you need to fix it in QB manually and then file W2s.
No, you cannot print W2 forms without the Social Security Number of the employee.

Oriana Zabell, a professional cloud engineer, has over three years of experience in desktop, online QuickBooks support and troubleshooting. She is currently working as a cloud hosting consultant with Asquare Cloud Hosting. She loves to read and write about the latest technologies such as cloud computing, AI, DaaS, small businesses, manufacturing. When not writing, she is either reading novels or is indulged in a debate with movie fanatics.