Last Updated on June 11, 2026
You can print Form 1099 and 1096 in QuickBooks Online, QuickBooks Desktop, or QuickBooks Contractor Payments. If you want to learn how, continue reading this blog.
Moreover, if you want to pay your contractors and file your 1099s directly through QuickBooks, you can do that too. For that, you will need to add contractor payments, and if you have employees in addition to contractors, add QuickBooks Online payroll instead. For filing your returns electronically, you don’t need to submit Form 1096 to the IRS.
However, if you have already filed your 1099s, the steps to print the forms would be different, than if you haven’t filed the 1099s yet.
Section A: Print Form 1099 and 1096 in QuickBooks If You Haven’t E-Filed 1099s
If you don’t e-file your 1099s with Intuit, you will need to e-file them by yourself. You must send the Form 1099 to the IRS and, if required, your state government as well. In addition, you also might be required to file 1096.
If you intend to print Form 1099 and 1096 in QuickBooks and file them, you need to purchase the 1099 kit. Once you are ready, follow the steps below to print your forms.
Important Note: If you are on the QuickBooks Desktop application (for Windows or Mac), you must update it to the latest release for the forms to print correctly. Therefore, do that before you follow the steps below.
For QuickBooks Desktop (macOS)
Here is how to print Form 1099 and 1096 in QuickBooks Desktop for Mac.
- Firstly, install the updates available for your QuickBooks Desktop. This is important for 1099s to print correctly.
- Now, open the application and launch Vendors.
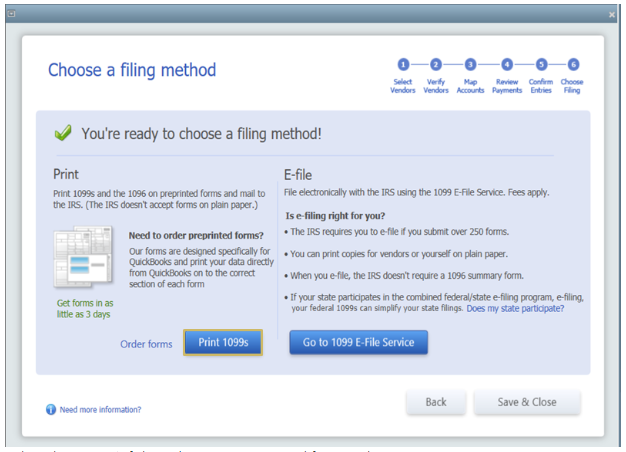
- Choose 1099 Forms, followed by Print or E-file 1099/1096, and then create your 1099s.
- When asked to choose a filing method, choose Print 1099-NECs or Print 1099-MISCs.
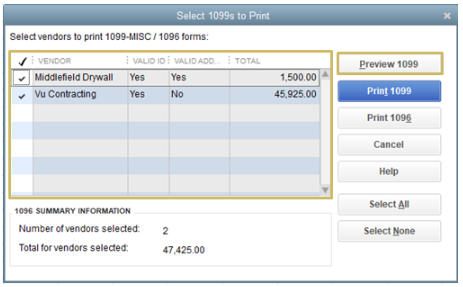
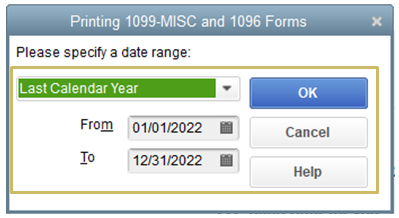
- Carefully set the date range for the forms and highlight every vendor that you need to print 1099s.
- Tap on Print 1099.
- Review the printer settings thoroughly and hit Print.
The steps to print 1096s are similar; just select print 1096 instead of 1096.
For QuickBooks Desktop (Windows)
Let us now show you how you can print the Form 1099 and 1096 if you use QuickBooks Desktop for Windows.
- Before you print the IRS tax forms, you must update your QuickBooks Desktop to the latest release, and while doing so, mark the Reset Update checkbox. This is important for the forms to print correctly
- Open the application, launch Vendors, choose 1099 Forms, followed by Print/E-file 1099 Forms. Next, create the 1099s.
- When the Choose a filing method window opens, tap on Print 1099-NEC or Print 1099-MISC.
- Set the date range for the forms, and tap OK.
- Now, choose all the vendors for which to print 1099s.
- Choose Print 1099.
Note: In case you are printing Form 1096, choose Print 1096s instead.
Verify the printer settings, and tap on Print.
Note: Keep your accounting software running smoothly by learning How to Update QuickBooks Desktop. Regular updates improve performance, fix bugs, and enhance security. Follow simple steps to download and install the latest release to ensure uninterrupted business operations and payroll processing.
For QuickBooks Online and QuickBooks Contractor Payments
Here is how you can print the IRS tax forms in QuickBooks Online and QuickBooks contractor payments.
- Depending on whether you use QBO and Contractor payments, the steps may vary:
- QuickBooks Online and Contractor payments with QuickBooks Online: Choose Payroll, followed by Contractors.
- QuickBooks Contractor Payments only: Go to 1099 filings.
- Choose Prepare 1099s, and then create your 1099s.
- Finally, when you are ready, tap on Print and Mail instead.
- Now, go ahead with the on-screen instructions to adjust the alignment and print the forms.
Also See: Stay compliant with payroll tax regulations by understanding QuickBooks Form 941. This essential quarterly tax form helps businesses report federal income tax, Social Security, and Medicare withholdings. Learn how to generate, review, and file Form 941 accurately in QuickBooks Desktop to avoid penalties.
Section B: Print Form 1099 and 1096 in QuickBooks After E-Filing 1099s
If you have already e-filed 1099s, but you want to print them, in this section, you can learn how. The steps for the same vary, depending on which QuickBooks product you use.
For QuickBooks Desktop (Windows)
If you use Tax1099 to e-file forms, you can view, print, and email a copy of them. Let us show you how to find the forms and print them in Tax1099:
- Open Tax1099 and go to Forms, followed by Manage Forms.
- Choose Payer and Tax Year in this window.
- You will now find that the recipients and forms will start to load.
- For every individual recipient, you can choose an action to perform, such as for printing it, choose View/Print.
- Alternatively, you can choose multiple recipients, and select the blue buttons such as Download All PDF or Download Multiple PDF to download and print the forms, or other buttons to mail them directly.
Note: In case you can’t find your forms or are not sure whether they were submitted yet, navigate to Forms > View/Edit/Submit Forms and look for them there.
For QuickBooks Contractor Payments
QuickBooks Contractor Payments allows you to print and mail your 1099s while you are filing them. However, QB might charge a fee for this service. If you like to print the form yourself, here is what you can do:
- Navigate to 1099 filings and choose View 1099.
- You will view a PDF copy, which you can also print.
For QuickBooks Online
If you use QuickBooks Online to e-file your forms, you can choose to have them printed and mailed to your employees, which might cost you a fee.
If you’d like to print the forms yourself,
Navigate to 1099 filings.
Choose View 1099.
Now, you will be able to view a PDF copy, which you can print as well.
Conclusion
In this blog, we discussed how to print Form 1099 and 1096 in QuickBooks Desktop and Online, in both cases, whether you have already e-filed 1099s or not.
However, if you have a query or face a problem when printing the tax forms, speak to a QuickBooks expert. If you want to learn how to set up a 1099 contractor in QuickBooks, you can check out the guide for that as well.
Frequently Asked Questions (FAQ’s)
Can I print a 1096 form in QuickBooks?
Yes, you can print a 1096 form in QuickBooks, whether it be the desktop application for Windows or macOS, or the web version. The steps to print 1099s and 1096s are similar; all you need to do is choose Print 1096s instead of Print 1099s.
How to print a 1099 in QuickBooks?
Follow the steps below to print a 1099 in QuickBooks Online:
1. Launch QuickBooks and choose Vendors.
2. Tap on Pay Bills Online, followed by Prepare 1099s.
3. Now, verify the company details and tax year.
4. Choose Print 1099s and then Print.
5. In the Print window, choose your printer and tap OK.

Alastor Moody is an Author at Asquare Cloud Hosting with experience in technical and functional writing. He loves travelling for adventure and fun.