Last Updated on July 23, 2025
Employers must report wages paid, tips received, federal income tax withheld, and both the employer’s and employee’s portion of social security and Medicare taxes on a quarterly Form 941. The last day of the month following the end of the quarter is when Form 941 is due. QuickBooks application takes care of the whole process and QuickBooks Form 941 allows you to e-file, e-pay, manually pay, print, delete archived forms, and even change the preparer information within the application itself.
To put it in simple words, the 941 form in QuickBooks allows you to complete all federal responsibilities through the application itself. You can also apply for a Paycheck Protection Program loan through QuickBooks form 941 too. So let’s look into these processes in a deeper sense.
What is QuickBooks Form 941?
941 is a federal payroll form that is required for non-agricultural businesses that owe more than $1,000 in total federal taxes (Federal Withholding, Social Security, and Medicare). Employers file this form quarterly to report:
- How much wages they have paid to the employees
- Tips received by the employees
- The federal income tax withheld
- Lastly, the share of social security and Medicare taxes of both the employer and employee
What is the Due Date to File Form 941?
As discussed, employers file this form with the IRS quarterly. Another key point is that filing Form 941 on time throughout the year is necessary. Therefore, it’s essential to know the last day until you can file it. When it comes to the due date of the form, it is the last day of the month following the end of the quarter. Here is the table below:
| For the quarter | Form 941 is due |
| January 1 to March 31 | April 30 |
| April 1 to June 30 | July 31 |
| July 1 to September 30 | October 31 |
| October 1 to December 31 | January 31 |
Note: It is important to know that the due date mentioned in the box may fall on a Saturday, Sunday, or legal holiday. In that case, you can file the return on the next business day.
How To Find 941 Report In QuickBooks Desktop Based On Payroll Subscription?
There is a large variety of payroll subscriptions offered by Intuit to its customers. You need to follow different steps to access QuickBooks Payroll form 941 based on the payroll subscription you have. Let’s look at them according to the QuickBooks subscription.
Where to find the 941 Form in QuickBooks Online Payroll Full Service, Core, Premium, and Elite?
It’s a two-step process to find the 941 Form in QuickBooks Online Payroll Full service, Core, Premium, and Elite:-
- Select Taxes from the left menu and then choose Payroll Tax.
- Tap on Download under Forms and then select each Form 941 for the respective year.
Where to find the 941 Form in QB Online Payroll Enhanced?
You can view QuickBooks form 941 in Payroll Enhanced subscription by following four different steps:-
- Go to the Taxes menu and select Payroll Tax.
- Choose View Archived Forms in the Quarterly Forms or Annual Forms sections.
- Select Form 941 from the list.
- Click on View for every Form 941.
Recommended to read– Check the Latest QuickBooks Payroll Tax Table Update
Where to find the 941 Form in QuickBooks Desktop Payroll Standard and Enhanced?
The process of viewing QuickBooks form 941 in the desktop version is different from the Online version. Form 941 opens up in PDF form. Here are the steps you need to follow:-
- Go to the Employees menu and select Payroll Center.
- Click on the File Forms tab. You need to go to the Filing History section under the Saved Filings tab if you want to access any previously saved forms.
- Now select the QB form 941 to view the form under the Saved PDF column.
Read more: How to Update QuickBooks Desktop to the Latest Version 2023?
Where to find the 941 Form in QuickBooks Desktop Payroll Assisted?
The process of viewing QuickBooks payroll form 941 in the assisted version is a little complicated. You need to have your Payroll Pin with you while attempting to view it. These are the steps you need to follow:-
- Go to the Employees menu and select Payroll Center.
- Click on the File Forms tab and then click on View/Print forms W-2s.
- Now enter Payroll PIN in the Payroll Tax Center window and click on OK.
Note:- If an error message pops up on your screen or nothing happens, you need to repeat step 3 but keep pressing Ctrl (Control) and Alt key through all the messages appearing on your screen until the PDF opens.
- Tap on File Forms.
- Choose the Form 941 you wish to view.
Read Also: How To File Form 940 In QuickBooks Desktop?
How to E-file Form 941 in QuickBooks Desktop Payroll Enhanced
QuickBooks Desktop Payroll Enhanced allows you to file and pay your federal payroll forms and taxes electronically. It is the fastest and easiest way to stay compliant with the federal laws. You can schedule your tax payments before paying them and keep track of them so you don’t miss them. These are the steps you need to follow to E-file and E-pay in QuickBooks:-
Step 1- E-file your Tax form
- Go to Employees, choose Payroll Tax Forms and W-2s, then choose Process Payroll Forms.
- Choose the federal form you need to file from the list.
- Choose Create Form, select the form filing period, and then hit OK.
- Ensure that you review each part of the form. Secondly, you can choose Check for Errors to make necessary corrections.
- Now, choose Submit Form and then E-file.
- Enter the 10-digit IRS Efile PIN and then follow the onscreen instructions to continue filing the form.
You will likely receive a confirmation email within two days of filing the form.
Step 2- E-pay your Federal Taxes in QuickBooks Desktop
- Go to Employees, choose Payroll Center, and then select the Pay Liabilities tab.
- In the Pay Taxes & Other Liabilities section, choose the liability to pay and then tap on the View/pay button.
- Check the liability details and ensure that everything is correct.
- Tap on E-Pay.
- Enter the 4-digit EFTPS PIN in the E-Pay Login window along with other login info, and then tap on Submit.
Note:- Use your new PIN if you’ve recently changed your e-payment bank account.
- You can print the confirmation notice that appears on the screen, showing that Intuit has accepted your request, and your e-payment will be sent to the appropriate agency.
- Lastly, click on Close.
You’ll get an email confirmation within two days.
Read Also: How To Change EFTPS Password in QuickBooks- Desktop and Self-Employed.
- Tap on Employees and choose the Payroll Center.
- Click on the Pay Liabilities tab.
- Go to the Pay Taxes & Other Liabilities section. Select Quickbooks Form 941 and tap on the View/pay button.
- Check the details and ensure that everything is correct.
- Tap on E-Pay.
- Enter a 4-digit EFTPS PIN in the E-Pay Login window. Enter any other information if asked for.
- Tap on Submit.
- You can print the confirmation message that displays, showing that Intuit has accepted your request and that your e-payment will be sent to the appropriate agency.
- Now click on Close.
Read Also: How To Change EFTPS Password in QuickBooks- Desktop and Self-Employed.
How to E-file Form 941 in QuickBooks Online Payroll
941 form is typically due each calendar quarter. Here is how you can file 941 from in QuickBooks Online Payroll:
- Ensure you have paid all the taxes related to the form you want to file.
- Move to Taxes, choose Payroll Tax, and then choose Filings.
- Under Action Needed, you can see the form you want to file. Forms that are due later will show in Coming Up. To make things easier, you can choose Filter to find your desired form faster.
- Choose File on the form you want to file and then ensure the File Electronically box is selected.
- Choose Submit.
- You can see the filed form under Done. Moreover, you can also print it if needed.
Check the Status of the Payroll Tax Payments and Form Filings Sent Electronically
The status of the tax payments and form filings sent through QuickBooks payroll to the IRS or state agencies can be checked. Here is how you can check the status in real-time:
Check the status of your payroll form filing:
- For QuickBooks Online Payroll:
You receive a confirmation email when you send your tax filings through QuickBooks Online Payroll. However, if you don’t receive a confirmation email, you can check the status of your product.
- Move to Taxes, then Payroll Tax, and then choose Filings.
- Choose Filter and then choose the form or report you want to see. Alternatively, you can scroll down to the filings under Done. You can see the status next to the tax name. However, select Archived Forms and Filings if you don’t see your filing on this screen.
Statuses:
- Not Transmitted – It shows that you have sent your tax filings. However, Intuit hasn’t sent your tax filings yet.
- Transmitted – It shows that Intuit has sent the form to the agency. However, the agency hasn’t processed it yet. The IRS generally takes up to a few weeks to process forms.
- Accepted – The form has been received and accepted.
4. Rejected – The agency has received the form. However, the form has been rejected. Moreover, you will receive a rejection letter email along with the specific issue mentioned in it.
For QuickBooks Desktop Payroll Enhanced:
Find the Form:
- Choose Employees and then Payroll Center.
- From the Payroll Center, opt for the File Forms tab.
- Choose the E-Filings tab in the Filing History section.
- Toggle between the Saved Filings tab and the E-filings tab if the status doesn’t update. It refreshes the E-Filings list.
- In the Audit Trail column, hit the View link to get more info.
Statuses: You can get the following real-time statuses:
- Submitted to Intuit – It shows the payments or filings sent to Intuit have been submitted.
- Intuit rejected – It simply means your payments or filings have been rejected by Intuit. The following reasons trigger this rejection:
- There is a problem with the info you have submitted with the payments or filings.
- Server connectivity issues.
- Submitted to the agency – It shows that Intuit has submitted the electronic payments or filings to the agency.
- Agency rejected – It shows that the agency has rejected the e-payment or e-filed form. Additionally, the agency also sends a rejection notification along with the solution.
- Agency accepted – It shows that the agency has processed the e-payment or e-filed form successfully. Your transaction is complete.
In case you get a notification “Problem: Your email address is invalid or missing”
If you get this error message while opening the e-payment or e-filing history, you should consider adding or updating the email in QuickBooks. Here’s how you can add or update your email:
- Hit the Close button.
- Move to Company, choose My Company, and then choose Edit.
- Now, update or add the email address in the Email field.
- Hit OK to ensure that changes have been saved.
Hopefully, you can now open the E-Payment History or E-Filing History.
Check the status of the payroll tax payment:
For QuickBooks Online Payroll: Intuit sends an email notification to the Primary Admin listed in QuickBooks Online. That specific email has all the info that shows the status of your tax payments. However, if you don’t receive the email, you can check the Primary Admin in QuickBooks Online here. Alternatively, you can check the email junk or spam folders.
Find the tax payment:
- From the main menu, Choose Employees, then choose Payroll Center.
- Now, from the Payroll Center, choose the Pay Liabilities tab.
- Select the E-Payments tab in the Payment History section.
- Toggle between the All Payments tab and the E-Payment tab if the status doesn’t update. It refreshes the list.
- Click on the View link in the Audit Trail column for more info.
Statuses: Check the status of the QuickBooks Desktop Payroll Enhanced mentioned above.
How to File Form 941 Manually in QuickBooks Desktop Payroll
If you do not wish to file your tax forms electronically, there is a manual option too. Here is how you can do it manually:
Note: Ensure you have paid all the taxes related to the form. Otherwise, you will get to see the amounts due on the form.
- Go to the Employees tab, choose Payroll Tax Forms and W-2s, and then choose Process Payroll Forms.
- Select QuickBooks Form 941 and choose Create Form.
- Choose the Filing Period from the drop-down and then hit OK.
- Fill out the Interview section of the form. Fill in those sections highlighted in green. Double-check any pre-filled information on the form.
- Hit Next and check all the pages of the form.
- Click on Check for Errors once you are done. QuickBooks will find the errors on the form, and you can fix them before you print and save
- the form.
- Choose to Save as PDF or Print for your records if you’re ready to print and save the form. Select Save and Close if you need to return to the form later.
Recommended to read: How to fix QuickBooks Payroll Error 30159 – Verify Subscription
How to Print Form 941 in QuickBooks Online Payroll?
If you have e-filed the QuickBooks form 941 in QuickBooks Online Payroll, printing it is easy and comfortable. Here is how you can print the 941 form in QuickBooks Online Payroll:
- First, log in to the QuickBooks Online account and move to the Taxes menu.
- Select the Payroll Tax tab and then click on the Forms tab.
- Lastly, select the 941 forms and then hit the print option.
How to View Form 941 in QuickBooks Desktop Payroll Enhanced
For multiple reasons, businesses may need to check the 941 form from the previous year. Here is how you can view your saved form:
- Move to the Employees menu and choose Payroll Center.
- Select the File Forms tab and then the Save Filings or E-Filings tab under Filing History.
- Finally, you can view the form by selecting it.
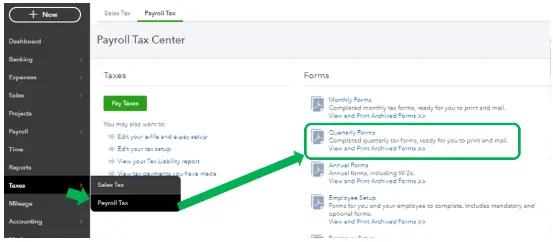
How to View Form 941 in QuickBooks Online Payroll
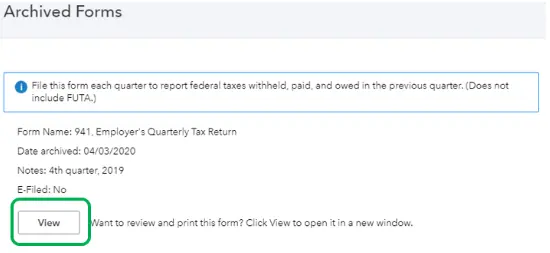
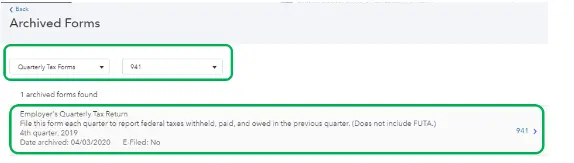
- Move to Taxes and then select Payroll Tax.
- Choose Quarterly Forms or View and Print Archived Forms under Forms to see the archived forms from prior periods.
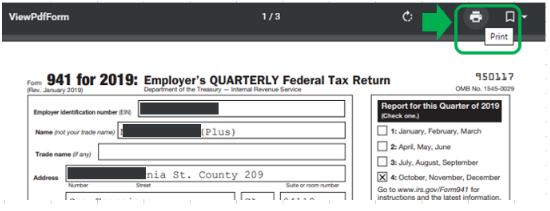
- Hit the 941 link and click Preview.
- Lastly, you can download the form in PDF format or print it.
The Process to Delete the Archived 941 Form in QuickBooks
It is very common to archive the 941 form in QB by mistake, and the simple way to fix it is by deleting it. Follow these steps to delete the achieved form:-
- Go to the Tax menu and select Payroll Tax.
- Choose View Archived Forms in the Quarterly Forms section.
- Select the QuickBooks Form 941 and tap Delete.
- You will be redirected back to the filing due date.
The Process to Change Information About Preparer of QuickBooks Form 941
The preparer information appears on QB form 941. If there has been any change in the preparer’s credentials, you must change them accordingly, as these forms are submitted to a federal agency, and any wrong information can lead to trouble in the future. Follow these steps to edit the preparer information:-
- Tap on the Gear icon.
- Select Payroll Settings.
- Select Federal Form Preferences under Payroll and Services.
- Tap on Yes in the Paid Preparer Information box.
Update the information as required and tap OK.
Conclusion
In this blog, we have discussed how to e-file, e-pay, manually file, and print QuickBooks form 941, among other things. If there are things you have yet to figure out about forms and taxes, contact our experts at Asquare Cloud Hosting Helpline Number and allow them to guide you. Our team can essentially make e-filing federal forms through QuickBooks a breeze for you.
Frequently Asked Questions
1. Open the employee’s paycheck and review the details for any errors.
2. Make the necessary corrections to the paycheck.
3. Re-enter the paycheck and choose to save it to the “Payroll History” list.
4. Run a Payroll Detail report and review the employee’s new paycheck.
5. If needed, adjust the payroll liabilities and General Ledger accounts to ensure that everything is in balance.
6. Record the necessary journal entry to reflect the changes.
To amend a 941 in QuickBooks Desktop, follow these steps:
1. Go to the Employees menu and select Payroll Tax Forms & W-2s.
2. Select the 941 form and choose the period you need to amend.
3. Make the necessary changes to the form as needed.
4. Print the amended form and submit it to the IRS.
If an incorrect Form 941 is filed in QuickBooks Desktop, the user will receive a notification from the IRS that the form is incorrect and must be corrected. The user will then need to go back into QuickBooks Desktop and make the necessary corrections to the form before resubmitting it to the IRS.

Oriana Zabell, a professional cloud engineer, has over three years of experience in desktop, online QuickBooks support and troubleshooting. She is currently working as a cloud hosting consultant with Asquare Cloud Hosting. She loves to read and write about the latest technologies such as cloud computing, AI, DaaS, small businesses, manufacturing. When not writing, she is either reading novels or is indulged in a debate with movie fanatics.