Last Updated on March 5, 2025
Are you looking for useful answers on how to make a journal entry in QuickBooks Desktop? Well, if that’s so, you have stopped at the right place. Accounting is a bit complicated, and that’s where software like QuickBooks comes to the rescue. QuickBooks records transactions the moment they are processed and all this information is stored in the account of the general ledger QuickBooks. You might end up with issues in such cases and thus, it becomes essential to know the method of making QuickBooks journal entry. We have come up with this blog, for a better understanding of how to make a journal entry in QB Desktop
What is QuickBooks Journal Entry?
Before we go ahead and talk about how you can make a QuickBooks desktop journal entry. It would help if you get a brief idea of ‘what is a journal entry in the QuickBooks application’. In simple words, a journal entry can be defined as a record of the transactions made in which the total amount in the debit column equals the total amount in the credit column. Each amount (Debit and Credit) mentioned there is assigned to an account on the chart of accounts.
Why Do You Need To Record Journal Entry In QB?
You can create a journal entry in QuickBooks online to navigate the navigation of your QuickBooks online software that allows you to post journal entries. Below are the valuable points that indicate why there is a need to record journal entry in QuickBooks.
- It includes the Debits and Credits that the Company makes.
- Besides, it holds information on money transfers between income and expense accounts.
- Money transfer to income or expense account from the equity, asset, or liability account.
Well, we hope the above-listed points would have assisted you in getting a better idea of the general journal entries in QuickBooks. Therefore, you are in a better state to learn how to make a journal entry in QuickBooks online.
How To Make QuickBooks Journal Entry?
- A journal entry is a transaction that’s listed in your business’s general ledger. But the question arises of how to record the QuickBooks Journal Entry.
- If you ever need to insert a transaction manually, you will use the QuickBooks Online journal entry feature. In QuickBooks, when you post a journal entry, it must balance the debit you have a corresponding credit vice versa.
- We will provide you with the five easy steps by which you can record the QuickBooks Accounting Journal Entries.
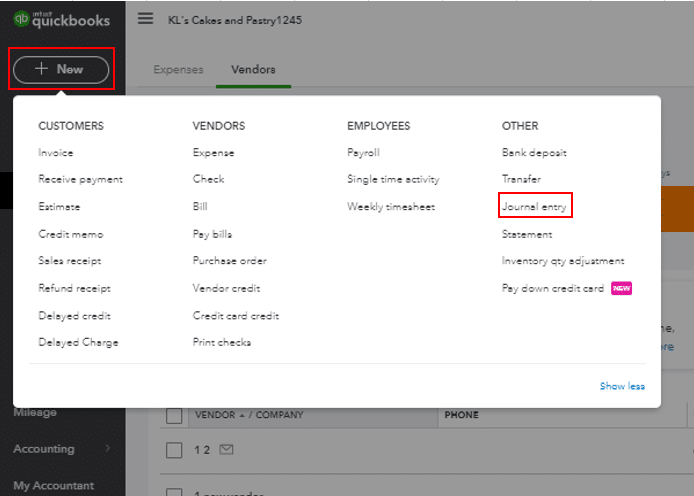
Step#1: Navigate to the Journal Entry Feature
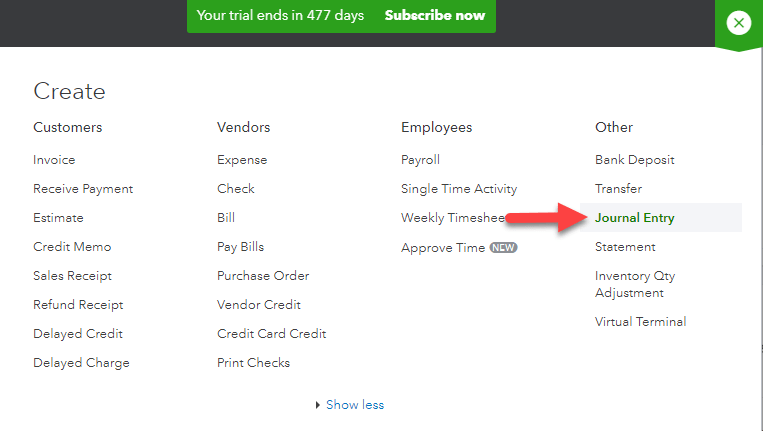
In this step, you have to navigate to the QuickBooks Online software section that allows you to post the journal entries. If you press the + icon from the top right of your file, a drop-down menu appears that shows “Create” that lists “Journal Entry” in the next column from the right side.
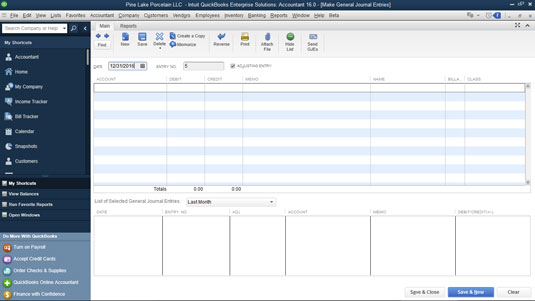
Step#2: Fill Date and Journal Number
In this step, firstly, you have to edit the journal ate. QuickBooks will automatically pick the current date, so if you are recording any journal entry from any previous day or month, you have to provide the correct date.

After this, you have to provide the journal number to fill. For example, if the journal number is 151, QuickBooks will opt for any number which sequentially follows the number, such as 152.
Step#3: In the “Category” Column, Provide Correct Accounts
For example, you are creating any journal entry for a prepaid purpose. Because the prepaid is for a month or a year, it is considered as an “other current asset” to begin with. But it needs to be expended as the year or month passes. You can book the asset of the prepaid by using a check and also use the general journal entry.
With this, we’ll be adding the two accounts in the column of the category. The first account is from the chart of accounts, which is the company checking account. This account will lose the money when you are paying for your prepaid purpose. The second account will receive the funds you are prepaying for your prepaid purpose for a year or month. In any QuickBooks Accounting Journal Entries, there will be two accounts, one is a debit account, and the other is a credit account.
Step#4: Enter the Debit and Credit Amount
After getting the correct accounts, you have to fill in the corresponding debit and credits. As your prepaid plan costs $2000, so you have to add a credit to check the account and debit.
The nature of journal entry is that you impact the books, or can say, General Ledger. It is always necessary to balance the entry. The Debit column will balance the credit column. Therefore, after multiple payments within one entry, you have to ensure that the debits and credits are equal at the end of the entry.
Step#5: Add a Description and Save
You have to complete your QuickBooks Accounting Journal Entries and add them to a description in this step. After you provide the description, save the journal entries and close them. It is simple to record a journal entry in QuickBooks online.
If you follow these steps in the order described, you will surely end up knowing how to make a journal entry in QuickBooks Desktop or QuickBooks Online. If in case, you want to learn how to make journal entries that may affect a particular customer’s account receivable or a vendor’s account payable. Then, it’s mandatory for you to put the vendor or customer on the first line of the entry.
After you have created a journal entry, you can view the journal entry in QuickBooks whenever ready, in simple steps.
Read also: A Detailed Guide On How To Protect QuickBooks From Ransomware Attacks
How To Edit QuickBooks Desktop Journal Entry?
At times, it might happen that you want to edit the journal entry that you have made in QuickBooks Desktop 2020 due to some reason. The below-given steps can help, if that’s what you want to know:
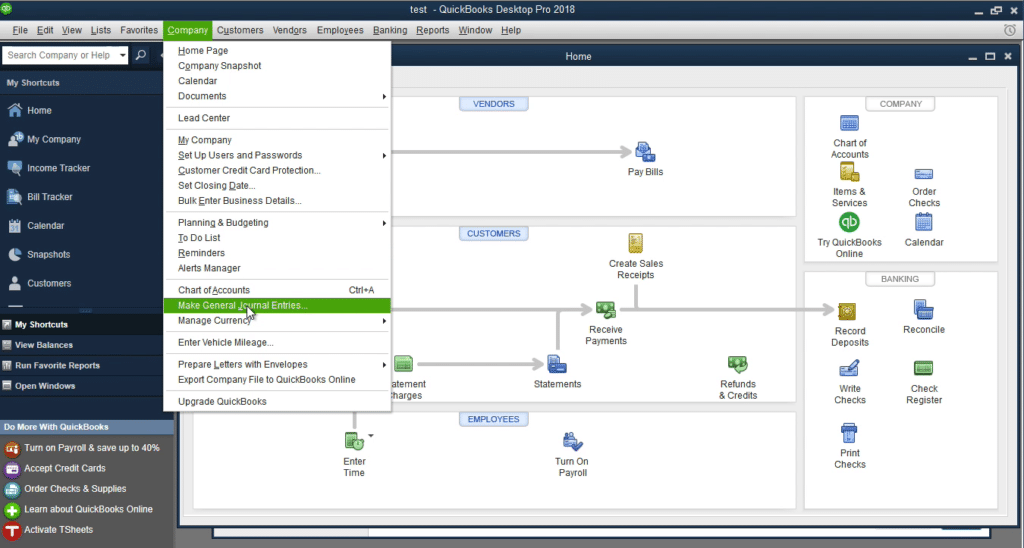
- In the first place, you have to select the make general journal entries option from within the Company menu.
- After that, click on Find and enter the Date, Name, Entry Number, or Amount.
- Once done, click on the Find icon.
- To proceed, you need to double-click on the journal entry that you want to make modifications in and then you can go ahead and make the required changes.
- Now, click Save & Close once you have done what’s required.
- To end the process, you have to click on Yes to save the changes made.
Conclusion
We have put in our best efforts to help the QuickBooks users with their query on how to make a journal entry in QuickBooks Desktop. If in case, any doubt persists related to this procedure, feel free to take the assistance of our experts and they will assist you with the most manageable steps for making a journal entry in QB.
Frequently Asked Questions
General Ledger in QuickBooks is a set of numbered accounts that are used by businesses or organizations to prepare financial reports and to track their financial transactions. General Ledger Accounts are also used to categorize the types of financial transactions. Each account is a unique record summing each type of asset, equity, revenue, liability, and expense.
If you want to see the complete transactions list of all accounts then you can use the general ledger report in QuickBooks.

Oriana Zabell, a professional cloud engineer, has over three years of experience in desktop, online QuickBooks support and troubleshooting. She is currently working as a cloud hosting consultant with Asquare Cloud Hosting. She loves to read and write about the latest technologies such as cloud computing, AI, DaaS, small businesses, manufacturing. When not writing, she is either reading novels or is indulged in a debate with movie fanatics.