Last Updated on July 8, 2024
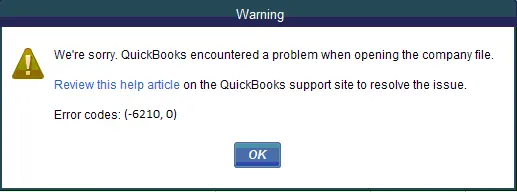
Are you trying hard to understand and fix QuickBooks error 6120, 0 for quite some time and still no success? Your search ends here with this troubleshooting guide on the same. You must be witnessing QuickBooks Error -6120, 0 on one or more workstations while opening the company file. It mostly strikes when the person using QB on a workstation mistakenly selects the option to host the company file.
Moreover, it is an error from 6000 series errors that most QuickBooks users bump into once. Resolving this issue is a little complicated and time-consuming, but troubleshooting becomes more effective once you focus on the precise reasons. So, if you want to avoid going back and forth and get rid of this issue in no time, follow this article closely.
What are the key Reasons Behind the QuickBooks Desktop Error 6120 0?
The following are the 8 top factors that interrupt QuickBooks from hosting a company file in the multi-user mode and trigger the issue constantly. Understand them and implement the methods listed in the blog accordingly.
- If one or more of the workstations are hosting the company file.
- If you did not include the QuickBooks Desktop application in the firewall port exceptions, which provoked the QuickBooks error 6120, 0.
- When the Windows Firewall port (8019) is blocked.
- If the company file hosted on the server is damaged and the workstations connected to it are trying to access it, it might trigger this error code.
- Inadequate permissions to access the network server.
- When the folder having the company file is damaged.
- If the QuickBooks company file has an invalid extension, it might provoke the QuickBooks Company File Error 6120 0.
- If you do not have Windows admin permissions to work with QuickBooks Desktop.
How to Rectify QuickBooks Error Code -6120, 0 Effectively?
The following are the top nine solutions that will assist you in eradicating the QuickBooks multi-user mode error 6120, 0 in no time.
1. Disabling the Hosting on Workstations
When you are hosting the company files over a network, you must always check if the hosting option is disabled on every workstation. These computers communicate with the server system that is supposed to host the company file. If the hosting option is enabled on workstations, you might see the QuickBooks error 6120, 0.
- Launch the QB Desktop on the workstation where the QuickBooks Company File Error 6120 0 popped up.
- From the menu on top of the page, choose the Help menu and then click the Utilities option.
- If you see the Stop Hosting multi-user access option, click it to disable the hosting.
- But if you find the Host Multi-User Access option, do not click it and move on to another workstation. Repeat all these steps to check the settings on each workstation.
2: Check the Firewall Ports Exceptions
There may be a considerable possibility that the Windows Firewall ports are blocking the QB program and provoking the QuickBooks error 6120, 0. You can resolve it by implementing the procedure in these two steps.
1st Step: Include the QB Software in the Firewall Port Exceptions
Perform the steps below for each version of QB Desktop if you have installed more than one version on your system.
- First, click the Windows Start menu.
- In the search panel, enter Windows Firewall and then hit Enter.
- In the Firewall Security window, choose the Advanced Settings option.
- Then, proceed to right-click Inbound Rules, and under it, click the New Rule option.
- Further, select Port and then click Next.
- Now, verify if TCP is selected. If not, click on it.
- In the field of specific local ports, enter these ports for the specific QuickBooks year version:
- For the QB 2020 and later: 8019, XXXXX.
- For the QB 2019: 8019, XXXXX.
- For the QB 2018: 8019, 56728, 55378-55382.
- For the QB 2017: 8019, 56727, 55373-55377.
Note: QB Desktop versions, including 2019 and 2020, use dynamic ports. These ports are assigned at the time of installation to ensure QB gets exclusive utilization of the given ports.
> Get the Number for the Dynamic port
- Next, enter the port number and click on Next.
- Now, choose Allow the Connection and again click Next.
- Make sure all profiles are selected, and then choose Next.
- Create a rule and further name it like “QBPorts(year).”
- Finally, when you’re done, choose Finish.
Repeat the steps above to make outbound rules in place of inbound rules
Launch the QuickBooks Desktop software and switch to multi-user mode. If the issue persists and you see QuickBooks error 1620, 0, move on to Step 2.
2nd Step: Create Firewall Exceptions for QuickBooks Desktop
QuickBooks software uses executable files (.exe) to perform several tasks. Start by following the steps below to create exceptions for every executable file in the table:
- First, click on the Windows Start menu.
- Then, in the search panel, type Windows Firewall and hit Enter.
- Now, on the Firewall Security Page, choose the Advanced Settings option.
- Further, right-click the Inbound Rules option.
- Then, from the drop-down, select the option saying New Rule.
- Then, click Program and then Next.
- After that, continue to click the This Program Path option and then click Browse.
- Proceed to select the executable files in the table below and select Next.
- Now, choose Allow the Connection and once again click Next.
- Check if all profiles are marked. Once you are sure that all the profiles are marked, select Next.
- Finally, end the solution by creating a rule and naming it QBFirewallException(name.exe).
You must repeat the steps above and create outbound rules.
| Executable files | Location |
| AutoBackupExe.exe | C:\Program Files\Intuit\QUICKBOOKS YEAR |
| Dbmlsync.exe | C:\Program Files\Intuit\QUICKBOOKS YEAR |
| DBManagerExe.exe | C:\Program Files\Intuit\QUICKBOOKS YEAR |
| FileManagement.exe | C:\Program Files\Intuit\QUICKBOOKS YEAR |
| FileMovementExe.exe | C:\Program Files\Intuit\QUICKBOOKS YEAR |
| QuickBooksMessaging.exe | C:\Program Files\Intuit\QUICKBOOKS YEAR |
| QBW32.exe | C:\Program Files\Intuit\QUICKBOOKS YEAR |
| QBDBMgrN.exe | C:\Program Files\Intuit\QUICKBOOKS YEAR |
| QBServerUtilityMgr.exe | C:\Program Files\Common Files\Intuit\QuickBooks |
| QBCFMonitorService.exe | C:\Program Files\Common Files\Intuit\QuickBooks |
| QBLaunch.exe | C:\Program Files\Common Files\Intuit\QuickBooks |
| QBUpdate.exe | C:\Program Files\Common Files\Intuit\QuickBooks\QBUpdate |
| IntuitSyncManager.exe | C:\Program Files\Common Files\Intuit\Sync |
| OnlineBackup.exe | C:\Program Files\QuickBooks Online Backup |
Note: If you see Program Files (x86), then you are operating on a 64-bit Operating system. Launch QB Desktop to enable Multi-user mode, and check if the QuickBooks Enterprise Error 6120 0 is eliminated.
3: Try Running the QB File Doctor
It is a utility you can access from QB Tool Hub that helps in recovering damaged and corrupted company files. It resolves multiple issues in the file, including network problems. You can review the File Doctor’s results and resolve the QuickBooks Error 6120 0 accordingly.
Step 1: Installing QuickBooks Tool Hub
If you haven’t downloaded the Tool Hub on the system, follow the steps below. If you use QuickBooks Tool Hub on Windows 10, 64-bit, your troubleshooting experience will be far better.
- If the QB application is running, close it and download the Tool Hub.
- You can get the link to download Tool Hub on Intuit’s website.
- After downloading the Tool Hub, the file will be automatically saved to the downloads section on the system.
- Now, double-click the (QuickBooksToolHub.exe) file to initiate the installation.
- Then, follow the on-screen instructions to install Tool Hub.
- Lastly, when the process finishes, double-click the QB Tool Hub icon and launch it.
Step 2: Fix Company File Issues with File Doctor
- After launching the Tool Hub, go to the Company File Issues section.
- Then, click on File Doctor and give it a minute to open.
- Subsequently, select the damaged company file from the drop-down in the File Doctor.
- If you cannot find the file, choose Browse and search the file.
- Then, select the middle option, which is to Check Your File, and choose Continue.
- Lastly, enter the QB admin password and click Next.
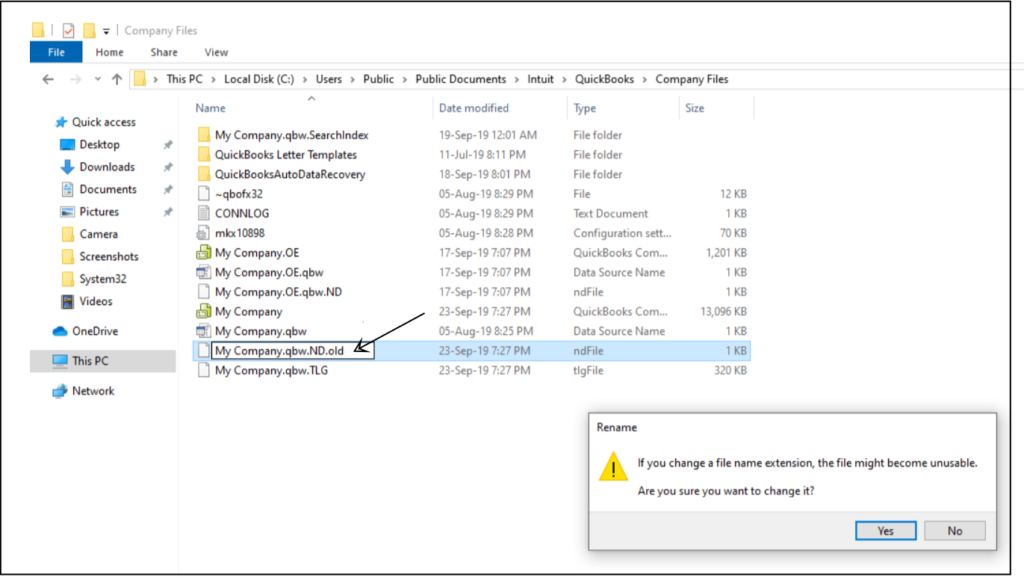
4: Modify the Names of .ND and .TLG Files in the QuickBooks Installation Directory
If you want to work on the company file in a multi-user network, these files must be in good condition and error-free. It is because these are the crucial configuration files, and any damage may set off QuickBooks multi-user mode error 6120, 0. One of the solutions to fix issues in these files is renaming them. Let’s learn how:
- Start by opening the folder where the company file is saved.
- These files have a similar name as the company file but with .ND and .TLG extenstions.
- For example:
- company_file.qbw.nd
- company_file.qbw.tlg
- Now, right-click on any of these files, and from the drop-down, click on the Rename option.
- Then, type .OLD at the end of the file name and save the changes
- Follow the same procedure to rename the remaining file.
- Launch the QB software and log into the company file in multi-user mode.
5: Using the Sample Company File
You can test and rectify problems in the company file or QB by opening a sample file. If the sample company file does not open, it means the QB installation files are damaged. If this is the case, we will repair the installation files in the next solution.
- After launching the No Company Open window, click the option to Open a Sample File.
- Then, a list of sample files will be displayed, and you can choose any one of them.
- If the sample file opens, skip the next solution and go to the sixth troubleshooting solution; if not, then implement the steps mentioned below to eliminate the QuickBooks error 6120, 0
6: Repairing the Installation Files of QB Desktop
If the QuickBooks installation files are damaged, you won’t be able to host the company file or access it on any workstation connected to the server. So, it is necessary to repair these files to resolve error 6120 and prevent several others from striking the system.
Step 1: Employ Quick Fix My Program from the Tool Hub
- Begin by opening the Tool Hub and selecting the Program Problems tab.
- Then, choose the Quick Fix My Program option from there.
- After running the tool, open the QuickBooks company file, and if the problem persists, go to the next step.
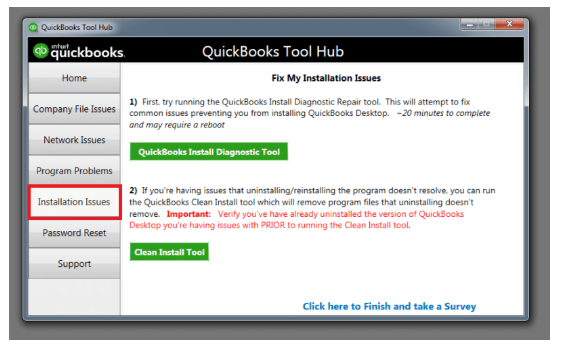
Step 2: Employ the Install Diagnostic Tool
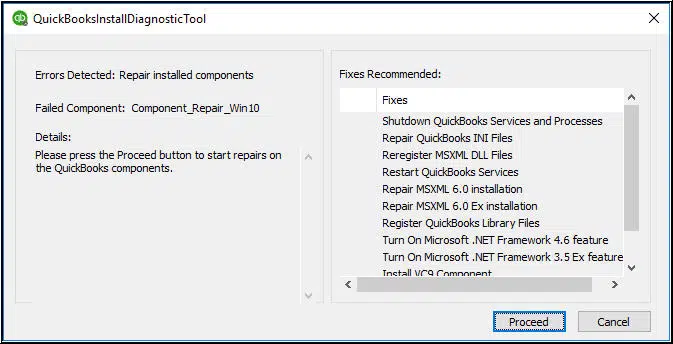
- If you install QB and face problems in between the process, the application will not run smoothly. Using this utility, you can ensure that everything is fixed with the installation.
- Locate and click the Installation Issues option in the Tool Hub.
- Now, select the QuickBooks Connection Diagnostic Tool option and let it run to fix the installation issues, which can sometimes take up to 20 minutes.
- Lastly, see if the QuickBooks Desktop error 6120 0 is rectified when the process ends.
7: Updating QuickBooks Manually
Updating your QB application is initially essential and is one of the standard methods for troubleshooting QuickBooks error 6120, 0.
- Open the QuickBooks program and navigate to the Help tab.
- Now, click on the option to Update QuickBooks Desktop.
- Then, choose Update Now and then Get Updates.
- Now, when the update process finishes, close the application.
- Then, re-open it and choose Yes to install the freshly downloaded updates.
What if the Update Process Fails?
Select the End Task option for some specific QuickBooks processes in this case.
- Firstly, close the QB application and right-click on the taskbar at the bottom.
- Then, choose the Task Manager option.
- After that, from the Details tab, select the following background processes and select End Task for each:
- QBW32.exe or QBW.exe
- QBCFMonitorService.exe
- QBDBMgr.exe or QBDBMgrN.exe
- QBMapi32.exe
- qbupdate.exe
- After right-clicking on the QB shortcut, choose the Run as administrator option.
- Lastly, run the updates to fix QuickBooks error code 6120.
8: Copy the Company File and Paste it into a New Folder
Check if the damage is in the company file or the folder holding it. To do this, you need to copy the company file and paste it into a new folder created on the desktop. Now, after pasting it, if you can open it, that means that the file is error-free and the original company file folder is damaged. However, if the files do not launch even after changing the location, there is damage to the file.
- Firstly, start by opening the folder that has the company file.
- Then, look for the file with the .QBW extension.
- Proceed to right-click on the file, follow by choosing the Copy option.
- Further, go to the Desktop screen and create a new folder
- Now, right-click inside the new folder.
- Then, choose the option to paste the copied file from the drop-down menu.
- After that, you must press and hold the control key to launch the QuickBooks application.
- The above action will launch the No Company Open window on the screen.
- Now, click the option to Open or restore an existing company.
- Finally, go to the desktop to launch the company file to see if the QuickBooks Error -6120, 0 is fixed.
9: Get Lost Data Back with Auto Data Recovery
A beneficial feature known as the ADR helps you recover all the data you might lose due to company file damages and corruption. You must know that Inuit Data Protect Service does help you recover lost data, but it is also time-consuming. Therefore, you must consider regaining the lost data much faster by employing the ADR. But use ADR only after implementing all the troubleshooting techniques beforehand to ensure it is none other than data corruption that is triggering QuickBooks error 6120, 0
Before starting, do note the following points:
- Auto Data Recovery is a feature that is available in QB Pro, Premier, and QB Enterprise for the Windows OS.
- If you are using Accountant Edition, then you cannot use ADR.
- The file size limit of ADR is 1.5 GB. It means if the file you wish to restore is more than 1.5 GB in size, you cannot restore it.
- Make sure to update the QB Desktop to the recent release.
Using the .TLG file with .QBW.adr file
To recover all the current transactions, you must use the original file and the ADR version of the QB company file.
- Initially, start by creating a folder on the desktop screen and name it QBTest.
- Now, open the folder where the company file is saved.
Quick Tip: You can easily search the location of the company file on the No Company Open Window and the Product Information screen. Just hit F2 or Ctrl and 1 keys together.
- Then, in the company file’s folder, you will see the .TLG file. This file has the exact same name as the company file.
- However, if locating the .TLG file becomes a hustle, perform the steps below:
- Start by hitting the Windows and E keys to open the File Explorer window.
- Now, click Organize and then Folder and Search options.
- Then, for known file types, choose Hide extensions.
- Choose Apply and then click OK.
- Afterwards, copy and paste the .TLG file into the QBTest folder you created earlier.
- Then, open the QuickBooks ADR folder, which you will find in the QuickBooks installation folder.
- Proceed to copy the .QBW.adr file and paste it into the QBTest folder.
- Now, by right-clicking the .QBW.adr file, choose the Rename option. Remove .adr from the file name.
- Launch the QB application and open the company file from the QBTest folder.
- Then, from the account register, verify that no transactions are missing.
- Further, double-check the integrity of the restored data from File > Utilties > Verify Data.
- If all is good, move the copy of the company file to the default location and remove the damaged file.
Utilizing .QBW.adr and .TLG.adr files to get back the recent transactions
The ADR versions for both files will help you recover the most recent transactions correctly. It will recover the last 12 hours of transactions and help you get rid of QuickBooks error message 6120.
- In the beginning, you must create a new folder on the desktop.
- Then, name it QBTest
- Now, in the folder where the company file is saved, search for the folder named QuickBooksAutoDataRecovery.
Quick Tip: Hit the F2 or Control + 1 Key to launch the Product Information screen or No Company Open Window. Here, you can check the company file location.
- Then, start finding the .TLG.adr and .QBW.adr files that have the same name as the company file.
- If you cannot find these files, follow the steps below, as these will show you the file extensions.
- Firstly, launch the File Explorer on the system by hitting the Windows and E keys.
- Now, click Organize and then choose the option stating Folder and Search.
- Uncheck the Hide extensions for the known file types option.
- Then, select the Apply option and then OK.
- Proceed further and copy the .TLG.adr and .QBW.adr files to the QBTest folder. Do not forget to remove .adr at the end of the files in the QBTest folder.
- Then, launch the QB Desktop application.
- Now, open the company file in the QBTest folder.
- Also, verify the transactions from the account register.
- Now, follow these steps to check the data integrity of the restored data: click on File > Utilties > Verify Data.
- Move the company file from the QBTest folder to the orginal folder.
- Finally, remove the damaged company file from the original folder.
Wrapping Up!!
All the reasons and the troubleshooting solutions mentioned in the article will assist you in resolving QuickBooks error 6120, 0. However, if understanding the above methods is complicated, and things are getting out of your hands, do not panic!! It is entirely OK to feel that professional help can be a better choice for you. Pick up the phone and dial QuickBooks Data Repair Service. Our support team is efficient and skilled in handling issues like this in the QuickBooks application.
Error 6120, 0 FAQs
ADR is an inbuilt feature in QB Desktop. It is available for Windows OS in Pro, Premier, and Enterprise Desktop versions. It helps you recover all the lost data effectively. But your file size has to be less than 1.5 GB. ADR recovers the lost file by utilizing the copy of the QB company file and recent Transaction Log File and restoring the lost transactions
To verify if a QuickBooks company file is damaged, you can use the built-in Verify Data utility. Go to the File menu, select Utilities, then Verify Data. QuickBooks will scan the file for errors and provide a report. If issues are found, you can attempt to rebuild the file to fix them
The two common reasons for triggering QuickBooks error 6120, 0 are corrupted QuickBooks installation or damaged company files. Issues with installation files or data corruption within the company file can lead to this error, disrupting normal QuickBooks operations and requiring troubleshooting to resolve.
The following are the alarming symptoms of error code 6120 in QuickBooks:
The Windows OS or the QuickBooks application might frequently start to crash.
You will not be able to enable the multi-user mode.
QuickBooks error message 6120 will start popping up on the server system and the workstations continuously.
You cannot launch the company file on the workstations and will see a QuickBooks company file error 6120 0 notification on the screen.
The system will freeze periodically.

Alastor Moody is an Author at Asquare Cloud Hosting with experience in technical and functional writing. He loves travelling for adventure and fun.