Last Updated on July 8, 2024
QuickBooks is a widely used accounting application around the world that helps simplify financial tasks with its amazing features. It can be used to manage financial records, process payroll for employees, etc. However, QuickBooks needs to be updated from time to time to make sure it adheres to the tax laws while managing payroll. But, sometimes, while updating the QuickBooks application, you might encounter QuickBooks error code 12029. As a result, you won’t be able to get the latest update and then face issues like being unable to calculate payroll taxes and process payroll.
There are multiple reasons behind error code 12029 in QuickBooks Desktop. In this blog, we will discuss all those reasons along with some easy solutions to tackle it, so keep following.
What Does QuickBooks Error Code 12029 Mean?
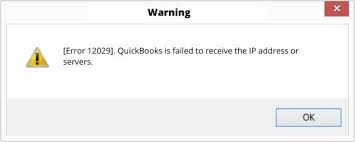
QuickBooks Error 12029 is an update error that appears while downloading the updates for the QuickBooks Desktop application and payroll. This error basically points towards a network connectivity issue that prevents QuickBooks from accessing the server. The error message for this error reads, “[Error 12029]: QuickBooks failed to receive the IP address or servers.”
QuickBooks Desktop application, at times, faces issues while connecting to the internet, which can cause updates to fail and windows error 12029 to appear. So, go through the next section to learn more about the reasons causing this issue.
What Causes QuickBooks Payroll Update Error 12029?
There are a lot of technical things involved when it comes to connecting with the server, and the failure of even one can lead to this error. It can be due to technical reasons, such as the wrong configuration in Windows, or even external reasons, such as poor internet connection. Let’s look at the possible reasons for QuickBooks update error 12029:-
- Poor or No internet connection.
- Update downloads fail because of interference by the Windows Firewall settings or any third-party application.
- Your SSL settings are wrong.
- The error number 12029 can appear if the system does not fulfill the Operating System requirements to run QuickBooks Desktop.
Troubleshooting Steps For QuickBooks Error Code 12029
As discussed above, there are multiple reasons for QB payroll update error 12029, so a single troubleshooting solution can not fix it. However, we have tried to mention some verified steps that can help you fix this error. So, once you have gone through all the reasons that might be behind the error code 12029, try the related troubleshooting methods to fix it. If you don’t know which specific solution to follow, try all of them.
Note- You need to ensure a few things before you directly jump into the troubleshooting method in order to test connectivity and settings:-
- Download and run the TLS 1.2 Utility.
- Internet Explorer is your default browser.
- You can access secure websites outside of QuickBooks Desktop, such as your financial institution’s sign-in page.
- Your company file is running in single-user mode.
You will have to consult an IT expert if you are not able to access a secure website outside of QuickBooks.
Method 1- Review Your Internet settings
Internet Explorer is one reason why QuickBooks error message 12029 might occur on your system. Follow these steps in order to do so:-
- Close down QuickBooks Desktop and run Internet Explorer.
- Choose Tools and then select Internet Options.
Note– You can also press Alt if you can’t find tools.
- Tap on the Security tab and then click on the Globe icon. Ensure that security is not more than Medium-high.
- Select Never Dial a Connection on the Connections tab if you don’t use the dial-up node (DUN) on the system, or choose ISP in case you do.
- Now tap on OK.
- Select LAN settings, then select Automatically detect settings and ensure that the Use a Proxy Server checkbox is unchecked.
- In case Use a Proxy Server has a tick mark, document the whole address and port.
- Do not uncheck the Use a proxy server option in case the port is other than 80.
- Unmark it if the port is 80 for testing purposes.
- Tap on OK.
- Select Restore Advanced Settings from the Advanced menu, then go under Settings, find TLS 1.2, and make sure it’s checked. (There is a possibility that these options are not available in Internet Explorer.)
- Now tap on OK.
- Now close Internet Explorer and restart your computer.
Method 2- Create a Windows Firewall Exception For QuickBook Desktop
As discussed earlier, firewall security is one possible reason behind QuickBooks online connection error 12029. So, to fix it, you need to manually add a Firewall port exception for QuickBooks using the steps below:-
- Tap on the Start button and search Windows Firewall in the search bar.
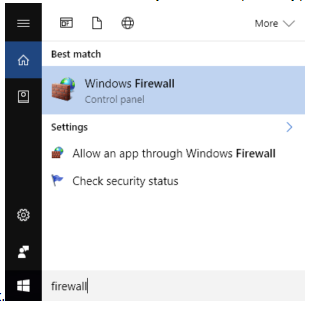
- Tap on Windows Firewall from the list of programs.
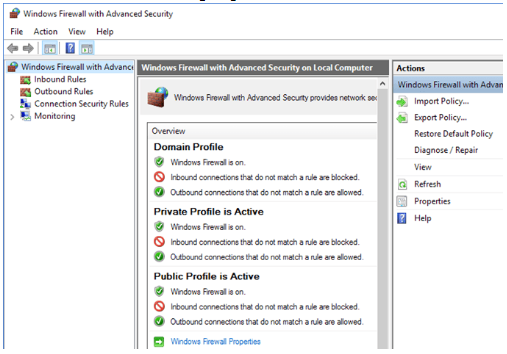
- Right-click the Inbound Rules under Advanced options and select New Rule.
- Click Next and select This Program Path under Programs
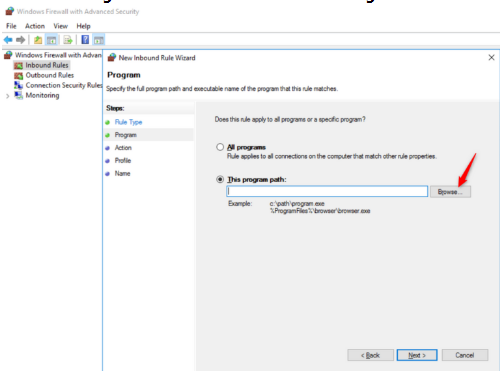
- Then, browse to the QuickBooks folder, and select one of the executable files mentioned in the table below, and hit Next.
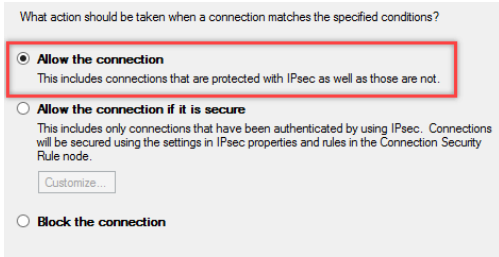
- Click the Allow the Connection option and then Next.
- Make sure you’ve checked all of the boxes before moving on to the next step.
- Give this rule a name, and then click Finish.
- To set outbound rules, follow the same steps as you did for inbound rules.
- This time, make sure to select Outbound rather than Inbound.
Here’s a list of QuickBooks executable files you need to add.
| Executable files | Location |
| AutoBackupExe.exe | C:\Program Files\Intuit\QUICKBOOKS YEAR |
| Dbmlsync.exe | C:\Program Files\Intuit\QUICKBOOKS YEAR |
| DBManagerExe.exe | C:\Program Files\Intuit\QUICKBOOKS YEAR |
| FileManagement.exe | C:\Program Files\Intuit\QUICKBOOKS YEAR |
| FileMovementExe.exe | C:\Program Files\Intuit\QUICKBOOKS YEAR |
| QuickBooksMessaging.exe | C:\Program Files\Intuit\QUICKBOOKS YEAR |
| QBW32.exe | C:\Program Files\Intuit\QUICKBOOKS YEAR |
| QBDBMgrN.exe | C:\Program Files\Intuit\QUICKBOOKS YEAR |
| QBServerUtilityMgr.exe | C:\Program Files\Common Files\Intuit\QuickBooks |
| QBCFMonitorService.exe | C:\Program Files\Common Files\Intuit\QuickBooks |
| QBLaunch.exe | C:\Program Files\Common Files\Intuit\QuickBooks |
| QBUpdate.exe | C:\Program Files\Common Files\Intuit\QuickBooks\QBUpdate |
| IntuitSyncManager.exe | C:\Program Files\Common Files\Intuit\Sync |
| OnlineBackup.exe | C:\Program Files\QuickBooks Online Backup |
Method 3- Reset the Previous QuickBooks Updates and Update It Again
The outdated QuickBooks version is a possible cause of this error. You can manually update QB and fix this error. Follow these steps to do so:-
- Close your company file and then close down QB.
- Tap on the Windows start button.
- Search for QuickBooks desktop and then right-click on it and select Run as Administrator.
- While the No company file window is open, click on the Help tab and select Update QuickBooks desktop.
- Go on to the Options tab and choose Mark all; now press save.
- Go on to the Update Now tab and then choose the Reset Update checkbox.
- Tap on Get Updates once you are ready.
- Once the Update is over, close QB, reopen it, and tap on yes to install the updates.
Method 4- Clean install QuickBooks in Selective Startup
There is a possibility that an existing application or extra files are interfering with the download process and leading to this error. So, you need to clean install QB in the selective startup to avoid any interference:-
Before starting the process, take into consideration the following points:
- Create a backup of your company file.
- Note down your QuickBooks desktop product and license info.
- Step 1: Switch to the Selective Startup Mode on the System
- This will make sure that no other application gets in the way of downloading the QuickBooks updates.
- Now press Window +R on your keyboard, the Run command window will open.
- Type in MSConfig and then press OK.
- Select Selective startup and Load system services from the General tab.
- Select Hide all Microsoft Services from the Services tab.
- Tap on Disable All.

- Unmark Hide all Microsoft services checkbox.
- From the list of services, make sure the Windows Installer checkbox is selected. Select the checkbox if it isn’t.
- Tap on OK.
- Select Restart on the system configuration window.
- Step 1: Uninstall or Reinstall the QuickBooks Desktop Application
- After you have switched to selective startup mode and restarted the system, clean install QuickBooks Desktop.
- Again press Windows+R and open Run command window.
- Type MSConfig and press OK.
- Select Normal startup in the general tab.
- Tap on Ok.
- Now restart your system.
Method 5: Check the Date And Time on the System and Correct It If Required
- You won’t be able to download the updates if the date and time on your system are incorrect. So, you need to check and correct them before downloading the QuickBooks Desktop updates. Here’s how you can do it:
- Go to the bottom right corner of the desktop and right-click the time displayed there.
- Choose the Adjust Date/Time option.
- Then, click the Change date and time option and correct the date and time.
- Click OK twice to save the changes.
- After this, close and open the QuickBooks Desktop application again.
- Try to install the updates again and check if you are still getting error 12029.
This was all about the QuickBooks error code 12029. In this blog, we have discussed everything that you need to know about the error to resolve it. Hopefully, you will be able to follow the instructions given above and resolve the error number 12029. However, if you face any difficulty while following any of the instructions or can’t resolve the error even after troubleshooting, we recommend you connect with our experts at Asquare Cloud Hosting.
Frequently Asked Questions
You are getting the error 12029 on Windows 8.1 because QB Desktop Pro 2019-R16P is unable to connect to the internet and thus cannot download the updates.
You can run the TLS 1.2 utility from the Tool Hub application to get rid of error code 12029. Here’s how:
In the Tool Hub application, locate and select the Installation Issues tab.
Then, select QuickBooks TLS 1.2 Tool at the bottom right corner.
Click OK to open the TLS tool and then Yes for the EULA Agreement.
After this, hit Run, and when it completes the process, hit Exit.

Oriana Zabell, a professional cloud engineer, has over three years of experience in desktop, online QuickBooks support and troubleshooting. She is currently working as a cloud hosting consultant with Asquare Cloud Hosting. She loves to read and write about the latest technologies such as cloud computing, AI, DaaS, small businesses, manufacturing. When not writing, she is either reading novels or is indulged in a debate with movie fanatics.