Last Updated on November 20, 2025
Mapped drives are essential in QuickBooks, as they enable you to access QB files on a different server. The problem arises when your QuickBooks not seeing mapped drives in the system, which occurs due to an incorrectly mapped drive. It can be because of an issue while finding the UNC path. When this happens, you become unable to access the mapped drive when opening or saving a file.
However, we can resolve this with the help of some effective troubleshooting methods. In this detailed blog, we will explore all aspects related to not seeing mapped drives in QB Desktop. We will thoroughly understand the reasons behind this problem and learn how to resolve it, ensuring seamless operation.
When troubleshooting the problem with mapped drives when working in QuickBooks, you may encounter technical difficulties. Consider seeking a free expert opinion by calling +1(855)-510-6487. QB professionals will assist you in addressing the issue!
Why is QuickBooks Not Seeing Mapped Drives? Some Possible Reasons
It is essential to understand the reasons that cause QuickBooks not seeing mapped drives in your system. The following are the potent triggers regarding this problem:
- It might be the case that your network drive is mapped incorrectly.
- The Network Discovery in your operating system is not enabled
- The computer’s disconnection from the path where the QB files are stored can also cause this glitch.
- Some changes you made to your QB company data file, such as renaming it or relocating it, can also be a reason.
- A damaged or incorrectly installed QuickBooks Desktop program
- When you are not able to obtain the IP address and DNS automatically, the main problem could be the UAC path.
- After accessing QuickBooks, ensure you are using a Windows account with administrative rights.
The above list includes all potential causes behind why QuickBooks not seeing mapped drives. After discussing the reason, let us walk you through the methods that will help you resolve it.
QuickBooks Mapped Drive Not Showing? Here’s What You Should Do
Once you have learned about the causes, it is essential to know the most effective troubleshooting methods to resolve the issue of QuickBooks not seeing mapped drives. Go through the steps below to resolve this issue.
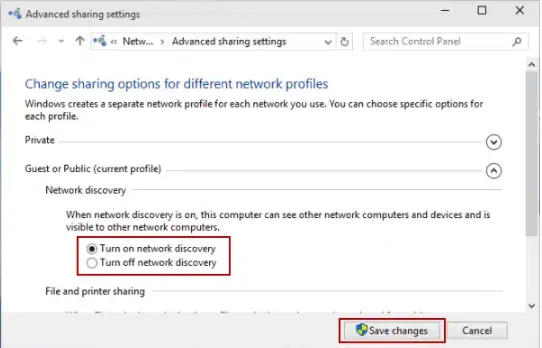
Method 1: Turn On the Network Discovery
If the Network Discovery on your computer is turned off, then it may cause this issue. In that case, you need to turn it on. Also, this will help you resolve it:
- Search Settings in the Windows search box
- Then, head to the Settings tab
- Next, click Sharing Options
- Choose and expand the Private Network
- Select the Turn On Network Discovery option
- Tap Turn on Automatic Setup of Network-Connected Devices
- Choose Save Changes to turn on Network Discovery and end the process
After enabling Network Discovery, you need to re-launch QB Desktop and check whether the issue is fixed. If the QuickBooks’ not seeing mapped devices’ problem persists, then proceed to the following method.
Method 2: Try Using QuickBooks With a New User
The problem might lie not with mapped drives, but with the QuickBooks user you are logged in as. Therefore, try with a different QB user. Here’s how you can create a new QB user:
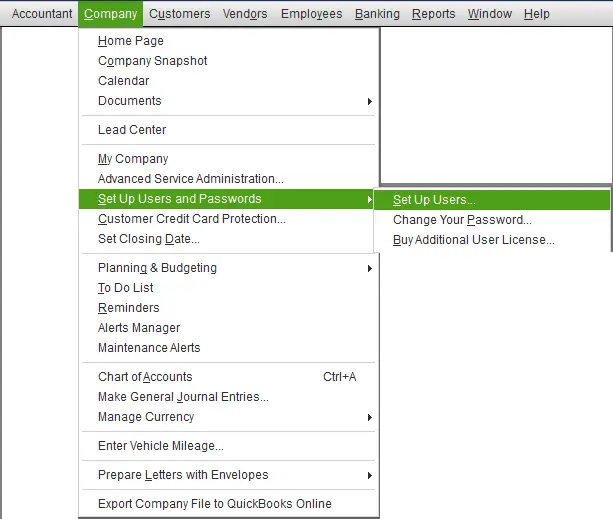
- Open QB and go to the Company menu
- Tap on the Set Up Users and Password tab, followed by Set Up Users
- Next, tap the Add User button and then provide all the required information, such as the username and password

- Then, choose Next, and then you will see a window where you can configure the access for the new user. You can choose from No Access, Full Access, or Selective Access.
- Once done, tap on Finish
Finally, check if the problem is resolved, and if you find QuickBooks not showing network drives, move to the next step.
Method 3: Grant Windows Access Permissions
If you are facing the same issue, you need to grant Windows access permissions to all the users on the network using the following instructions:
- Click the Start button
- Type File Explorer in the taskbar
- Tap the File Explorer icon
- Find the folder that contains the company file
- Right-click the icon of the company folder
- Select the Properties tab
- Head to the Sharing menu from the Properties window
- Select the Add option
- Choose the QBDataServiceUserXX icon that corresponds to the year of the QuickBooks Desktop
- Grant Full Control access permissions to the users
- Then, tap the Share option
- Click the OK button
From now on, you can easily access the company files from any workstation over the network. Check if the problem is resolved. If not, and you are still facing the same issue, proceed to the following resolution method.
Method 4: Disable the Firewall on Windows
Occasionally, the Firewall could prevent the connection between the device and the server. Additionally, in such a case, the situation is that QuickBooks not seeing mapped drives, which can occur. To resolve this problem, try disabling the Firewall so that QuickBooks can access the network drives.
Alternatively, you can try creating Firewall exceptions for QB.
Method 5: Try to Map a Network Drive in Windows
If you are still unable to locate the network drives, try remapping the network drive in the Windows Operating System. The steps to do this are based on the version of Windows you are using.
Windows 10
These are the instructions to map a network drive in Windows version 10:
- Press the Windows + E keys to open Windows File Explorer
- Then, tap This PC from the left pane
- Head to the Computer tab to choose the Map Network Drive
- Open the Drive list
- Select a Drive Letter to open the Folder box
- Type the folder’s path or choose Browse to find the folder
- Tap the Reconnect at Sign-in to connect whenever you log in to your computer
- Lastly, select Finish
The same steps given above will also work for the Windows 8 operating system.
Windows 11
Follow the steps below to map the Network Drive in Windows version 11:
- Go to the Taskbar, located next to the Start button
- Type to search the Windows File Explorer, and tap Windows + E on the keyboard to access the File Explorer
- Open it and select More
- Then, click on Map Network Drive
- Go through the Drive list to choose any available Drive Letter
- Next, open the Folder box
Note: Unable to find the Map Network Drive in the More menu? You should right-click “This PC” in the folder to open a command prompt.
- Lastly, type the computer or folder’s path or click the Browser to find the folder when you want. Then, choose Reconnect at sign-in and click Finish
After completing the given instructions, try to open the QB with the newly mapped network drive. However, if QuickBooks not seeing mapped drives, then you should follow the upcoming method.
Method 6: Try to Open the QuickBooks File Manually
This issue can arise due to a modification in the company file’s name or location. To address the problem of QuickBooks not showing network drives, you must find the data file by accessing it manually.
Step 1: Search the Company Files
Utilizing the server computer and perform a search for the company files by inserting the extensions in the search bar:
*.qbw for Working files
*.qbw for Backup files
*.qba for Accountants Copy files
*.qbx for Accountants Transfer files
*.qby for Accountants Change files
Ensure that the Asterisk (*) is included in the extension type, and note the file location after accessing it. After completing this process, head forward to step 2 to access the .QBW file.
Step 2: Here’s How to Access the .QBW File
After finding the file’s location, open the company file in QB Desktop by following the steps below:
- Head to the File menu
- Choose Open or Restore Company
- Then, select the Open a Company File
- Tap Next, choose the QB company file you wish to open
- Lastly, select Open
Next, verify that you can access the file on the mapped network drive. However, if QuickBooks not seeing mapped drives, you should follow the next method.
Method 7: Obtain the IP Address and DNS
If you can’t locate the UNC path, it could be the reason behind the problems with the mapped drive. In that case, it becomes essential to access and utilize the server’s IP address and DNS in the given order:
- Head to the Windows Start menu, find Settings, and open it
- Then, go to the Control Panel
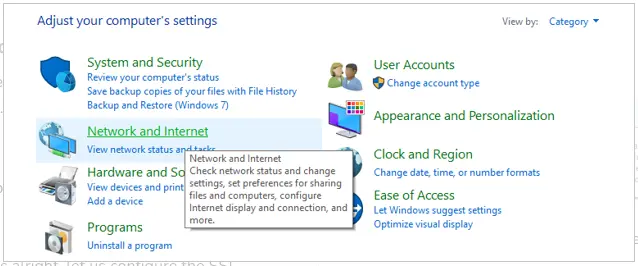
- Click on the Network and Internet, and choose Network and Sharing Center
- Choose the Changer Adapter option
- Move to the Network Connection window
- Right-click Ethernet, select Properties from the available options
- Click on the Networking panel
- Then, locate Internet Protocol Version 4 and select it
- Now, you need to uncheck the box next to it if it’s already marked
- Select the Properties option to open the IPv4 properties
- Click Obtain the IP Address Automatically
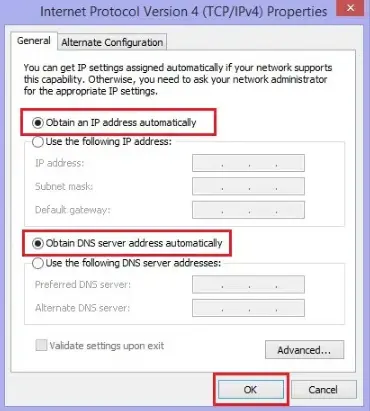
- Finally, select Obtain DNS Server Address Automatically and tap OK to apply the settings
From now on, the system will connect itself to the network, ending the need for manual resets. After completion, run the QB Desktop again and verify if you can find the mapped device. If you can’t find the mapped network device option, follow the next resolution method below.
Method 8: Ping the Server to Check the Network Connection
The problem mainly arises when locating the mapped drive due to a disconnection between the computer and the path where the QuickBooks file is located. Further, to make sure you are not disconnected, check the network connection by pinging the server as follows:
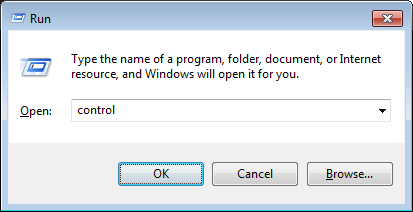
- Hit the Windows + R keys to open the Run dialogue box
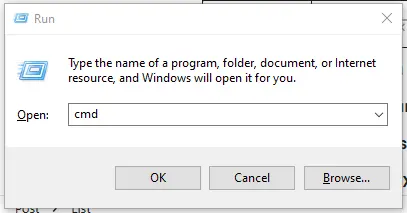
- Type CMD, and click OK
- Then, input the ipconfig/ all command, click Enter
- You should not down the Host/Server Name
- Type ping [name of the server]
- Choose Enter and check the reply for each in the given manner-
- When you see the prompt reply for each data packet, the computer should be connected to the network and verify that there are no connection issues
- Remember to confirm that there is a data issue when the data packet is lost or the reply is slow. To fix the internet problems, you should connect with an IT professional and get proper assistance
When you’re done solving the network issues, check again whether the QuickBooks not seeing mapped drives problem is solved. If it persists, follow the method below.
Method 9: Configure User Account as the Administrator
If you are using QuickBooks without proper access to admin rights, then you also can’t see network drives in Windows 11. It also prevents you from accessing some essential functions, such as saving files and PDFs. In such cases, verify whether you are accessing Windows with full administrative privileges and configure the user account into an admin account by following the steps below:
- Head to the Settings tab
- Select the Accounts to tap the Other Users button
- Next, go to the Other Users panel
- Then, select the flyout for the account to change
- Tap on Change Account Type, located next to the Account Options
- Choose the Account Type as Admin from the drop-down list
- Lastly, select OK
After obtaining Windows user accounts with admin rights, launch QB Desktop as an administrator. Then, verify if the QuickBooks not seeing mapped drives issue is solved, or continue to read if the problem persists.
Method 10: Repair Your QuickBooks Desktop
The faulty or damaged installation process of the QB program can be the reason why QuickBooks not seeing mapped drives. So, to fix it, you need to run some QuickBooks repair tools from the QuickBooks Tool Hub. Of course, to do that, you need to ensure that you have it on the computer. Next, let’s execute the steps below:
Step 1: Launch the Quick Fix My Program
The Quick Fix My Program tool will help you resolve issues related to QB program problems. Now, to run it, execute the steps given below:
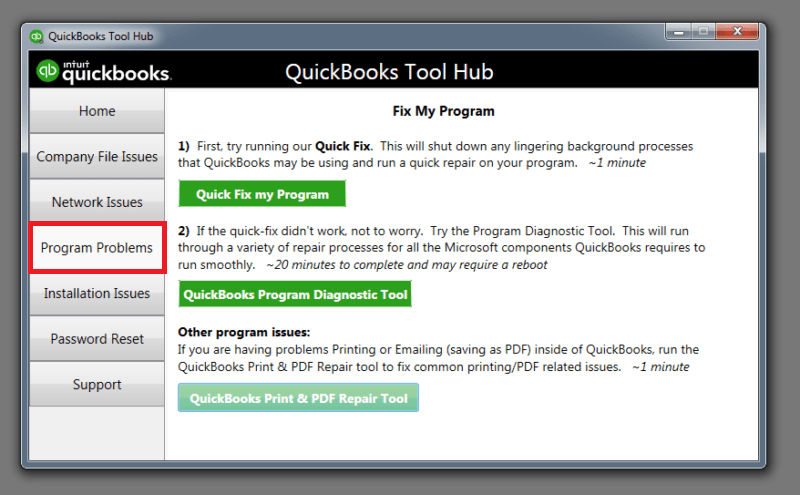
- Open the QuickBooks Tool Hub
- Head to the Program Problems tab
- Then, click the Quick Fix My Program tool
- Start the program repair process
- After the tool completes the repair, restart the QB and access the data file
Once you have completed the given procedure, check again to see if the problem is solved. Still facing the same issue? So, try the next step.
Step 2: Run the QB Install Diagnostic Tool
A faulty installation file can also be the primary issue; therefore, you should utilize the QuickBooks Install Diagnostic Tool. To do so, follow the steps below to avoid any further inconvenience.
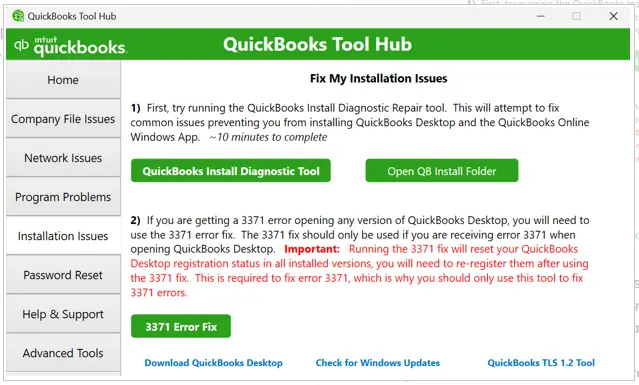
- Head to QuickBooks Tool Hub and open it
- Find the Installation Issues tab
- Then, choose the QB Install Diagnostic Tool
- Now, initiate the tool and perform the repair installation process. This process will take up to 20 minutes to complete
Also, ensure to update QB Desktop to its latest release. Once the process is complete, restart your device and check if the problem is resolved. However, if you continue to experience the same problem, try the following method.
Method 11: Clean Install the QuickBooks Desktop
Occasionally, the issue may be related to your QuickBooks installation itself. The QB you are using may be corrupted, and no repair tool can fix it. Therefore, you should clean install QB Desktop without any issues.
After completing the clean installation of QuickBooks, verify that QB can now access the mapped drives. Hopefully, the methods we’ve provided will resolve the QuickBooks issue where mapped drives are not visible in your system.
Standard Error Codes Related to Network Problems
The table below lists the standard error codes that occur when a network-related problem arises.
| Error -6073 -99001 | Error -H505 |
| Error -6000 | Error -5528 |
| Error -6130 | Error -12029 |
| Error -6000 -301 | Error -PS032 |
| Error -6000 -82 | Error -12007 |
| Error -6000 -305 | Error -15215 |
| Error -H202 | |
Error -6147 |
Go through the given table and learn about different error codes that indicate a problem with the network.
Conclusion
This detailed blog will help you understand why is your QuickBooks not seeing mapped drives. In this, we have covered many reasons that can lead to this issue. Additionally, we have discussed every primary method to resolve it.
However, when trying these methods, you may encounter technical difficulties, and the process can be time-consuming. If you ever feel under-confident in fixing it, you should seek expert guidance by calling us at +1(855)-510-6487. The QB professionals will help you with the same problem.
Frequently Asked Questions
How do you re-map a network drive in QuickBooks?
To remap a network drive in QuickBooks, start by clicking the Start menu and typing “This PC” in the search bar. Then, right-click the This PC icon and select the Map Network Drive tab. Next, select ‘Drive’ to choose the drive letter and use the ‘Browse’ option to locate the company file folder. Tap the ‘Reconnect at Sign-in’ option to ensure the mapped drives remain accessible every time from the server. End the procedure by tapping the Finish button.
Why can’t I see network drives in Windows 11?
Several reasons can lead you to this problem, in which you can’t see network drives in Windows 11. If your Network Discovery option is disabled or the drive is mapped incorrectly, you may encounter this problem. When you are unable to obtain the IP address and DNS automatically, or your workstation is disconnected from the path where the QB file is located. You may not be using the Windows operating system with administrative user rights. A damaged and faulty installation can also lead to this issue.
How do I make mapped drives appear?
Here’s how to access the company files when QuickBooks Desktop is not displaying the network-mapped drives. To do so, go through the UNC path to open the QB company file. Then, you need to open the company file after storing it on the hard drive. Utilize the company file to restore the backup file to a new location.
How to locate a data file in QuickBooks?
To locate the company data files in QuickBooks, follow these steps. Initiate by opening the Windows Start menu and typing “File Explorer” in the search bar to open it. Then, choose My Computer or This PC in the navigation bar. Next, type *.qbw, *.qbb to file all the files. Ensure to include the (*) before the extension. Alternatively, you can also search for *.qb to find QuickBooks files.

Kate is a certified public accountant (CPA) with expertise in various accounting software. She is technically inclined and finds passion in helping businesses and self-employed people carry out bookkeeping, payroll, and taxation without worrying about errors. Every once in a while, Kate loves to travel to far-off places and relax in the lap of nature.