You might run into QuickBooks error H202 or H505 when switching to multi-user mode. This implies that something, such as the Windows firewall, folder permissions, or antivirus, is disallowing your workstation to connect to the host computer (server). Here is the error message you might see on your screen:
| “This company file is on another computer, and QuickBooks needs some help connecting.” or “Problem with multi-user hosting setup. QuickBooks could not open the file in multi-user mode. (H202)” |
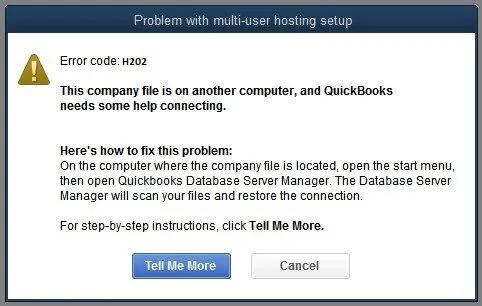
The error usually arises when the user tries to configure hosting for QuickBooks. In this guide, we will take you through the causes of the QuickBooks error code H202 in QuickBooks and guide you step by step on how to fix it. Alright then, let us begin!
Reasons for QuickBooks Error Code H202 While Switching to Multi-User Mode
Before you resolve a QB error, or for that matter, an error in any software, you must understand where it stems from. This is important to troubleshoot a problem and get rid of it from its roots. Here are some common reasons why you may run into QuickBooks error Code H202 while switching to multi-user mode
- Windows or an antivirus firewall on the server computer might be blocking incoming and outgoing communication.
- There might be a conflict with the DNS server.
- QuickBooks cannot get the IP address of the computer or server hosting the company file.
- The hosting configuration settings might be incorrect.
- More than one computer might be set to host the company file in the network.
- Either of the essential services, QuickBooksDBXX or QBCFMonitorService, or both, isn’t running on the host computer.
- The network data file (.ND) might be corrupt or damaged.
Now that we have an idea of what causes error H202 in QuickBooks Desktop, let us see how to fix it.
Before You Troubleshoot Multi-User Mode Errors in QuickBooks Desktop
There are some things you must ensure before you can work in multi-user mode in QuickBooks Desktop. We have listed them down below.
1. Update QuickBooks Desktop
With every new release, QuickBooks software comes with bug fixes, new features, and performance improvements. This is why you must update your QuickBooks Desktop to the latest release. Once you are done, proceed to the next step.
2. Create a Company File Backup
Your company file contains critical information that you cannot risk losing in any case. Therefore, before you make major changes to QB or its company file, create a company file backup. Once you have created a local backup of the company file, move to the next step.
3. Ensure QuickBooks Database Server Manager is Installed on the Computer
QuickBooks Database Server Manager must be installed on the computer you chose to host the company file. When you installed QuickBooks on the host computer, you were asked whether you wanted to use it to run the QuickBooks application on it, host the company file, or both. You should have opted to host the company and/or use QuickBooks. This would have installed QuickBooks Database Server Manager on it.
Now, if your computer doesn’t have QB Database Server Manager on it, it means you didn’t choose that you wanted to host the company file when you were installing QuickBooks Desktop. If that is the case, you need to install QuickBooks Database Server Manager.
4. Make Sure You Have a Stable Network Connection
The QuickBooks multi-user environment needs a stable and strong network connection to work. Therefore, check that all the workstations and the host computer are connected to the same strong and stable network. You can try an internet speed tester, browse the internet, or play online videos to test the internet speed.
With these things taken care of, you might be able to switch to multi-user mode in QuickBooks Desktop without getting error code H202. If the error persists, move to the next section for comprehensive troubleshooting.
How to Resolve QuickBooks Error H202 – Can’t Switch to Multi-User Mode
In this section, we will walk you through steps to troubleshoot QuickBooks error code H202 while switching to multi-user mode. This will include troubleshooting various aspects of a multi-user environment, such as the Windows Firewall, antivirus, hosting configuration, folder permissions, and so on.
Therefore, go through these instructions and follow them in the order they are given.
1. Check the Hosting Configuration on Both Workstations and Server
In multi-user mode, only one computer must host the company file and act as the server. This is the computer you choose as the host computer.
The rest of the computers are workstations, and they should not be set to host the company file. We need to check two things here. Firstly, we need to ensure that hosting is turned off on all the workstations except the host computer. After that, we will check and make sure hosting is enabled on the host computer.
(i) Turn Off Hosting on Workstations
Go to a workstation and follow these steps.
- Launch QuickBooks Desktop on the workstation where you get error codes like H101, H303, or H505.
- Don’t log into the company file. Go to File, followed by Utilities.
- Now, you might see the Host Multi-User Access option or Stop Hosting Multi-User Access option.
- If you see the Host Multi-User Access option, don’t click it. This means the hosting isn’t enabled on this workstation, and the workstation isn’t the root of the problem. You can move to the next workstation.
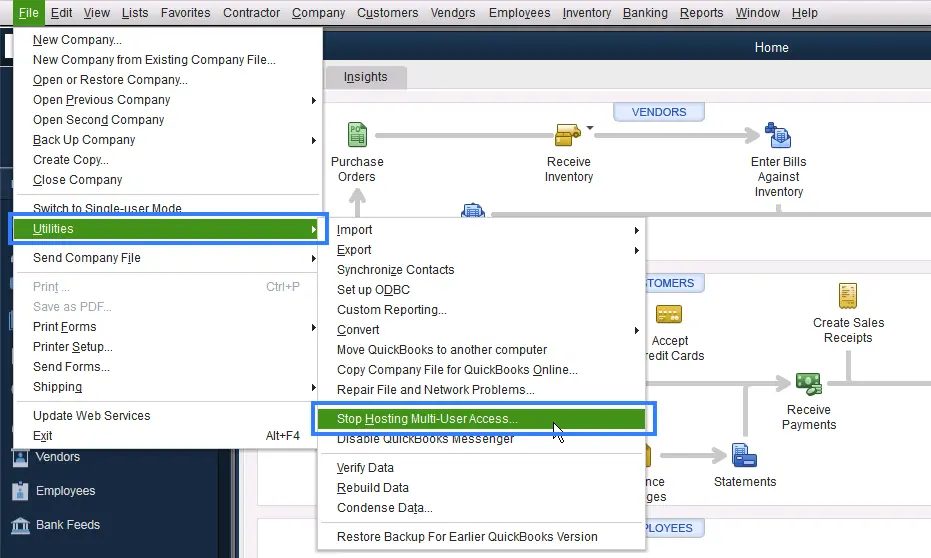
- However, if you Stop Hosting Multi-User Access option, click it. This will stop the workstation from hosting.
Now, repeat the above-mentioned steps on all the workstations. Once you are done, move to the next step.
(ii) Turn on Hosting on Server Computer
Go to the server computer where QuickBooks needs to be hosted and make sure the hosting is enabled there.
- Launch QuickBooks on the host computer (server).
- Go to File, followed by Utilities.
- Now, you might see the Host Multi-User Access option or Stop Hosting Multi-User Access option.
- If you see the Stop Hosting Multi-User Access option, don’t click it. This means the hosting is already enabled on this computer.
- If Host Multi-User Access is an option, choose it. This will begin hosting on the server computer.
Now, go back to the workstation where you wish to access the company file in multi-user mode. There, launch QuickBooks and switch to multi-user mode. However, if the problem persists, move to the next step.
2. Run QuickBooks Database Server Manager from Tool Hub
QuickBooks Database Server Manager facilitates the multi-user network. It needs to be running on the host computer for you to be able to work in multi-user mode. The reason for the error H202 could be QuickBooks Database Server Manager (QBDBMgrN) not running on the computer. Therefore, let us run it manually from the Tool Hub. To do so, you will need to install QB Tool Hub on your computer.
Now, close QB Desktop on the host computer and the workstations. Once you have QB Tool Hub installed on your computer, follow the steps below.
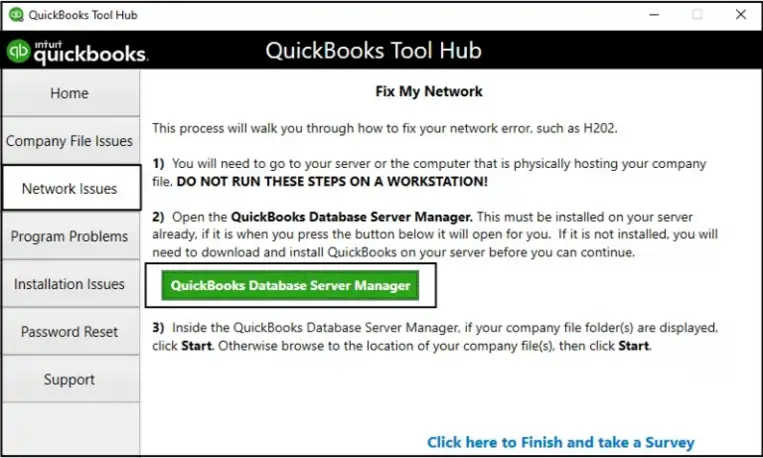
- Launch QuickBooks Took Hub and go to the tab for Network Issues.
- Choose QuickBooks Database Server Manager.
Note: If you do not have QuickBooks Database Server Manager installed on your server computer, Tool Hub will ask you to install it.
- Now, when QB Database Server Manager opens, check if you can see the folder where you store your QB company file on the home screen. If you can’t, click Browse and find where the company file is located.
- Now, choose Start Scan.
- QBDBMgrN will now scan your company file folder and repair Windows Firewall permissions automatically if required.
- Once the scan finishes, choose the Close option.
Now, launch QB on the workstation you faced error codes H202, H303 or H505 on, and check if you can work in multi-user mode without an error on it.
If you continue to see an error, run QB File Doctor to check both the company file and network. We have provided instructions for this in the next solution.
3. Run QB File Doctor to Check the Company File and Network
QuickBooks File Doctor comes with the functionality to check both company files and the network. This will help you resolve company file and network issues that might lead you to get a QuickBooks error code H202 when initializing multi-user mode.
Therefore, run QuickBooks File Doctor and when you see three options, choose to check both the company file and network.
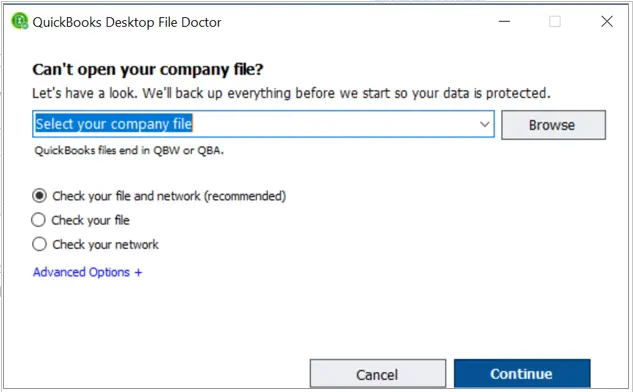
Once the tool is done repairing your company file and network, switch to multi-user mode and check if the error is resolved.
Ensure QB Services are Running on the Host Computer
If you have enabled multi-user hosting on your server computer and yet find an error H202, let us check if the QuickBooksDBXX and QBCFMonitorService are running on your computer. These services must be running for the multi-user mode to work without an error.
- Press the Windows + Run key on your keyboard to open the Run command.
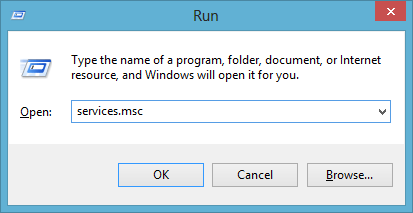
- Type in services.msc into the Run window, and hit Enter.
- Locate QuickBooksDBXX on the list and double-click on it. (Remember, you will see something like QuickBooksDB31, not XX because XX is the version of QuickBooks that was added with 10. For instance, if you use QuickBooks 2023, you will see QuickBooksDB33.)
- For Startup Type, select Automatic.
- Now, you need to ensure the Service status is either Running or Started. Otherwise, choose Start.
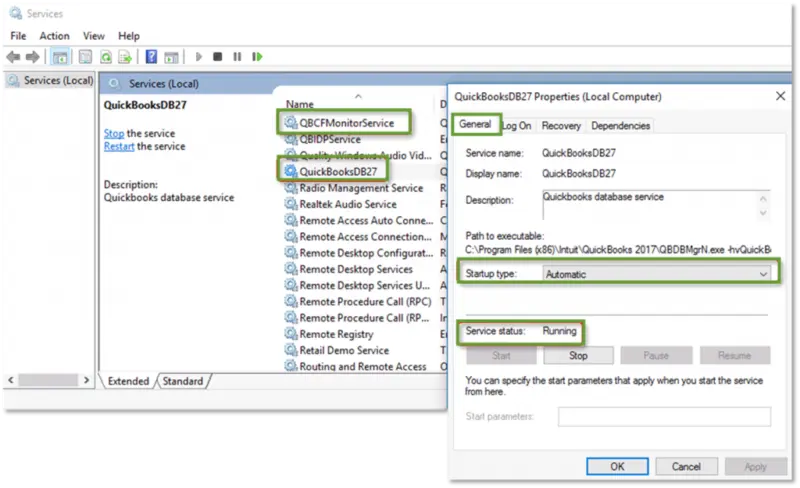
- Now go to the Recovery tab.
- One by one, go to the drop-down menus for First failure, Second failure, and Subsequent failures, and choose Restart the Service.
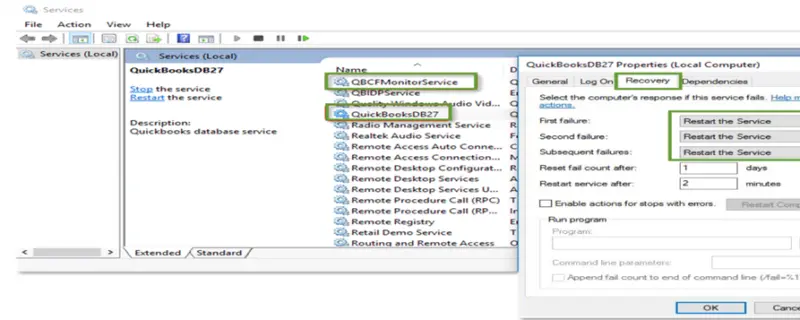
- Now, tap on Apply and choose OK. This will save the changes. Once done, repeat all the above steps for QBCFMonitorService.
Finally, go to the workstation where you faced QuickBooks error H202 and launch QB Desktop there. Switch to the multi-user mode and access the company file.
If you still find an error, let us check and make sure that QB has adequate permissions to access the company file and host it over the network.
5. Give QB Services Admin Permissions and Configure Folder Permissions
Services like QuickBooksDBXX and QBCFMonitorService must have permission to run as administrators on the server computer. Therefore, ensure that they have the required permissions. Moreover, QuickBooks needs access to the folder where the company file is stored on the server computer. Therefore, set up folder permissions to allow QB the access it requires.
Once done, resume your operations and check if the error H202 you faced earlier is resolved.
6. Configure Firewall Settings to Allow QuickBooks Through It
Often, the Windows firewall, antivirus, or other security system might interrupt QuickBooks programs on the server computer and prevent it from functioning or connecting to the internet. Certain QuickBooks programs must be running on the host computer so you can switch to the multi-user mode or work on it without error code H202 in QuickBooks Desktop.
Therefore, check your Windows firewall and ensure QuickBooks has access through it. Moreover, if you have security software or antivirus, create antivirus exceptions for QuickBooks. Once you have done so, restart your computer and now try to switch to multi-user mode. Check if the error you faced earlier is resolved.
7. Ping the Host Computer from a Workstation
The network connection should be good for connecting to the company file stored on the server computer. Otherwise, you will find QuickBooks cannot communicate with the company file. Therefore, let us try to ping the host computer from the workstation and check if there is a good network that connects them both.
Firstly, enable Network Discovery on your server computer and the workstations where you face QuickBooks error code H202. To do so, follow the steps listed below.
- Launch the Start menu on the host computer and workstations.
- Type in Network into the search box and choose Network and Sharing Center.
- Go to Change advanced sharing settings.
- In the Network Discovery and File and Printer sharing sections, check and make sure that Turn on Network Discovery is chosen.
Now, get the server name from your host computer.
- Press the Windows + R keys on your keyboard to launch the Run window.
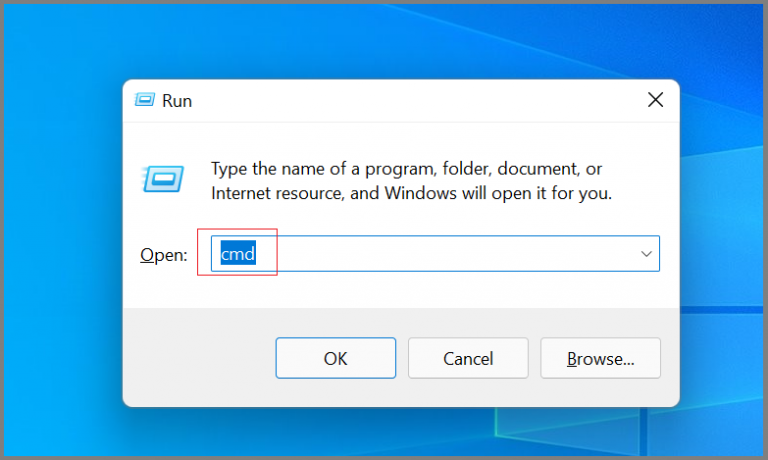
- Type cmd in the Run window, and hit Enter.
- Now, type ipconfig/all when the CMD window opens and press Enter.
- You will be able to see the Host Name in the Windows IP Configuration section. The server name is on the right.
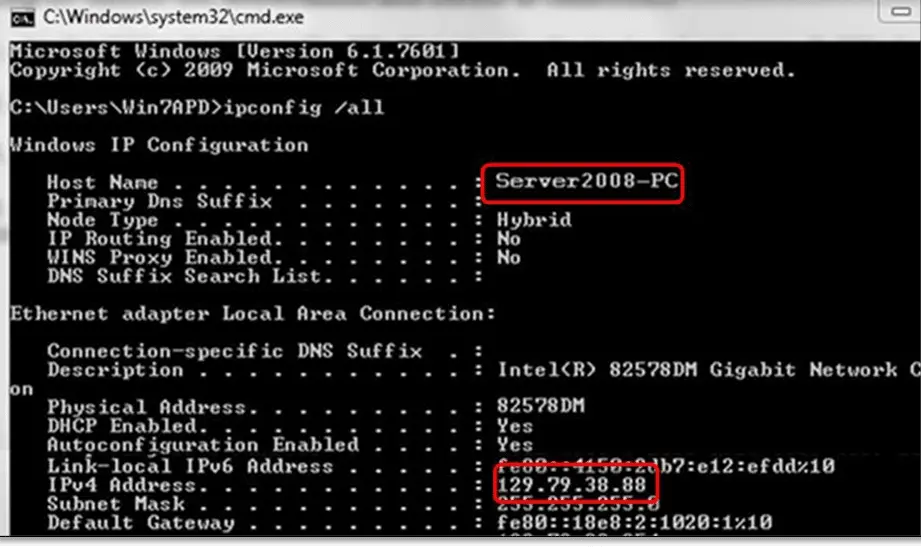
- Note down the hostname, or copy and paste it into a MS Word file.
Lastly, ping your workstations from the server computer to test the connection.
- Press the Windows + R keys on your keyboard to launch the Run window.
- Enter cmd in the Run window, and hit Enter.
- Type in ping [your server name] (without the brackets) and then hit Enter.
- Repeat the same steps at all the workstations.
If you get a reply for ping at each workstation without any packet loss, there is no problem with the network. You can move to the next solution. However, if there is a packet loss, connect with an IT expert or technician to repair the network connection.
How to Fix H202 Error When Server Computer is a Non-Windows OS
You might run into QuickBooks error H202 in those situations as well when the server computer is not a Windows computer but is Linux or Citrix. There are some reasons in addition to the general reason for the H202 error mentioned in the previous section:
- The hostname of the Fedora Linux server hosting the company file might be set to its Fully Qualified Domain Name (FQDN). For instance, it might be [ComputerName].[DomainName].com.
- You might be using a 64-bit version of Linux.
To resolve QuickBooks error H202, you can utilize the general steps mentioned in the previous section, such as checking the hosting configuration and ensuring the workstations can communicate with the host computer or server.
However, the Windows-specific steps will not fit here. Therefore, we have listed some dedicated steps for Fedora Linux and Citrix. Go through the instructions in these sections and follow them carefully.
Section 1: When the Server is Fedora Linux Computer
If your server computer runs on Linux operating software, follow the solutions below one by one. They will help bypass broken Domain Name Settings (DNS) within Windows.
Important Note: If you are not confident about carrying out the steps listed below, please reach out to an IT expert.
1. Edit the Host File of Each QB Workstation to Add the Server’s Fully Qualified Domain Name
You need to run the steps listed below on every workstation where you run QuickBooks to edit the host file there and add the server’s domain name.
- Firsty open the etc folder by launching the Start menu and typing in Run. Open Run application, type %SYSTEMROOT%\system32\drivers\etc in the Run box and then choose OK.
- Now, double-tap on the file named Hosts.
- Under Programs, choose Notepad, followed by OK.
- In the next line that is blank, type in the Linux server’s IP number. Now, press the Tab key on the keyboard, then type in the fully qualified domain name of the Linux server.
- Navigate to the File menu and then Save.
- Now, click on File and then Exit.
Repeat the same step for all workstations. Finally, try accessing your company file in multi-user mode on a workstation and check if it works. If you get an error, move to the next step.
2. On the Linux Server, Modify the QBGlobalAppConfig.ini File
Now, let us edit the QBGlobalAppConfig.ini file on the Linux host computer.
- Launch the Linux Terminal Window.
- Go to the QBGlobalAppConfig.ini.
- Now, verify the default range for ports, and if there are any spaces before and after the (=) equal sign, remove them.
| QuickBooks version | from | to |
| QuickBooks Desktop Enterprise 20.0 | 55388 = 5 | 55388 = 5 |
| QuickBooks Desktop Enterprise 19.0 | 55383 = 5 | 55383 = 5 |
| QuickBooks Desktop Enterprise 18.0 | 55378 = 5 | 55378 = 5 |
| QuickBooks Desktop Enterprise 17.0 | 55373 = 5 | 55373 = 5 |
To find the complete list of ports, Install Linux Database Server Manager.
- Now, save the QBGlobalAppConfig.ini file.
- Finally, stop the QBDBFILEMON and QBDBMGRN services and restart them.
Finally, try switching to multi-user mode. If you get the QuickBooks error H202, try the next solution.
3. Map the Drive
The last resort to work in multi-user mode is to map the drive where your company file is stored on every workstation. Therefore, setup a mapped drive to the Linux server’s IP address.
Section 2: When Server is a Citrix Computer
You might run into error H202 in the QuickBooks server on Citrix when the file is hosted using client-side application virtualization.
To resolve this, use the server-side application virtualization to host QuickBooks company files.
We cannot guide you about the individual server configuration issue in detail due to the complexity and sheer quantity of Citrix server configurations that are possible. Consult a local computer specialist or your system or network administrator if you require additional help setting up Citrix servers.
Conclusion
This was all on why you can’t switch to multi-user mode and get QuickBooks error H202 whenever you try to do so. We saw various solutions where we troubleshoot a specific aspect of multi-user mode. Comprehensive troubleshooting is important to resolve a deeply rooted error like H202.
Therefore, carry out the instructions carefully, and if you face difficulty self-troubleshooting it or even after the error persists, speak to a QB expert. Dial +1(855)-738-0359 and connect with a QB expert now!
Frequently Asked Questions
QuickBooks might not be able to switch to multi-user mode because of incorrect hosting configuration or an issue with the Windows Firewall. The workstation might not be able to communicate with the server, or an antivirus or security software is disallowing the QB Programs from running.
QuickBooks error H202 is a multi-user mode error, which implies that the workstation is not able to communicate with the server. This might result from plenty of reasons, such as incorrect hosting, firewall on antivirus blocking, poor network connectivity, and so on. Learn how to resolve error H202 in QuickBooks Desktop with the help of this guide.
To open QuickBooks in multi-user mode, all you need to do is go to the File menu and choose the appropriate option. Tap on the File menu and choose Switch to Multi-user Mode.
You might not be able to switch to multi-user mode if a user has opened the company file in single-user mode. If that is the scenario, you can go to the user who has opened the QB file and delete it from their recently accessed list. Finally, re-add it, and you will see the option to Open the file in multi-user mode.

Kate is a certified public accountant (CPA) with expertise in various accounting software. She is technically inclined and finds passion in helping businesses and self-employed people carry out bookkeeping, payroll, and taxation without worrying about errors. Every once in a while, Kate loves to travel to far-off places and relax in the lap of nature.