Last Updated on February 26, 2026
When you purchase a QuickBooks subscription, you receive valid purchase credentials, such as the product number, license number, and validation code. The QBregistration.dat file stores the information about the QB product and its license. You can register your QuickBooks product with Intuit using these credentials.
However, sometimes you need to reset QuickBooks registration to validate the license and continue using the software, which we will discuss in this blog.
A Brief On What Is QuickBooks Registration File
QuickBooks registration file (qbregistration.dat) stores all information related to license and product registration. This helps verify the product’s validity every time you open QuickBooks. It acts to support the authenticity of your product. The file is usually hidden in Windows and can be found by following the file path:
| C:\ ProgramData\ Common Files\ Intuit\ QuickBooks |
Make sure to edit the Install ID and License Number in the QBregistration.dat file while you begin to reset QuickBooks registration. However, the detailed steps to edit and replace the license registration information in QuickBooks registration file have been discussed in the later section of this blog.
Related Post: Select A Guide on QuickBooks Already Has a Company File Open Error
Important Things to Ensure Before You Reset QuickBooks Registration Timer
Below, we have mentioned all the major considerations that you must take into account to avoid any issues while you reset QuickBooks registration timer.
- To register your product with Intuit’s server, it’s important to have an active internet connection
- Your company file won’t be affected while trying to reset QuickBooks registration
- Make sure to keep your registration details, such as the Product code, License number, and validation code
- You can get all the information related to your License and Registration through Intuit’s CAMPS portal. CAMPS stands for Customer Account Management Portal, developed by Intuit to provide valuable details to QuickBooks Desktop users
- You will receive a purchase confirmation email if you purchase the product online. You can find the license number and the concerned product information in this email
- However, when buying a physical CD of the QuickBooks program, you can find a bright sticker pasted on the original envelope
- If you are somebody who has subscribed to the monthly or annual plans, then you will get an email that has the license and product information
- Now that you have the product information, you may try to reset the QuickBooks registration of your product
After discussing the important factors, follow the next section to implement the process to reset QuickBooks registration.
Read More: Facing a QuickBooks Registration Error? Learn how to fix activation issues, validate your license, and restore full access so QuickBooks runs smoothly without interruptions.
3 DIY Methods to Reset QuickBooks Registration
Below, we have mentioned all the possible methods that can help you reset QuickBooks trial period on your system.
Method 1: Create QBregistration.dat File
One effective way to reset QuickBooks Desktop registration is to create the qbregistration.dat file. You may do this by following the steps given below.
- Firstly, close your company file and then shut down all the active windows of your QuickBooks application
- Simultaneously press Windows + E keys to open the File Explorer window
- After that, go to your C drive and move to the installation folder of your QuickBooks application. You can locate it by following this file path: ProgramData > Common Files > Intuit > QuickBooks
- Right-click on the empty screen when you are inside the folder and hover over the New option
You can also try the next method to reset QuickBooks registration by creating a new text document.
Method 2: Create a New Text Document
Follow the instructions below to use this alternative method to reset registration in QB software.
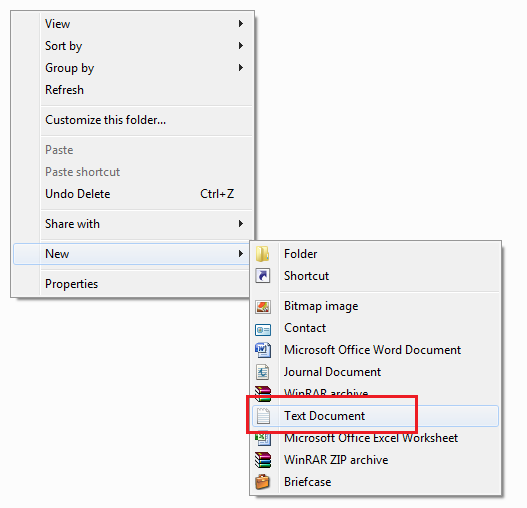
- From all the options provided, click on Text Document
- Further, you have to copy the following text into the Notepad window that opens up
Note: Users who have QuickBooks Pro should replace xx.x with Pro. Moreover, put 20.0, 29.0, and 28.0 instead of xx. x for QuickBooks Desktop 2020, 2019, & 2018 versions, respectively.
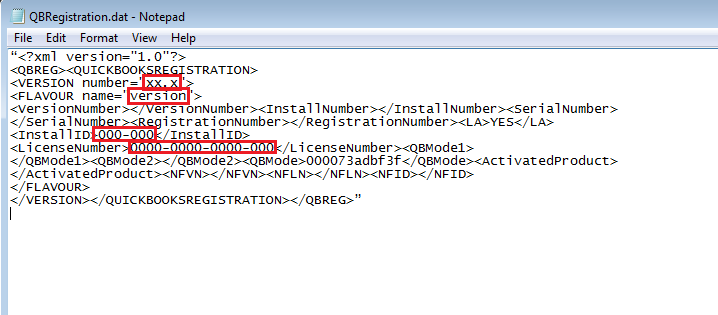
- Now, instead of the zeroes at the first six places of the second line, enter the number provided to you as your Product ID
- Whereas, the next series of 15 zeroes will be replaced by your product license number
- Make sure not to remove any characters in the text, such as the dashes (–)
- Now, go to the File menu of your Notepad window and click on Save as
- Then, enter qbregistration.dat in the Name column and All Files in the Save as type option
- Lastly, save your file by clicking on Save
We have mentioned an alternative way of resetting the registration in the QuickBooks application. Follow it if this one doesn’t work.
Read Also: Discover how QuickBooks Auto Data Recovery helps restore lost or damaged company files. Use ADR tools to recover transactions, rebuild data, and keep your accounting safe and accurate.
Method 3: Rename the Registration File to Recreate it
To reset QuickBooks registration, you may try to rename the original qbregistration.dat file. After renaming the file, QuickBooks can’t identify it, so you have to register it again. When you register, a new qbregistration.dat file is created automatically. To rename, you may follow the steps below.
- At first, you have to close all the company files that are running in the background
- Besides, you need to close the QuickBooks Desktop application as well
- Now, click on the Windows icon and search for Windows Explorer
- Open the explorer window and go to the C drive by following the file path to reach the QuickBooks installation folder: C:\ProgramData\Common Files\Intuit\QuickBooks
- Further, allows you to view hidden files and folders, then go to the qbregistration.dat file. Alternatively, you may find it through the Search option as well
- Right-click on the file and click on the Rename option
- Add .old at the end of the file name and press the Enter key. It will make your old file unidentifiable
- At last, QuickBooks will ask you to register the QuickBooks application once again
These were the proven ways to reset QuickBooks registration. We hope that these methods will help you to completely set up your QB software.
Recommended To Read: How to Fix QuickBooks Connection has been lost Error Message
A Quick View on How to Reset QuickBooks Registration
The table below will show you the condensed version of the information we have covered in this blog on how to reset QuickBooks registration timer.
| QBregistration.dat file description | The QuickBooks registration file (qbregistration.dat) contains information about the license and product registration. It provides the validation that the product is authenticated. |
| Proven Methods to reset QB Registration | Create a qbregistration.dat file, create a new Text document, and rename the registration file to recreate it. |
Conclusion
We have covered all the effective methods that can help you reset QuickBooks registration without any hassle. However, if you get stuck while following the above-listed methods and need any further assistance, we would suggest you give us a call at Asquare Cloud Hosting Helpline. Our experts are available round the clock to help you with any QB-related query
Frequently Asked Questions (FAQ’s)
How do you delete a QuickBooks registration file?
You can delete the qbregistration.dat file in the QuickBooks installation directory to remove the registration file. Back up important data before making changes to maintain data integrity.
How can you reset a company file in QuickBooks?
To reset the company file in QuickBooks, carry out the steps below.
1. Open QB and head to File
2. Click Open or Restore Company, then Open a Company File
3. Select the company file to reset, select Open
After that, follow the prompts to create a backup and reset. Be cautious: this action cannot be undone, and the data will be overwritten with the backup.
How can you register the QuickBooks Desktop license and product information?
To register in QB Desktop, implement the steps below:
1. Start by opening QB Desktop
2. Then, choose Register QuickBooks from the QuickBooks menu
3. Next, enter the License and Product information, select Next
4. Now, there are two methods to register in the QB first, where you can register the QB with a validation code on the phone. Second, where you should register via the online site

Alastor Moody is an Author at Asquare Cloud Hosting with experience in technical and functional writing. He loves travelling for adventure and fun.