Last Updated on July 5, 2024
QuickBooks Error 12057 is an internet connection-related issue that occurs while trying to download QuickBooks Desktop or payroll updates. This error belongs to the 12XXX series of errors in QB and indicates that QuickBooks is unable to establish a secure internet connection to download the updates. When QuickBooks can’t access the necessary servers or resources required to get the updates, you might also get other 12XXX series of errors. It generally is a result of incorrect internet browser settings or restrictions imposed by the Windows firewall or third-party security software. You are notified about this error with an error message that reads ‘Communication with Intuit Server: Failed to initialize. Error 12057 in HttpSendRequestW().’ Let’s check out the troubleshooting you need to perform to resolve QuickBooks update error 12057.
Common Reasons That Might Lead To QuickBooks Error Code 12057
Identifying the specific cause of the error is crucial for implementing the appropriate solution. By addressing these common causes, you can QuickBooks Connectivity Error Code 12057 effectively. Here’s a list of all those reasons that can trigger error 12057 in QuickBooks Desktop.
- Internet connectivity issues: Issues with the internet connection settings on the computer running QuickBooks primarily cause this error.
- Firewall or security software blocking QuickBooks: Firewall and security software can sometimes block QuickBooks from establishing a connection to the server, triggering Error 12057.
- Incorrect SSL settings: may also cause the error. QuickBooks relies on SSL to establish secure connections, and improper SSL configuration can lead to QuickBooks Error 12057.
- Outdated version of QuickBooks: An outdated QuickBooks Desktop application can also interrupt the download process of payroll updates in the form of error 12057.
- Problems with Internet Explorer: QuickBooks utilizes Internet Explorer settings to establish a connection with the Internet. If there are issues with Internet Explorer settings, such as incorrect proxy configuration and TLS settings, it can lead to QuickBooks Payroll Error 12057.
Solutions for QuickBooks Payroll Error 12057
Once you are able to determine the cause of this error, it becomes easier for you to choose the right troubleshooting solution. Here are some of the best solutions that you can choose from to fix payroll update error 12057.
Solution 1: Test Internet Connectivity and Settings
QuickBooks requires stable internet connectivity to download the updates; if there is an issue with it, you may get error 12057. With this solution, we will fix the internet connectivity by running the TLS 1.2 Utility and verify the stability of the connection by accessing some other secure websites.
Run TLS 1.2 Utility for QuickBooks Desktop
TLS 1.2 is an Internet security protocol that helps increase the system’s security over the network. You can run the TLS 1.2 Readiness tool from QuickBooks Tool Hub to make it TLS 1.2 compliant.
Download and Install Tool Hub on the System
To run the TLS 1.2 Readiness tool, you first need to download the QuickBooks Tool Hub application on the system, and here’s how you can do it on Windows 10, 64-bit OS.
- First, close the QB Desktop application and download the most recent version of QB Tool Hub.
- Save the file on the system where you can easily find it, like the Downloads folder or the Windows Desktop.
Note: If you have already installed Tool Hub on the system, you need to check the version you have to ensure it is the latest one. You can get the version at the bottom of the Home tab.
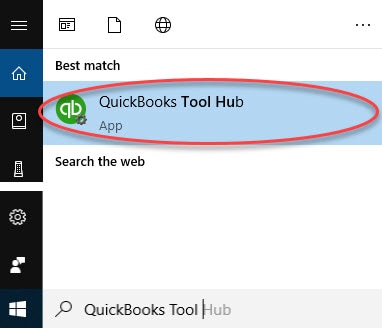
- Now, open the QuickBooksToolHub.exe file that you downloaded.
- Follow the on-screen instructions to install the tool hub application, and agree to the terms and conditions.
- When the tool hub gets installed, double-click the icon on the Windows desktop to launch it.
Note: If you cannot find the icon, search for tool hub in the Windows search field and select the program.
Run the TLS 1.2 Utility from the QB Tool Hub
- Once the tool hub application is up and running, go to the Installation Issues tab.
- Then, click the QuickBooks TLS 1.2 Tool from the bottom right corner.
- Click OK to open the tool, followed by Yes to the EULA Agreement.
- Then, hit Run to run the tool, and once it completes the process, click Exit.
Try To Access a Secure Website Outside the QuickBooks Application
You must now check the internet connection by accessing a secure website outside of the QB Desktop application, like the sign-in page of your financial institution. If you can access the website, the issue is with QB, and you need to check the other solutions. However, if you cannot access a secure website outside QB, you must consult an IT expert to fix the internet connection.
Read Also: How to Repair QuickBooks Error 6177? (Can’t Use the Path Issue)
Solution 2: Check the Internet Explorer Settings On the System
QB relies on Internet Explorer settings to establish a secure internet connection. Misconfiguring the settings can trigger errors while downloading updates So, you must review and edit the settings to let QuickBooks connect to the internet to download the updates.
- Launch the Internet Explorer browser on the computer.
- Click the Tools option, followed by the Internet Options. Press the Alt key if you cannot find the Tools option.
- In the Internet Options window, navigate to the “Security” tab. Select the Globe icon and set the security level to “Medium-high.” If it’s already set to this level, leave it unchanged.
- Then, on the Connections tab, choose the Never Dial a Connection if you do not use the dial-up node (DUN) on the system, or choose the correct ISP if you use DUN and then hit OK.
- After this, select LAN Settings, checkmark the Automatically Detect settings checkbox, and check if the Use a Proxy Server checkbox is clear. Write the complete address and port if the box against Use a Proxy Server is selected.
- If you find any port other than port 80, do not uncheck the Use Proxy Server checkbox.
- If the port is port 80 only, then you can clear the checkbox for testing purposes.
- After following the steps mentioned above, click OK to move ahead.
- On the Advanced tab, click the Restore Advanced Settings option, checkmark the Use TLS 1.2 option under the Settings section, and make sure it is selected.
- Lastly, hit OK, close Internet Explorer, and restart the system.
- Now, open the QuickBooks Desktop and try to update it again.
Solution 3: Manually Configure the Firewall Settings On the System
Add a Firewall port exception for QuickBooks Desktop
If the Firewall on the system restricts the QB application from completing the downloads, then add the Firewall port exceptions for QuickBooks in the following way:
If you have multiple versions (years) of the QB Desktop application on the same system, then you need to perform the below-given steps for all the versions:
- Click the Start button, type Windows Firewall in the search bar, and open it from the results.
- Click the Advanced Settings option and right-click the Inbound Rules.
- Select the New Rule option, followed by selecting the Port and Next options.
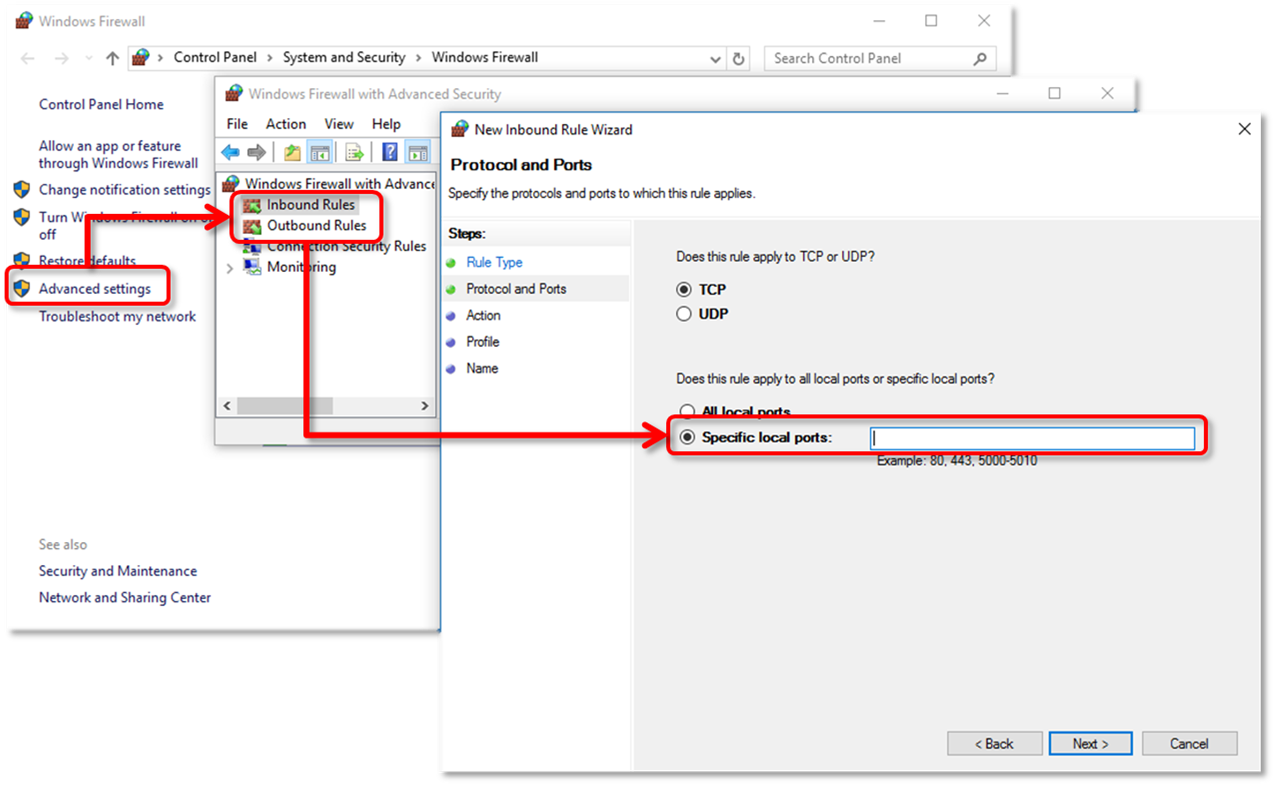
- Here, you need to make sure that the TCP option is selected.
- Then, in the Specific local port field, you need to enter the specific ports as needed for your QB version.
- QuickBooks Desktop 2020 and later: 8019, XXXXX.
- QuickBooks Desktop 2019: 8019, XXXXX.
- QuickBooks Desktop 2018: 8019, 56728, 55378-55382.
- QuickBooks Desktop 2017: 8019, 56727, 55373-55377
Note: QuickBooks Desktop versions 2019, 2020, and future versions use dynamic ports. These ports are the specific firewall ports and not a range that is assigned during the installation. It ensures that the QB Desktop gets exclusive use of a given port.
Here is how you can get the dynamic port number for your version of QB:
- Open the Windows Start menu, enter the command QuickBooks Database Server Manager into the search bar, and hit Enter to open it.
- Move to the Port Monitor tab and check for your QB version.
- Write down the Port Number from here and use this for the firewall port exceptions.
- Now enter the port number, and hit Next.
- Select the Allow the Connection option, followed by Next.
- If it prompts you, ensure that you mark all the profiles and then click Next.
- Next, create a rule and name it QBPorts(year), then click Finish when you are done.
You also need to create the Outbound Rules. For this, just repeat these steps but choose the Outbound Rules option in place of Inbound Rules.
Create Windows Firewall Exceptions for QuickBooks Desktop Application
QB uses various Excel files to perform different tasks. The Windows Firewall sometimes restricts these executable files, causing issues with downloading the updates. So, you need to create Windows Firewall exceptions for these exe files that QB uses.
- Open the Windows Start menu, enter Windows Firewall into the search bar, and open it.
- Go to the Advanced Settings tab and right-click the Inbound Rules option. Later on, you would need to create Outbound Rules as well.
- After this, you need to select the New Rule option followed by the Program and Next.
- Then, click This Program Path and the Browse option.
- You need to find and select the QuickBooks executable files and hit Next. The table below provides the list of QB .exe files; you can reference it.
- After selecting the exe files, hit Allow the Connection and Next.
- If prompted, ensure that you mark all the profiles and click Next
- Lastly, create a rule and name this as QBFirewallException(name.exe).
- Finally, repeat the above-given steps for Outbound Rules.
The list of executable files for QuickBooks is as follows:
| Executable files | Location |
| AutoBackupExe.exe | C:\Program Files\Intuit\QUICKBOOKS YEAR |
| Dbmlsync.exe | C:\Program Files\Intuit\QUICKBOOKS YEAR |
| DBManagerExe.exe | C:\Program Files\Intuit\QUICKBOOKS YEAR |
| FileManagement.exe | C:\Program Files\Intuit\QUICKBOOKS YEAR |
| FileMovementExe.exe | C:\Program Files\Intuit\QUICKBOOKS YEAR |
| QuickBooksMessaging.exe | C:\Program Files\Intuit\QUICKBOOKS YEAR |
| QBW32.exe | C:\Program Files\Intuit\QUICKBOOKS YEAR |
| QBDBMgrN.exe | C:\Program Files\Intuit\QUICKBOOKS YEAR |
| QBServerUtilityMgr.exe | C:\Program Files\Common Files\Intuit\QuickBooks |
| QBCFMonitorService.exe | C:\Program Files\Common Files\Intuit\QuickBooks |
| QBLaunch.exe | C:\Program Files\Common Files\Intuit\QuickBooks |
| QBUpdate.exe | C:\Program Files\Common Files\Intuit\QuickBooks\QBUpdate |
| IntuitSyncManager.exe | C:\Program Files\Common Files\Intuit\Sync |
| OnlineBackup.exe | C:\Program Files\QuickBooks Online Backup |
Note: You might see Program Files like (x86), this simply means that you are using a 64-bit operating system.
Check the Antivirus or Firewall Application Settings
If you have already configured the firewall but are still getting QuickBooks Desktop Update Error 12057, then this could be a result of the antivirus application restricting the update. So, ensure you check the settings of your antivirus application, such as Norton or McAfee, whichever you use on the system, and confirm that it doesn’t block the QuickBooks Desktop application and grants all the required permissions.
After setting up the correct settings, try to download the QB updates, and if you still face QuickBooks error code 12057, then move to the next solution.
Read Also: Unable to Locate PDF Viewer?- Here’s How You Can Resolve It
Solution 4: Re-install QuickBooks Desktop in Selective Startup Mode
Another option to complete the updates if you face the error code 12057 is to switch to the Selective Startup mode.
Step 1: Switch the System to the Selective Startup Mode
Running the system in selective startup mode ensures that no other app gets in the way of downloading the updates. Here’s how you can enable the selective startup mode on the Windows system:
- Press the Windows and R keys on the keyboard to get the Run command window on the screen.
- Enter the command msconfig and hit OK.
- Then, move to the General tab and select the Selective Startup option followed by the Load system services option.
- Visit the Services tab, select the Hide all Microsoft Services option, and then Disable all.
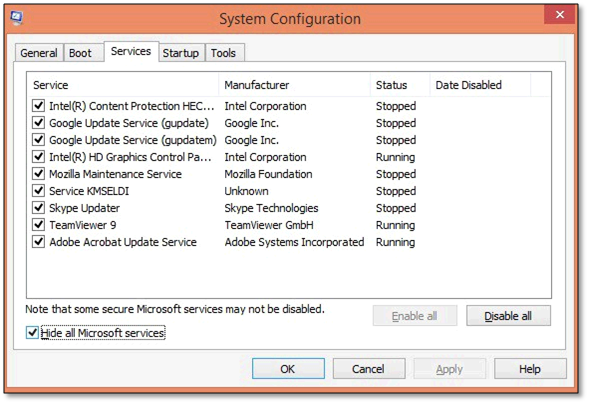
- Uncheck the Hide all Microsoft services checkbox, select the Windows Installer option from the list of services, and hit OK.
- Lastly, on the system configuration window, click Restart.
Step 2: Uninstall and Reinstall QuickBooks Desktop
In this step, you need to uninstall and reinstall the QB Desktop application on the system. After which, you can start your system in the Normal startup mode. Follow the steps given below after the reinstallation:
- Press the Windows and R keys on the keyboard to open the Run command window.
- In the run command window, type misconfig, and hit OK.
- Go to the General tab and choose the Normal Startup option.
- Hit OK and then restart the system from the System Configuration window.
Solution 5: Update QuickBooks Desktop After Starting Windows in Safe Mode With Networking
Using Safe Mode can help eliminate any potential conflicts with other programs or services that might be causing the error.
- Make sure QuickBooks is closed before restarting the system in Safe Mode.
- Now, as the system starts up, continuously press the F8 key (or another key, depending on your computer’s manufacturer) until you get the Advanced Boot Options menu.
- From the Advanced Boot Options menu, highlight the Safe Mode option using the arrow key and then hit Enter.
- When your system starts in the Safe Mode, log in with the admin account.
- Now, open QuickBooks and check for any available updates. If the updates are available, download and install them to resolve error 12057.
- After successfully updating QuickBooks, restart the system normally to exit Safe Mode.
- Once the system restarts, open QB in normal mode and check if error 12057 is resolved.
Read More: Causes and fixes for QuickBooks save as PDF not working
Conclusion
Resolving this error requires adjusting various settings and ensuring a stable internet connection. The blog above mentions all the key steps to address QuickBooks Error 12057. Hopefully, these steps will help you rectify the error quickly. However, if you are still unable to fix this issue, dial the QuickBooks Data Repair Service and get immediate assistance from our experts.
Frequently Asked Questions
Ans: QuickBooks error 12057 is a common internet connection error related to the 12xx series of errors that appear while downloading the QB Desktop or payroll updates.
Ans: Look for the below-given signs to identify the error code 12057 in QB Desktop:
If QB crashes or freezes very frequently.
You get an error message associated with error code 12057 on the screen.
QuickBooks cannot connect to the update servers to download payroll updates.
Slow or unresponsive performance of the QuickBooks Desktop application during the update process.

Alastor Moody is an Author at Asquare Cloud Hosting with experience in technical and functional writing. He loves travelling for adventure and fun.