Last Updated on March 20, 2025
Updating QuickBooks to the latest release is a common yet essential practice. It ensures that you avail of the latest features and product improvements in QuickBooks. However, QuickBooks error 15221 is an error that prevents you from downloading the updates. Consequently, multiple errors may cause grievous damage to the company file when you don’t update QuickBooks for too long. Now, if we discuss its causes, an unverified digital signature of a file plays a prominent role in provoking the error. Similarly, an expired Windows Security Certificate may also trigger the error. There are other reasons as well that need equal attention. We have curated this troubleshooting blog based on the recommendations of QuickBooks experts. This blog will give practical tips on resolving error code 15221 and its root causes. Therefore, read the blog till the end and gain valuable insights to keep the company file risk-free.
What are the Root Causes of QuickBooks Error 15221?
To eliminate the errors quickly, you first need to acknowledge the real cause of the error. Once you identify the cause, implement a suitable solution accordingly. This strategy works in the best possible way to get your business operations on track. The same goes for the QuickBooks error 15221.
Here are the root causes of error 15221:
- An expired Windows security certificate may cause this issue.
- If QuickBooks can’t verify the digital signature of a file
- Misconfigured Firewall and Antivirus settings
Practical Solutions to Quick Fix QuickBooks Error 15221
Now that you have already become familiar with the cause of the QuickBooks error 15221, read the tried and tested solutions below.
Resolution 1: Reinstall the QuickBooks Desktop
Downloading the QB desktop again to fix company file issues doesn’t affect the data. It means your business data is safe and sound.
Prerequisites before you proceed further:
- Ensure that you download the installer for your version of QuickBooks.
- Ensure that the license number is ready. You can easily find it in the original package. However, if you have bought it online, you can find it in the purchase confirmation email.
Step 1: Uninstall the QB Desktop
- Go to the Windows Start menu. A search bar will appear in the bottom-left corner of the screen. Enter Control Panel into the search bar, and then tap on the icon to open it.
- A new window will open. Select Programs and Features or Uninstall a Program.
- A list of programs will appear. Choose the version of QuickBooks Desktop you wish to uninstall.
- Choose Uninstall/Change, Remove, and then hit Next.
Note: In case you don’t see the option, sign out and then sign back into Windows as an administrator (or a user with admin rights).
Step 2. Install QuickBooks Desktop Again
Note: Before you proceed further to install the application, the first thing to remember is that you need to download it.
After uninstalling QuickBooks from the system, you should try to install it again. When you reinstall the QBD, it will automatically install new folders and rename the old ones.
1. Prepare for the Install
- Make sure that the computer is ready to meet the system requirements.
- If you haven’t downloaded your version of QuickBooks Desktop, do it now. Then, save the downloaded file somewhere you can easily find it. For instance, you can save the file in the downloads folder or on the Windows desktop.
- Keep the product and license number handy.
2. Install QuickBooks Desktop
- Launch the downloaded file, i.e., QuickBooks.exe.
- The next step is to follow the instructions on the screen. Then, agree to the terms and conditions and finally hit Next.
- Enter the product and license numbers and hit Next.
- Tap Express and then hit Next.
Finally, select Install, and when it finishes, select Open QuickBooks. After installing the software, QB will ask you to activate and update it.
Resolution 2: Uninstall QuickBooks and Rename Installation Folders Manually
In this resolution, you will learn how to rename the folders manually. Therefore, follow the steps in order:
- Uninstall QuickBooks and follow the steps to display hidden files.
- Go to the Windows Start menu and enter File Explorer into the search bar. Tap on the File Explorer icon to open it.
- Find and open the folder that contains the QuickBooks company files. You can find the folder in one of these locations:
- C:\ProgramData\Intuit\QuickBooks (year)
- C:\Users\(current user)\AppData\Local\Intuit\QuickBooks (year)
- C:\Program Files\Intuit\QuickBooks (year)
- 64-bit version C:\Program Files (x86)\Intuit\QuickBooks (year)
- Right-click the folder, choose Rename, and then add “.old” at the end of the folder name. It will prevent QuickBooks from opening this specific folder when you install it again.
Step 2. Install QuickBooks Desktop Again
In order to install QuickBooks Desktop again, check step 2 of resolution 1 above. Follow the steps as they are.
Now that you have accomplished the reinstallation procedure, the next step is to update QuickBooks. Follow resolution 3 below to learn how to update QuickBooks.
Resolution 3. Install the Latest Updates of QuickBooks
QB experts recommend updating QuickBooks regularly. Secondly, keeping QuickBooks up-to-date is essential, as it ensures you enjoy the latest features. Learn how to update QuickBooks by following these simple steps:
Step 1: Check the Version of QuickBooks for Compatibility
- Open QuickBooks and press F2 (or Ctrl+1) to open the Product Information window.
- The Product Information window appears with plenty of information related to QBDT. Check the current version and release of QB installed on the system.
You can see if you have the latest release available for your QuickBooks Desktop version:
You can check here the latest release available for your QuickBooks Desktop version.
Note: QuickBooks is a dynamic accounting software designed in such a way that it automatically downloads the updates whenever they are available. When QB downloads the updates, you will see the Update available on the status bar in the top right corner. It reflects that you now need to install the updates. Here is how you can install the updates manually:
Step 2. Install the Latest Updates
- Choose Update Available, then choose Install Now to begin the installation. It must be remembered that the installation takes a while to finish.
- Open the QBDT when the updates are installed.
Unfortunately, if you still can’t download and install the updates, you should look forward to trying resolution 4 of the blog below.
Resolution 4: Update the Microsoft Security Certificate
An expired Windows Security Certificate may trigger this issue in QuickBooks. You need to run Windows Update or download an updated certificate from Microsoft to fix this issue. Learn how to update Windows by following the guidelines step by step:
For Windows 10:
Select Start > Settings > Update & Security > Windows Update, then hit the Check for updates option. If updates are available, install them.
For Windows 11:
Select Start > Settings > Windows Update, then hit the Check for Updates option. If updates are available, install them.
Resolution 5: Add QuickBooks Desktop Security Certificate Manually
The security certificate is an essential aspect of QuickBooks Desktop. A Security Certificate contains important info that protects data and helps establish a secure network connection. Here’s how to add a Security Certificate in QuickBooks Desktop:
Step 1. Locate the File
- Right-click QuickBooks, and a list of options will appear on the screen. Choose Properties.
- Choose Open File Location on the Shortcut tab, then hit OK.
Alternatively, you can access this specific location manually by navigating to the product’s application folder. The product’s application folder path is given below for your convenience:
- Pro, Premier, and Premier Accountant: C:\Program Files (x86)\Intuit\QuickBooks 20XX
- For Enterprise or Enterprise Accountant: C:\Program Files (x86)\Intuit\QuickBooks Enterprise Solutions XX.0
Note: It must be remembered that the Xs signify the year of QuickBooks. Therefore, you can replace the Xs with the year of the software.
Step 2. Install the Security Certificate
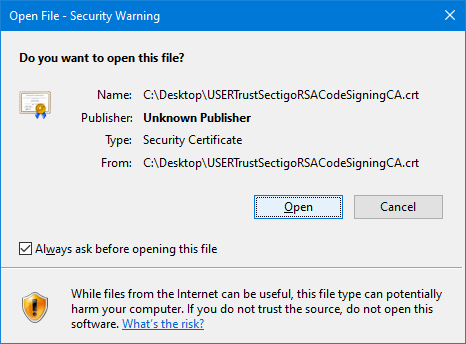
- Look for the application file (.exe file) in the File Location window.
- Right-click the application file and choose Properties. The application file Properties window opens on the screen.
- Select the Digital Signatures tab, choose one of the entries in the Signature List field, and then select Details.
- Under the Digital Signature Details window, choose View Certificate. On selecting the View Certificate option, the Certificate window opens.
- Select Install Certificate on the Certificate window under the General tab.
- A Certificate Import Wizard welcome screen appears. Ensure the store location is on Current User, then hit Next.
- Windows has already selected the certificate store based on the type of certificate in the Certificate Store window.
- Select Next, and then Finish.
- Lastly, select OK when prompted that the import was successful.
Note: Follow steps 3, 7, and 8 for the rest of the security certificates on the digital signature list.
If this doesn’t help resolve the QuickBooks error 15221, consider running the File Doctor tool addressed in the following solution below.
Resolution 6: Run the QB File Doctor
QuickBooks error code 15221 occurs when you unsuccessfully try to connect to the internet to download the QB updates. For the same reason, experts recommend running the QuickBooks File Doctor tool, as it helps resolve the network connectivity issue. Once the issue is fixed, you can download the updates pretty conveniently. Let’s learn how to run the File Doctor tool:
Step 1: Install the Latest QuickBooks Tool Hub Version
The QuickBooks Tool Hub has proved to be handy in resolving common errors. First of all, you must exit QuickBooks software to download and install the Tool Hub. Let’s learn how to download and install the application:
- Firstly, close QuickBooks and download QB Tool Hub’s latest version.
- After downloading the QuickBooksToolHub.exe file, consider saving it to an easily accessible folder. For instance, you can choose to save this file in the downloads folder or on your Windows desktop.
Note: If you already have the QuickBooks Tool Hub installed on the system, you should proceed further to check its version. You only need to select the Home tab; the version will appear on the bottom.
- Now, launch the downloaded QuickBooksToolHub.exe file.
- Follow the on-screen instructions for swift installation and agree to the terms and conditions.
- Lastly, when the installation finishes, double-click the icon to open it.
Note: If you can’t see the QuickBooks Tool Hub icon on the desktop, consider searching it manually. Enter QuickBooks Tool Hub into the search bar. The program will appear on the screen. Double-tap to open it.
Step 2: Run the QuickBooks File Doctor
- Firstly, select Company File Issues from the QuickBooks Tool Hub.
- Then, select Run QuickBooks, File Doctor. It must be remembered that the File Doctor usually takes up to a minute to open. However, if it doesn’t open, you must search for File Doctor in the Windows search bar and then open it manually.
- Select the company file from the drop-down menu after opening QuickBooks File Doctor. In case you don’t see the company file you wish to select, you can choose Browse and search to find the file.
- Choose Check your files and network, and then choose Continue.
- Lastly, enter the QuickBooks admin password, and then hit Next.
The scan time entirely depends on the company file size. However, the File Doctor takes as long as 20 minutes to scan a file. Another key point is that the scan may indicate that it was unsuccessful even if it fixes the issue. Ignore that notification. Lastly, open QuickBooks and access the company file when the scan finishes.
Resolution 7: Configure the Firewall Settings Manually
In case the QuickBooks error 15221 doesn’t get resolved even after running the QuickBooks File Doctor, you should look to set things up manually. Here’s how to do it:
Add a firewall Exception for QuickBooks
- Firstly, open the Windows Start menu and enter Windows Firewall into the search bar.
- When the Windows Firewall icon appears, tap to open it.
- Choose Advanced Settings, right-click Inbound Rules, and then choose New Rule.
Note: You will later create outbound rules in the same manner.
- Select Port and then hit Next. Additionally, make sure that TCP is auto-selected.
- Enter the specific ports needed for your QuickBooks year version in the Specific local ports field.
- QuickBooks Desktop 2020 and later: 8019, XXXXX.
- QuickBooks Desktop 2019: 8019, XXXXX.
- QuickBooks Desktop 2018: 8019, 56728, 55378–55382.
- QuickBooks Desktop 2017: 8019, 56727, 55373-55377.
- Hit Next after entering the port number.
- Choose Allow the Connection, and then hit Next.
- Hit the next button again after marking all the profiles.
- Lastly, create a rule, give it a name, such as “QBPorts(year),” and then select Finish when you’re done.
Note: Create outbound rules similarly by following the same steps above. Choose outbound rules instead of inbound rules in step 3.
Create Windows Firewall Exceptions for QuickBooks Programs
Executable files (.exe) are essential, as QuickBooks uses them to perform various tasks. Consider following the steps below to create exceptions for each executable on the table:
- Firstly, go to the Windows Start menu, enter Windows Firewall into the search bar, and then tap on the app icon to open it.
- Choose Advanced Settings, and then right-click Inbound Rules. As you are creating inbound rules now, you will later create outbound rules similarly.
- Select Program, then hit Next.
- Select This Program Path, then select Browse.
- Look for one of the executable files in the table below and select it. Then, hit Next.
- Choose Allow the Connection, and then hit Next again.
- If you are prompted to mark all the profiles, mark all of them, and then hit Next.
Lastly, create a rule. Also, give it a name like “QBFirewallException(name.exe).”
Repeat the steps above to create outbound rules. Ensure you choose outbound rules this time instead of inbound rules in Step 2.
| Executable files | Location |
| AutoBackupExe.exe | C:\Program Files\Intuit\QUICKBOOKS YEAR |
| Dbmlsync.exe | C:\Program Files\Intuit\QUICKBOOKS YEAR |
| DBManagerExe.exe | C:\Program Files\Intuit\QUICKBOOKS YEAR |
| FileManagement.exe | C:\Program Files\Intuit\QUICKBOOKS YEAR |
| FileMovementExe.exe | C:\Program Files\Intuit\QUICKBOOKS YEAR |
| QuickBooksMessaging.exe | C:\Program Files\Intuit\QUICKBOOKS YEAR |
| QBW32.exe | C:\Program Files\Intuit\QUICKBOOKS YEAR |
| QBDBMgrN.exe | C:\Program Files\Intuit\QUICKBOOKS YEAR |
| QBServerUtilityMgr.exe | C:\Program Files\Common Files\Intuit\QuickBooks |
| QBCFMonitorService.exe | C:\Program Files\Common Files\Intuit\QuickBooks |
| QBLaunch.exe | C:\Program Files\Common Files\Intuit\QuickBooks |
| QBUpdate.exe | C:\Program Files\Common Files\Intuit\QuickBooks\QBUpdate |
| IntuitSyncManager.exe | C:\Program Files\Common Files\Intuit\Sync |
| OnlineBackup.exe | C:\Program Files\QuickBooks Online Backup |
Conclusion
Hopefully, the fixes mentioned in this blog have helped you get rid of the QuickBooks error 15221. However, if the issue hasn’t been resolved yet even after implementing the resolutions, dial +1855-738-0359 Get in touch with our technical experts and let them handle your issue proficiently.
FAQs
QuickBooks does so to protect your computer and its contents. If QuickBooks fails to verify the digital signature of a file, you are likely to encounter a 15XXX series error.
In that case, you should look to add the QuickBooks Desktop Security Certificate manually.

Kate is a certified public accountant (CPA) with expertise in various accounting software. She is technically inclined and finds passion in helping businesses and self-employed people carry out bookkeeping, payroll, and taxation without worrying about errors. Every once in a while, Kate loves to travel to far-off places and relax in the lap of nature.