Last Updated on September 26, 2024
QuickBooks is full of technically advanced algorithms and smart features that make your daily business accounting process easy. It tends to connect with your bank account directly and executes the related operations. However, there are many situations where you may encounter errors while executing tasks. One such among them is the QuickBooks Error OL-301.
It is also known as the account not syncing with bank error, or you can find this in TD Bank QuickBooks OL-301 error, Ol-309, QuickBooks American Express import OL-301 error. This error can occur due to various reasons, such as network issues, outdated software, or incorrect login credentials. It disallows you to create a contact with your bank account, and thus it needs to be fixed soon. We will tell you the reason that causes QuickBooks error code OL-301 and the solutions to resolve it through this write-up.
What Does QuickBooks Error OL-301 Means?
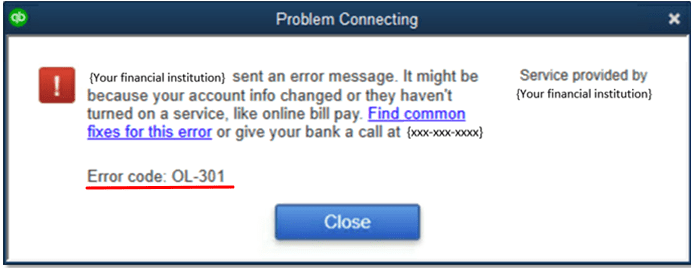
While trying to connect with a financial organization such as a bank or downloading the banking transactions or feeds, users may face the error code OL-301 or Error Ol-393. It will appear with a message showing that your financial institution has sent an error; thus, the process can’t be executed. Majorly, QuickBooks bank feeds error OL-301 occurs when QB fails to connect with the financial institution server or there is an issue with the company file.

QuickBooks error message OL-301 can appear due to many other reasons, given below. Let’s go through them.
Read Also: Update QuickBooks Desktop to Latest Version 2024.
What Triggers the QuickBooks Error OL-301?
You might also notice various types of error messages that appear on the screen, “QuickBooks and the bank cannot connect because they have different account information.” After receiving these errors, mentioned below are the possible reasons the error occurs while trying to connect with the Bank.
- The provided bank information in QuickBooks Desktop is incorrect.
- It can also be due to the Inactive status and blocked accounts.
- Incorrect Login details entered for online banking.
- The Bank’s Server is Under-Maintenance or Down.
- While trying to access a service that is not activated, such as an Online Bill Payment Service.
- Corruption in the QuickBooks company file.
- Your identity confirmation has not been approved yet.
let’s proceed to fix this QuickBooks bank feeds error OL-301.
Recommended To Read: How to Fix QuickBooks Connection has been lost Error Message
What are the common signs and symptoms of QB error OL-301?
Although there are multiple signs and symptoms that can be problem creators in QB error OL 301, the common ones are given below.
- One of the primary symptoms of this error is the inability to update bank account information in QuickBooks. Users may receive an error message when trying to do so.
- You may see an error message on their screen that reads “OL-301” or “OL-301-A.”
- The QuickBooks software keeps crashing or becoming unresponsive when trying to update bank account information.
- You may notice that the QuickBooks software is performing slowly or takes longer than usual to complete tasks.
- If the error occurs during an update, the update may be incomplete, leaving the software outdated.
If you can’t connect QuickBooks to the bank and get Error Code 377, you need to resolve that first.
How to Fix the QuickBooks Error Code OL-301?
Before executing the methods to fix QuickBooks error code OL-301, save a backup of your QB Desktop Company File to eliminate the risk of losing any essential data in the process.
Step 1: Create a New Company Test File.
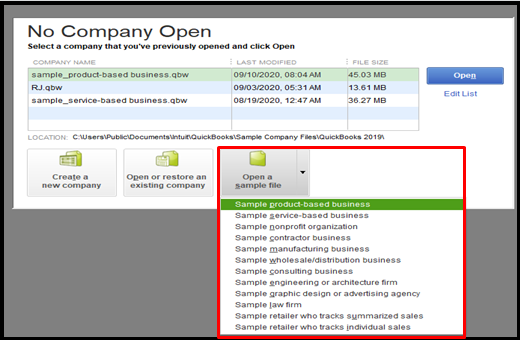
To test if the QuickBooks bank connection error OL 301 occurs due to an issue with the company file or the bank connection, you need to create a new test company file.

- To start, click the File tab and choose New Company.
- Then, click the Express Start or Start Setup option.
- Now, provide all the required information to set up a company click the Create Company button, and start working.
If the error persists then there is an issue with your Bank connection:-
If you recently installed the latest QuickBooks Desktop version, it is suggested to verify your Bank’s identity once again. To verify your identity, sign in to your Online banking with any web browser and check the identity confirmation request notification. If you don’t get any notification then you need to contact your Bank directly or you can call our expert team to resolve the error code: OL-301.
If You don’t get any Errors after using the test Company:-
It means your bank is working fine so you’re required to proceed with the next troubleshooting steps.
Step 2: In QuickBooks, Reset the Connection for Your Bank Account.
Sometimes banks make changes to their online banking services so you should try refreshing your bank connection to troubleshoot any such issue.

First Turn off all the Bank Feeds
- First, click on the Chart of Accounts, which is under the Lists.
- Then, locate and click right on the Account and select Edit Account.
- Now, under the Bank Feed Settings, press the Deactivate all online services option.
- Click OK and then Save & Close.
After the deactivation of the online bank feed of the Account, we need to reactivate the Account’s online bank feed once again to fix the OL-301 error QuickBooks.
Turn On the Bank Feeds For Direct Connect
- Hit the Bank Feeds option under the Banking tab and then choose Set up Bank Feed for an Account.
- Then, select your Bank and provide all the information as required.
- Now, follow the instructions which are displayed on the screen to complete the procedure.
Turn On the Bank Feeds For Web Connect
- Sign in to your Online Baking Account and then download the banking transaction data file in the .qbo format and save it on the Desktop.
- Hit the Utility option from the File tab.
- Now, click Import and then Web Connect Files.
- After that, choose the .qbo file from the Desktop, and click Open.
- Here, select the option of Using an existing QuickBooks account in the Bank.
- Press OK after your Web Connect data is read into QuickBooks Successfully.
After the completion of this method, try performing the same task and check if the QB Bank Feed error Ol-301 or 393 occurs. If it does, follow the next step else you’re good to go.
Step 3: Reset all the Banking Connections.
Sometimes, resetting the bank connection for one account doesn’t fix the Intuit QuickBooks Error Ol-301. In such a case, you should try resetting all the bank connections within your QB including the inactive ones.
- Firstly, choose the Chart of Accounts from the Lists.
- Then, from the Accounts drop-down menu, choose the Show Inactive Accounts option.
- Now, click right on any inactive account and then select Edit Account.
- Under the Bank Feed Settings, mark Deactivate all the Online Service options.
- Press OK on the confirmation window.
- After that, reboot the QB and check the status of the OL-301 error message.
- Repeat the same procedure and deactivate any other inactive accounts.
In most cases, OL-301 or Wells Fargo issues can be fixed by executing the above 3 steps. If it doesn’t work, then follow the next one.
Step 4: Check Your Company File Data

If the QuickBooks Error OL 301 doesn’t resolve even after resetting all the banking connections, then you need to check your company file data for any potential issue that might be causing such a problem. To do that, Run the QuickBooks Rebuild tool twice to get rid of any company file data issues and try performing the task after that.
Read Also: QuickBooks Auto Data Recovery- Recover Lost & Damaged Data.
Step 5: Contact Your Bank.
If the QuickBooks error codes OL-301 or OL-393 don’t resolve by opting for the above methods. Then you must contact the Bank to seek out the problem and get an appropriate solution.
Additional Solution for QuickBooks OL-301 error
Even after executing these steps, you are facing the issue; we would suggest that you pick these solutions. Depending on your assessment of signs and causes one of these will surely help you out.
Solution 1: Try deleting all the temporary files
Sometimes, your Chrome caches and other temporary files can also create this issue. So, for that reason; deleting all the temporary files can be a good help. And here is how you can execute the solution.
- Close the QuickBooks software and any other programs that may be running on your computer.
- Open the Internet Explorer browser on your computer.
- Click on the gear icon in the upper-right corner of the browser window.
- Select “Internet Options” from the drop-down menu.
- Under the “Browsing history” section, click on the “Delete” button.
- In the “Delete Browsing History” window, make sure that “Temporary Internet files and website files” are checked.
- Click on the “Delete” button to delete the temporary internet files.
- Once the files have been deleted, close the Internet Explorer browser and restart QuickBooks.
Solution 2: Use the manual method to fix the problem
It is quite an easy way out of QB error OL-301 and to get here you will have to follow these steps.
- Generate a ‘Test company file‘
- Re-establish the connection with your bank
- Reset all ‘online banking connections‘
- Verify your company data
- Get in touch with your bank.
Solution 3: Check your QuickBooks account connection on your system
You need to check the account connection on your Quickbooks desktop and then fix this. Maybe you will have to reboot the connection. Here is what has to be done.
- Close the QuickBooks software and any other programs that may be running on your computer.
- Make sure that QuickBooks is up-to-date with the latest updates and patches. You can check for updates by going to the Help menu and selecting “Update QuickBooks Desktop.”
- Open the QuickBooks software on your computer.
- Click on the “Banking” menu option in the top navigation menu.
- From the drop-down menu, select “Banking” again.
- In the list of accounts, click on the account that is causing the error.
- Click on the “Edit” button for the account.
- From the drop-down menu, select “Edit account info.”
- In the “Account Details” window, click on the “Disconnect this account on save” option.
- Click on the “Save and Close” button to save the changes and close the window.
- Close and reopen QuickBooks.
- Go back to the “Banking” menu and select “Banking” again.
- Click on the “Add Account” button.
- Enter the login credentials for your bank account and follow the on-screen prompts to complete the setup process.
- Check if the error is still occurring by attempting to download the transactions for the account that was causing the issue.
Solution 4: Just check if your QB update is pending
Another way to fix this problem is to update your Quickbooks to its latest or newest version. Here are some quick steps that you can take for this.
- Open QuickBooks Desktop and click on the Help menu.
- Select Update QuickBooks Desktop.
- Go to the Update Now tab.
- Choose the updates you want to download or select Select All.
- Click on the Get Updates button.
- Wait for the download to complete. This may take a while depending on the size of the updates and your internet speed.
- Once the download is complete, QuickBooks will prompt you to install the updates.
- Click on the Install Now button to start the installation process.
- Follow the instructions on the screen to complete the installation.
- When the installation is complete, restart QuickBooks Desktop to apply the updates.
Solution 5: Look for any inactive account in your QuickBooks
If you want to reactivate an inactive account, you can do so by right-clicking on the account in the Chart of Accounts list and selecting Make Account Active.
- Open QuickBooks Desktop and go to the Lists menu.
- Select Chart of Accounts.
- Click on the gear icon at the bottom of the Chart of Accounts window and choose Include inactive.
- The inactive accounts will now be displayed in the list with “(Inactive)” next to their name.
- You can sort the list by clicking on the column headers to find the inactive accounts more easily.
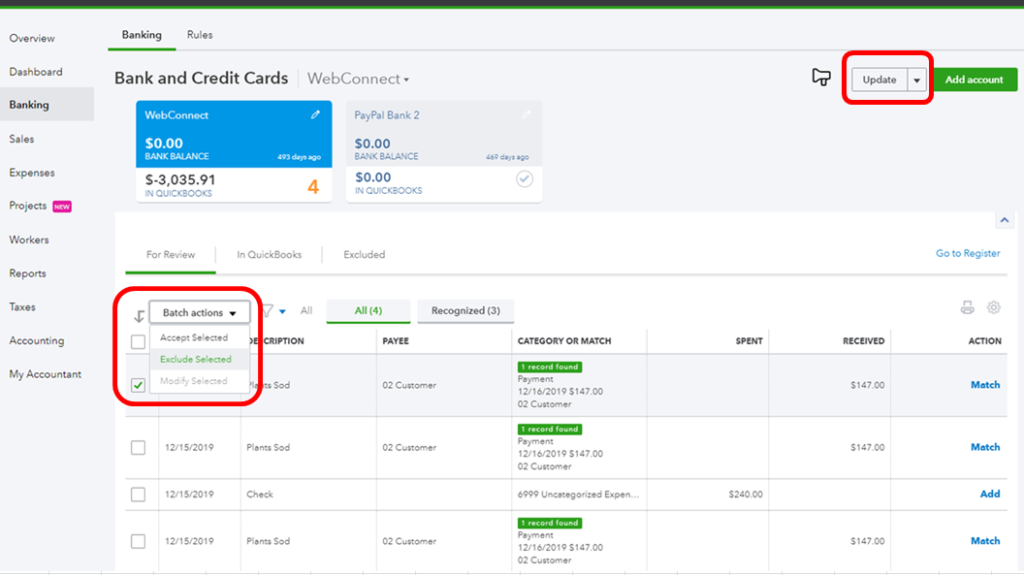
Solution 6: Match your pending transactions of QuickBooks
You should execute this solution too and here is what has to be done. After matching or adding all pending transactions, the QuickBooks error OL-301 should be resolved.
- Open QuickBooks Desktop and go to the Banking menu.
- Select the account with the pending transactions that you want to match.
- Click on the For Review tab to see all pending transactions.
- Find the pending transaction that matches a transaction already in QuickBooks.
- Select the transaction to highlight it, and then click on the Find Match button.
- A list of potential matches will appear. Select the correct match and click on the Save button to complete the match.
- Repeat steps 4-6 for each pending transaction that matches a transaction already in QuickBooks.
- If a pending transaction does not have a matching transaction in QuickBooks, you can create a new transaction by selecting the transaction and clicking on the Add button.
- Once all pending transactions have been matched or added as new transactions, click on the In QuickBooks tab to see all transactions that have been successfully matched or added.
- Review the transactions in the In QuickBooks tab to ensure that they have been correctly matched or added.
Conclusion
If there is significant damage to data, you might encounter the QuickBooks Error OL-301 even after running and rebuilding data utility at different times. In this case, we suggest you call Our Expert Team is proficient in handling such cases and provides a complete solution for Wells Fargo QuickBooks banking error OL-301 and more to QB users.
Frequently Asked Questions
The QB error OL-301 or we can say the Account not syncing with bank error stops all communications with the Bank. Sometimes it makes the company file inaccessible.
Yes, it is mandatory to keep a backup of your QuickBooks Company file data as there is a risk of corruption and damage to the company file while fixing the error code OL-301 in QuickBooks.
You can detect this error when you cannot access the company file due to any corruption or damage.
This error occurs usually in all banks that the user integrates with QB, users also find this error as Web connects QB error OL-301, OL-301 Wells Fargo, Bank of America direct connect error OL-301, error OL-301 with Chase Bank, TD bank QuickBooks error OL-301, etc.
Related Search Terms
wells Fargo QuickBooks direct connect not working, Connection error between bank and QuickBooks OL-301, I’m getting an error message OL-301

Oriana Zabell, a professional cloud engineer, has over three years of experience in desktop, online QuickBooks support and troubleshooting. She is currently working as a cloud hosting consultant with Asquare Cloud Hosting. She loves to read and write about the latest technologies such as cloud computing, AI, DaaS, small businesses, manufacturing. When not writing, she is either reading novels or is indulged in a debate with movie fanatics.