Last Updated on June 16, 2026
QuickBooks streamlines accounting tasks and integrates with a payroll service, simplifying payroll management with features such as automated tax filing and direct deposit. You must select a QuickBooks payroll service and purchase a subscription to access these benefits. Activating a retail payroll subscription is necessary to utilize these automated features.
However, during this process, you may encounter QuickBooks error UEXP with a warning message stating, “We are having a problem verifying your account status. Error=UEXP.”
If you successfully activated the payroll subscription, the UEXP error may occur when updating payroll services. This article covers the potential causes of the error and provides the appropriate solutions in both scenarios. Let’s dig deep into this article.
You may encounter technical issues when resolving the UEXP error in QuickBooks. To tackle that, you must seek professional help. Call at +1(855)-510-6487 to speak with a certified QB expert.
What is QuickBooks Error UEXP? A Detailed Explanation
Payroll integration with QuickBooks enables entrepreneurs and professionals to automate paycheck distribution or direct funds transfers to employees. QuickBooks error UEXP occurs when downloading payroll updates due to outdated e-File, e-Pay, and desktop releases, resulting in verification account status issues. If you have fallen victim to a UEXP error in QuickBooks Desktop, it can disrupt your payroll operations.
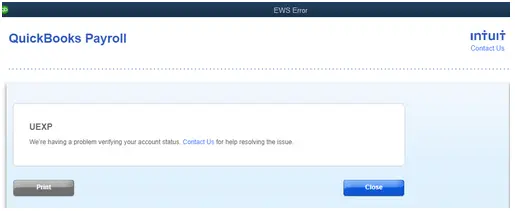
This issue is related to QuickBooks Payroll Services for the desktop version. The error message, “We are having difficulties verifying your account status. Error=UEXP,” appears on your Windows screen when you encounter this error. While seeing the error notification, you might wonder what issues might occur if you are a victim of this payroll error. Well, you can face some problems while doing the following things in your QB application: –
- While downloading the payroll update
- Activating a retail payroll subscription
After understanding the issue, now let’s discuss what are triggers that can lead you to this issue.
Possible Reason Behind UEXP Error During Retail Payroll Activation
Let’s get familiar with the reasons why you are getting a UEXP error in QB when activating the retail payroll:
- Outdated QuickBooks software
- Special characters might be present in the company file name, legal address, charts of accounts, contact names, and other employee information
- Incomplete QB installation
- An expired payroll subscription could also be another reason behind the UEXP error
Once we’ve identified the causes of the UEXP error, let’s move on to the next section to learn how to resolve it.
5 Expert Fixes to Get Rid of QuickBooks Payroll Update Error UEXP
In this section, we have outlined the tested solutions preferred by experts to resolve the QuickBooks error UEXP.
1. Download and Install Latest QuickBooks Desktop Updates
It’s important for the users to download and install the latest updates of QuickBooks Desktop that Intuit releases, as it can fix the latest errors like QuickBooks Desktop error UEXP that you might come across while using the QuickBooks application. If in case, you haven’t turned on the automatic updates feature, then you must proceed with the below-given steps to update QB desktop manually:
- First, close the company files and QuickBooks application.
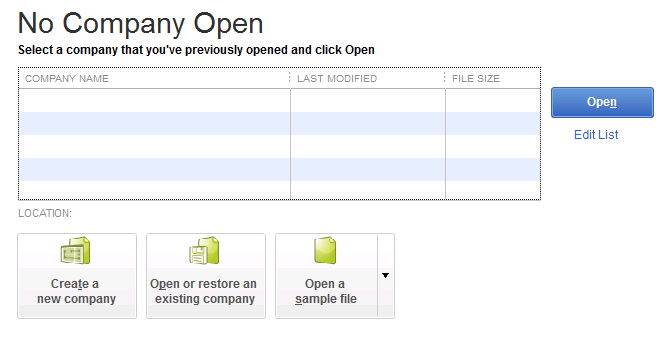
- Double-click the QuickBooks icon while holding the CTRL key until the No Company Open screen comes up.
- It will open the No Company Open window.
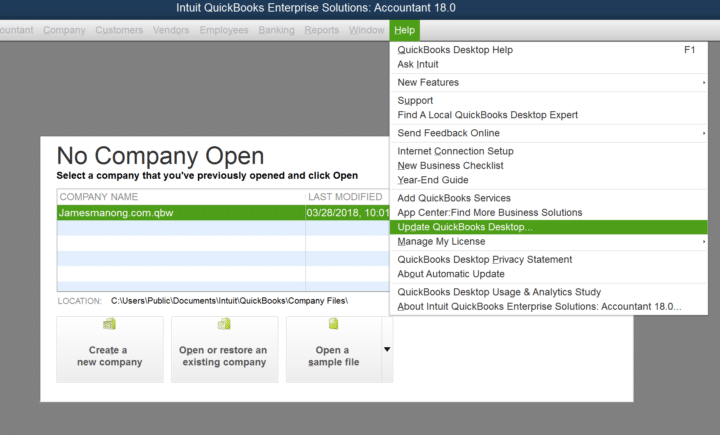
- There, go to the Help menu and choose the Update QuickBooks Desktop option.
- Now, go to the Options tab, click on Mark All, and click Save.
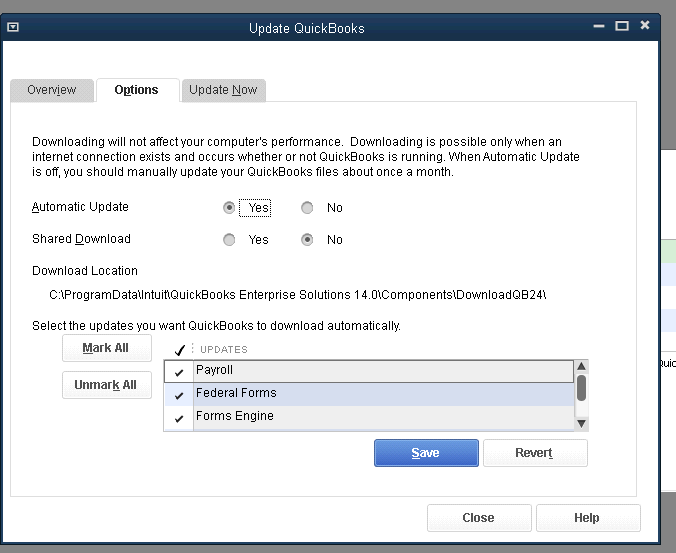
- Move to the Update Now tab and mark the Reset Update checkbox.
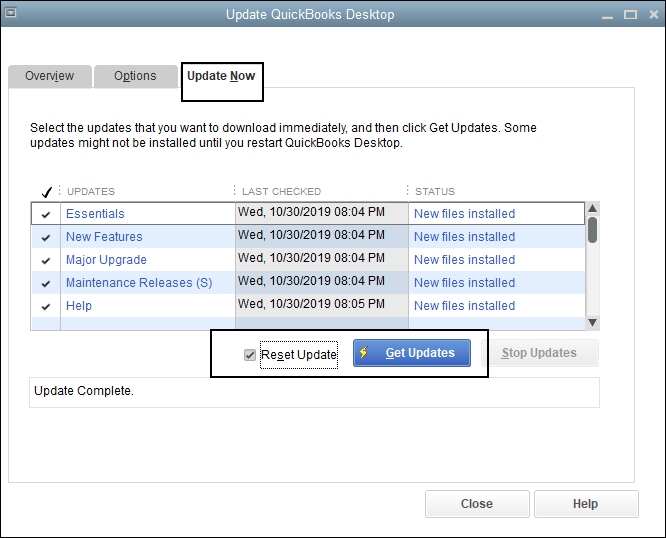
- Further, click on Get Updates and wait for the download to complete.
- Once the updates are installed, close the No Company Open window and restart QuickBooks Desktop.
- Click Yes when the Install Update prompt appears on the screen.
- After the installation, reboot your computer.
Note: If you don’t want to get into this hectic procedure of manual updating any further, then you must set the automatic updates for QuickBooks by following the given steps.
- Open the QuickBooks application, go to the Help menu, and click on Update QuickBooks Desktop.
- Under the Options tab, click on the Yes option against the automatic updates.
- Click on Close to exit the window.
2. Create a Backup Copy of the Data File
To keep your company data secure from any unfortunate event of data corruption or accidental deletion, make sure to create a backup of your company file before making any program file changes. To do so, you can proceed with the below-given steps to fix QuickBooks error UEXP:
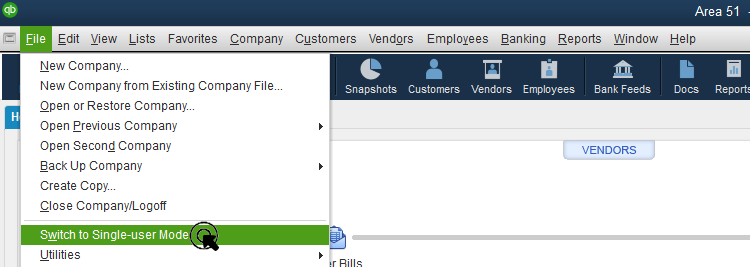
- Open QuickBooks Desktop, go to the File menu, and select the Switch to Single-user Mode option.
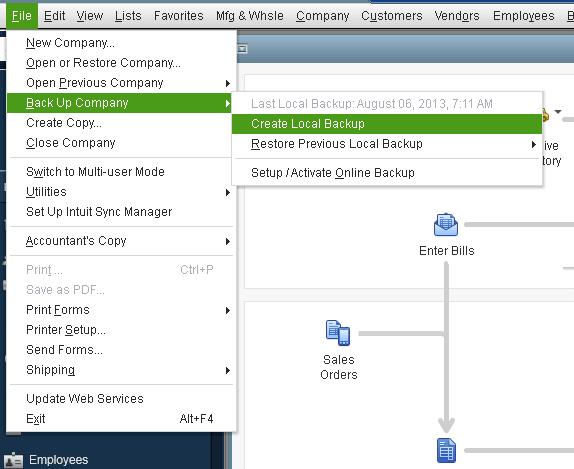
- Go back to the File menu again.
- Go to Back Up Company and click on Create Local Backup.
- On the pop-up window, click on Local Backup and select Next.
- Click on Browse under the Local Backup Only section, and choose the location where you want to save the backup company file.
- To make sure that your backup files are in a good state, a test will run before being saved on the system.
- Click OK followed by Save it Now and Next.
Note: If you’re facing QuickBooks Error 557, it usually occurs due to damaged company files or incorrect setup. Resolving it quickly helps prevent payroll disruptions and accounting inaccuracies.
3. Replace the outdated e-File and e-Pay Files
Once you install the QuickBooks updates, you need to update the e-File and e-Pay versions in the company file as outdated files become erroneous when the user opens them on the updated software. You may do so by following the below-given steps.
- Open the QuickBooks application.
- From there, go to the Employees menu click on My Payroll Service, and select Manage Service Key.
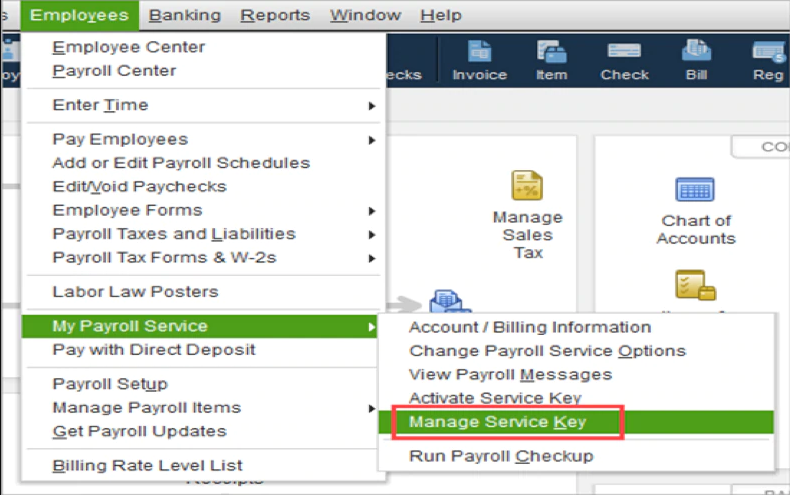
- On the QuickBooks Service Keys window, make sure to highlight the appropriate payroll service. Then, proceed with the following steps:
- If you’re using QuickBooks Desktop Direct Deposit, select Edit, then Next> Finish.
- If you aren’t using QuickBooks Direct Deposit, select Remove. Alternatively, you can also press Alt+0 while on the Manage Service Key window to remove the payroll service.
- For the next two messages displayed, select Yes. This removes the old e-File and e-Pay agreement from the company file.
Note: Error UEXP when downloading QuickBooks Desktop payroll update: Are you getting an error while activating a retail payroll while you are connected to the internet? Well, the below-mentioned reasons would have triggered a QuickBooks Desktop Error UEXP while updating QuickBooks Desktop Payroll
- The license is not activated for payroll service.
- Special Characters might be present in the company name, legal address, Chart of Accounts, or contact name.
Note: If you encounter QuickBooks error 3008, it usually appears during payroll updates due to corrupted files or incorrect system settings. Fixing it promptly helps ensure smooth payroll processing.
4. Application of the ‘Install Diagnostic Tool’ to Ensure the Software Remains Error-free
This unique tool is a remarkable addition to QuickBooks owing to its vitality and error-diagnosing capability. You can easily check for installation issues and displeasing errors that result from an improper installation. Let’s proceed with the below-mentioned steps to execute it practically and effectively.
- The first thing you must do is ensure that you have the latest version of the QuickBooks tool hub installed.
- In case you have found any updated QuickBooks tool hub version, consider downloading it to your system.
- To quickly initiate the installation, you must run the QuickBooksToolHub.setup.exe file. In addition, you need to agree to the terms and conditions of this program.
- Once you download the file on your system, consider saving it to a convenient location to access it easily. Now, it’s time to launch QuickBooks Tool Hub. Once you finish launching, click on the Installation Issues tab to launch the QuickBooks Install Diagnostic Tool.
- Consider restarting the system once the utility has finished scanning QuickBooks for problems and doing a quick repair.
As mentioned above, the solution is a tried and tested problem-solving approach to rectifying QuickBooks Error Code UEXP. However, if you still witness this error on your QuickBooks desktop, you must switch to another solution described in-depth after this paragraph.
5. While Reinstalling Your QB Desktop, Consider Backing up your Data and Enabling the Selective Startup Mode
Another effective way to get rid of QuickBooks error UEXP is installing the QB desktop application in selective startup mode. It’s a proven method to fix this undesirable error quickly, and many users have found it helpful. Another key point is that you must back up important data to prevent data loss. Let’s quickly move on to executing the below-mentioned steps: –
- The next step in troubleshooting error UEXP is to shut down the system and consider restarting it in selective startup mode, as described earlier. However, to avoid any last-minute haste and hassle, don’t forget to keep your license and product information handy for the swift accomplishment of this procedure.
- Press the Windows + R button simultaneously to start the Run window. Following this, a command box will appear on the screen of your Windows. Now, all you have to do is type in MSCONFIG in that command box.
- To activate the selective startup mode, select the Selective Startup and Load System Services options under the General tab.
- Now, make sure to disable all services other than Microsoft. For this to happen, click on the Hide All Microsoft Services option and then hit on the Disable All option. It will disable all not-so-important services.
- Uncheck the Hide All Microsoft Services checkbox on your Windows screen and checkmark the Windows Installer checkbox in its place.
- Here, at this point, you need to restart your computer to get back to the Normal Startup Mode after installing your QuickBooks program.
- Lastly, re-open your QB desktop to check whether you have gotten rid of QuickBooks error UEXP.
A Quick View on Error UEXP in the QuickBooks Application
This tabular section provides a concise overview of this blog on the QuickBooks error UXEP.
| Error description | The UEXP error in the QB application occurs when the application encounters an unexpected internal exception while performing a task. Corrupted company files, damaged program components, or conflicts during data processing usually trigger it. |
| Common reasons | Outdated QuickBooks software, QB installation issues, faulty company file, special characters in the company file name, or expired payroll subscription. |
| Tested fixes | Update QB software, create a backup copy, replace outdated e-File and e-Pay files, run Install Diagnostic Tool, and reinstall the QB in Selective Startup mode. |
Conclusion
This was all about the QuickBooks error UEXP. While the error may seem unexpected, it is usually caused by internal program conflicts, corrupted files, or data-related issues. Implement the methods outlined in this blog to resolve it.
However, if you encounter any technical issues while resolving this issue, or if a method doesn’t work for you, seek professional help. Dial +1(855)-510-6487 to speak with a certified QB professional.
Frequently Asked Questions (FAQ’s)
What is the QB Desktop error UEXP?
QuickBooks error Code UEXP occurs due to outdated e-File, e-Pay, and QuickBooks Desktop when downloading payroll updates, which also results in verification account status problems. If you are getting the UEXP error in your QuickBooks Desktop, it can interrupt your payroll operations and prevent you from moving further.
Can QuickBooks Desktop error UEXP be prevented?
While some causes of QuickBooks error UEXP may be unavoidable, you can minimize the risk by ensuring that your QuickBooks software is regularly updated, your company data is intact, and you have a stable internet connection during the update process.
How do I know if I’m experiencing the UEXP error in QuickBooks?
You may encounter QuickBooks error UEXP when trying to activate retail payroll or update the payroll services. Common symptoms include error messages stating ‘We’re having a problem verifying your account status’, sudden crashes or freezing of the software during the update process, or inability to access certain features after attempting an update.

Oriana Zabell, a professional cloud engineer, has over three years of experience in desktop, online QuickBooks support and troubleshooting. She is currently working as a cloud hosting consultant with Asquare Cloud Hosting. She loves to read and write about the latest technologies such as cloud computing, AI, DaaS, small businesses, manufacturing. When not writing, she is either reading novels or is indulged in a debate with movie fanatics.