Last Updated on January 14, 2026
Every software requires updates to avail new features and tools. Similarly, QuickBooks Desktop also needs to be updated to the latest version to get new features and benefits. But there can be times when you encounter QuickBooks error 12009 during an update. This is one of the 12XXX error series.
When this happens, you fail to install the software update. To resolve this error, follow a series of troubleshooting steps, such as checking internet connectivity & settings, and ensuring no third-party app or service is blocking access. We have covered everything you need to do to resolve update error 12009 in QuickBooks, including the root causes.
If you need help with the QuickBooks update process, you can easily get in touch with our experts at +1(855)-510-6487!
What is QuickBooks Desktop Error Code 12009?
QuickBooks Desktop error 12009 occurs when you try to update the application or your payroll service. Often, the error appears as a network timeout that interrupts QuickBooks Desktop’s connection to the Intuit server. Consequently, QB cannot reach the internet or the Intuit server, and it fails to download updates. Let’s look into the list of error codes for the 12000 series.
List of 12XXX Series Error Codes
| Error 12002 | Error 12001 | Error Code 12009 |
| Error Code 12007 | Error 12029 | Error 12006 |
| Error Code 12164 | Error Code 12031 | Error 12008 |
| Error 12052 | Error Code 12057 | Error Code 12152 |
| Error 12157 | Error 12165 | Error Code 12166 |
| Error Code 12173 |
Let us see the multiple reasons that may lead to QuickBooks error 12009.
Potential Causes for QuickBooks Error Code 12009 During Update
QuickBooks error code 12009 occurs when the software fails to communicate with the Intuit server. This may occur for several reasons. Here is a list of common reasons for QuickBooks Desktop update error 12009.
- If QuickBooks Desktop experiences an unstable internet connection, it may result in error 12009.
- If the Windows firewall settings are set incorrectly on your computer.
- An outdated version of QuickBooks Desktop can also be a reason for the error.
- If the settings for your browser are not set appropriately.
- When the SSL settings are misconfigured.
- If the Windows firewall is blocking QB operations.
Let’s now move on to solutions to resolve error 12009 in QuickBooks.
How to Troubleshoot QuickBooks Desktop Update Error 12009
QuickBooks Desktop update error 12009 can be resolved using the troubleshooting solutions listed in this section.
Solution 1: Test Internet Connectivity and Settings
In this section, we’ll learn how to test the internet connectivity and settings. Additionally, we’ll also learn how to run the TLS 1.2 utility.
- Firstly, start by checking that your internet connection is fast and stable.
- Moreover, check whether you can access other secure websites besides QuickBooks.
- Lastly, ensure that the default browser is set to QuickBooks’s default browser for downloading updates.
Now that you have considered the above points, let’s run the TLS 1.2 utility by following the detailed instructions below.
Solution 2: Download the TLS 1.2 Utility and Run it on Your System
Running this utility may help resolve QuickBooks Error 12009 effortlessly. Therefore, let’s download and install the QB Tool Hub first and then follow the detailed instructions below to run the TLS 1.2 utility.
- Firstly, open QuickBooks Tool Hub.
- Choose the Installation Issues tab.
- Select the QuickBooks TLS 1.2 tool from the bottom right corner.
- Then select OK to open it.
- Further, select Yes to the EULA Agreement,
- Then, select Run.
- Lastly, select Exit once the tool completes.
If this doesn’t help you resolve error code 12009 in QuickBooks, try the next solution.
Solution 3: Verify Security Settings
If network connectivity, internet settings, or the browser aren’t the cause of QuickBooks Update Error 12009, a third-party application or software could be preventing the update. Therefore, we need to check if another software or program is causing the error.
- First, configure Windows Firewall settings for QuickBooks tax table, payroll, desktop updates, etc.
- Moreover, add QuickBooks programs to Windows Firewall port exceptions.
- Remember to restart your computer, then try downloading the QuickBooks and payroll tax table updates again.
- If the QuickBooks Desktop update error 12009 persists, open Windows in Safe Mode with Networking and try downloading the update again.
Solution 4: Run Windows in Safe Mode with Networking
With safe mode enabled, Windows uses a limited set of files and drivers. If you can update QB and payroll in safe mode, it means the default settings and basic device drivers are causing the error. Another key point is that running Windows in safe mode enables you to narrow down the source of a problem, helping in resolving the error. In this section, we’ll run Windows in Safe Mode with Networking. Let’s follow the steps below for the same.
- First, click the Windows Start button.
- Then select Settings.
- Select System, then choose Recovery.
- Next, go to Advanced Startup settings.
- Opt for the Restart now option.
- You’ll see the Choose an option screen, select Troubleshoot, then Advanced options.
- Then go to the Startup Settings and Restart.
- Another point is that you may be asked to enter your BitLocker recovery key.
- After the PC restarts, a list of options will appear on the screen.
- Then, press F5 to start the PC in Safe Mode with Networking.
Now, the next step is to try downloading the updates again. If this doesn’t help either, move to the next solution and reset QB updates.
Solution 5: Reset QuickBooks Updates
If QuickBooks error 12009 keeps appearing, you should reset the updates. Ensure you use QuickBooks in single-user mode when updating. Now, let’s see how to reset QuickBooks updates by following the detailed instructions below.
- Firstly, open QuickBooks.
- Go to the Help menu.
- Select Update QuickBooks Desktop.
- Click the Update Now tab.
- Check the box next to Reset Updates.
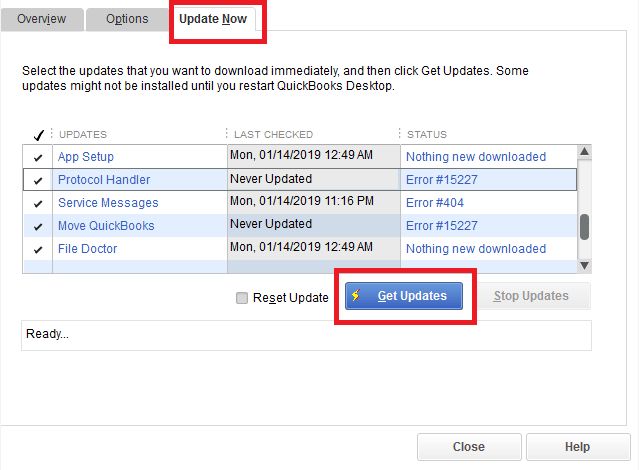
- Click Get Updates.
- Wait for the update to finish; once it does, close and reopen QuickBooks. Also, select Yes to install the updates.
Lastly, once the updates are installed, restart the computer and open QuickBooks. After resetting QuickBooks updates, try downloading and installing them again. If the QuickBooks Desktop update error 12009 doesn’t resolve, proceed to the next solution.
Solution 6: Reinstall QuickBooks in Selective Startup
If you cannot download updates for QuickBooks or payroll due to error code 12009 after trying all the solutions above, you should reinstall QuickBooks in Selective Startup. Let’s follow the steps below in detail for the same. Before you proceed with this step, consider the following important points.
- Create a backup of your company file.
- Keep a copy of your QuickBooks information, including product and license details.
Step 1. Switch to Selective Startup Mode
We uninstall and install QuickBooks in selective startups to ensure that no applications interrupt QuickBooks Desktop and payroll updates. You can talk to your computer manufacturer or a Windows expert. Now, let’s follow the steps below to switch to selective startup:
- Close all the open Windows and programs on the system.
- Then press Windows + R to open the Run window.
- Type msconfig in the search bar.
- Hit Enter to open the System Configuration window.
- Now, click the General tab.
- Then choose Selective Startup and Load system services.
- Move the Services tab.
- Tap on Hide all Microsoft services.
- Choose Disable All.
- Uncheck the Hide all Microsoft Services box.
- Choose Windows Installer from the list of services.
- Lastly, click OK, then select Restart in the System Configuration window.
The next step is to uninstall QuickBooks from the system.
Step 2: Uninstall QuickBooks from the System
- Click the Windows icon on the taskbar.
- Type Control Panel in the search field.
- Press the Enter key.
- Select the Uninstall a Program option.
- Choose the version of QuickBooks you want to uninstall.
- Click Uninstall/Change, then click Remove.
- Then hit Next.
Step 3. Install QuickBooks on the System
Before you reinstall QuickBooks on the system, here are a few points to consider.
- You must ensure the computer meets the QB system requirements and keep your product and license number handy.
- If you still haven’t downloaded it, consider downloading your version of QuickBooks Desktop and saving the downloaded file to a location you can easily access later.
Now, let’s follow the steps below to install QB.
- Open the recently downloaded QuickBooks.exe file.
- Follow the on-screen instructions, accept the software license agreement.
- Then hit Next.
- Enter the product and license numbers to continue.
- Then, hit Next.
- Choose the Install option.
- Lastly, when it finishes, select Open QuickBooks.
After the system restarts, open QuickBooks Desktop and try updating the payroll version.
Solution 7: Create a Firewall Exception for QuickBooks
By creating exceptions for the QB application, you can avoid the firewall application from blocking the operations.
- Go to the Start menu.
- From the search bar, look for Windows Firewall.
- Then, select the Advanced Settings.
- Right-click on the Inbound Rules.
- Click on the New Rule option.
- Select the Port and then tap on Next.
- Check if the TCP option is selected.
- Under the Specific local port section, enter the specific ports that are needed for the QuickBooks year version:
- QuickBooks Desktop 2020 and later: 8019, XXXXX.
- QuickBooks Desktop 2019: 8019, XXXXX.
- QuickBooks Desktop 2018: 8019, 56728, 55378-55382.
- QuickBooks Desktop 2017: 8019, 56727, 55373-55377
- Tap Next after entering the port number.
- Select the Allow the connection option.
- Click on Next.
- Check that all the profiles are selected, then click Next.
- Create a new rule and name it QBPorts(years).
- Click on Finish.
Then follow the steps to create a Windows Firewall exception for the QuickBooks application.
- Access the Windows Start menu.
- Look for the Windows Firewall in the search bar and access it.
- Tap on the Advanced Settings.
- Now, right-click on the Inbound Rules.
- Then choose the New Rule.
- Choose the Program and click Next.
- Tap on This Program Path.
- Click on Browse.
- Locate the executables file and then select Next.
- Choose the Allow the Connection option.
- Click on Next.
- When prompted, make sure all profiles are marked.
- Click on Next.
- Create a rule. Give it a name like QBFirewallException(name.exe).
By following the steps, you can create an exception for QB operations in your system.
A Quick Glimpse into QuickBooks Error 12009
In this section, let’s have a quick overview of all the information covered on QB error 12009 in this blog.
| Description | QuickBooks error 12009 occurs when you are unable to update the software or when the QBDT application keeps crashing or freezing. |
| Causes Behind it | This issue can be caused by Windows Firewall or antivirus software blocking operations, an outdated QuickBooks version, SSL configuration issues, or a poor internet connection. |
| Ways to Fix | You can test the internet connection and upgrade it for a better speed, download the TLS 1.2 utility, verify the security settings, reinstall QuickBooks in selective startup mode, or create a firewall exception to fix this issue. |
Conclusion
The solutions above should fix QuickBooks error 12009 when you attempt to update the desktop application or payroll service. However, if you get stuck while following the troubleshooting steps or the issue remains unresolved for any reason, you must consult a technical expert immediately. Contact our experts at +1(855)-510-6487 to get free guidance if you still encounter any update errors.
Frequently Asked Questions (FAQs)
What is error 12009 in the QuickBooks support update?
Error 12029 in QuickBooks support update occurs when there is an issue with QuickBooks or payroll updates. Like QuickBooks error code 12009, QuickBooks error code 12029 falls under the 12XXX error series.
What causes error 12009 in the QuickBooks support update?
Error code 12009 occurs when QuickBooks fails to connect to the internet or to the Intuit server due to issues with security settings, Windows Firewall, Internet Explorer configuration, or similar factors.
How do I fix general QuickBooks errors?
To diagnose and fix a QuickBooks Desktop error, start by analyzing the error code or error type. The QuickBooks application encounters several error categories, including multi-user mode, company file, and payroll update errors. Identifying root causes and implementing effective solutions can help fix QBDT errors effortlessly.

Alastor Moody is an Author at Asquare Cloud Hosting with experience in technical and functional writing. He loves travelling for adventure and fun.