Last Updated on August 8, 2024
As we all know, QuickBooks is prone to errors and issues, specifically company file errors. QuickBooks error C=153 is one such error you may encounter while working on the company file or opening QuickBooks. It is one of the C series errors that not only prevents you from working on the company file but also interrupts payroll-related operations. Regardless of the reasons behind it or the situation wherein you face this company file error, you must fix it quickly to continue with QuickBooks. This article contains all the practical solutions you need to fix the error; be sure to go through it until the end.
Are you curious to know how to fix QuickBooks error code C=153? You can get in touch with the QuickBooks Data Repair Service experts to get help. Dial +1(855)-510-6487 to connect with them on a direct call and get a consultation on this error. The team is highly experienced and is available to help anytime.
What Causes QuickBooks Error C=153
Knowing the causes behind error code C=153 can help you find suitable solutions. Here’s a list of possible reasons that trigger the error when opening QuickBooks, working in the company file, and running other operations.
- A damaged or corrupted QBUSER.INI file can be responsible for error C=153.
- Some common network connection or company file issues.
- Using an outdated version of QuickBooks can also trigger error code C=153.
- Your company file data might have lost its integrity or the .TLG is damaged.
- There might be some issues with your program files, or the QuickBooks installation might get damaged.
Getting familiar with the causes behind QuickBooks error C=153 can help you find a suitable solution you need to follow. So, move to the next section of this article and explore the solutions mentioned below.
Top Solutions to Fix QuickBooks Error Code C=153
Now that you know what causes QuickBooks error C=153, you must follow the solutions accordingly to troubleshoot the error. Follow the stepwise solutions carefully, as mentioned below.
Before jumping to the solutions,
- ensure QuickBooks application is updated to the latest release.
- Keep the computer connected to a strong network connection.
Solution 1: Run QuickBooks File Doctor
The QuickBooks File Doctor can help fix common company file and network connection issues. It also fixes corrupted or damaged data file issues. You must download and install the Tool Hub on the system to run this utility.
Step 1: Get the QuickBooks Tool Hub in its Latest Version
- Close QuickBooks and go to Intuit’s official site.
- Download the QuickBooks Tool Hub in its latest version.
- Once the file is downloaded (QuickBooksToolHub.exe), save it in an easily accessible location.
- Double-click the QuickBooksToolHub.exe file to initiate the installation procedure.
- Follow the on-screen instructions to install and then agree to the product’s terms and conditions.
Note: The Tool Hub icon will appear on the screen. Double-click to open it. In case you can’t see the Tool Hub icon, you can search it manually in the Windows search bar and then open it.
Step 2: Now Run QB File Doctor
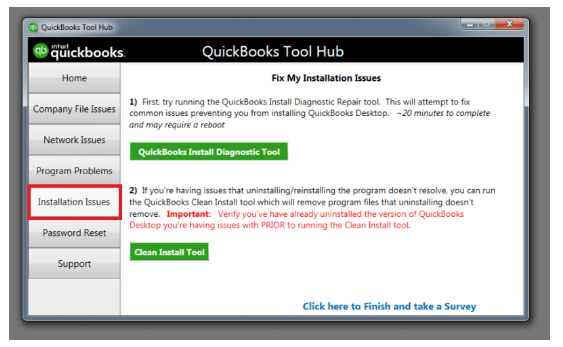
- Access the Tool Hub and select Company File Issues.
- Further, choose QuickBooks File Doctor. As has been noted, File Doctor may take some time to open.
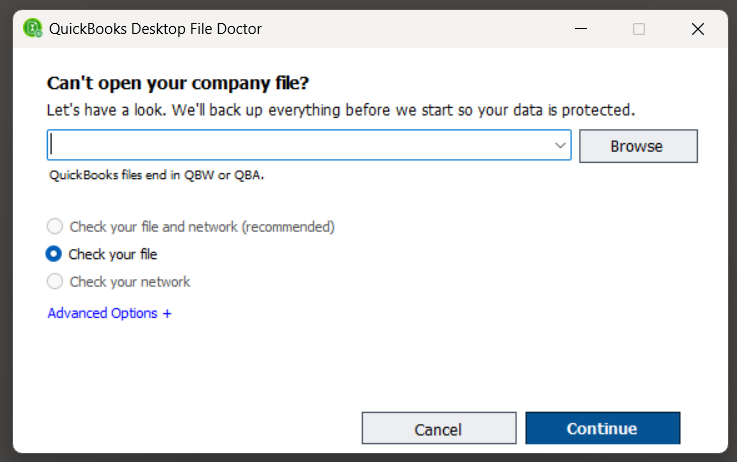
- In the file doctor, choose the company file from the dropdown menu. If you can’t find your file, select Browse and Search to find it
- Choose Check your File from the given options and click Continue.
- Finally, enter the QuickBooks admin password and click Next to conclude.
If error code C=153 is fixed, you’re good to go. However, if it persists, follow the solution mentioned below.
Further Reading:
- QuickBooks Company File extension Not Found after update
- How to Update QuickBooks Company File to newer versions
- QuickBooks Cannot use the Path to Open the Company File
- What to do if QuickBooks Cannot Communicate with the Company File
- How to create QuickBooks Portable Company File on a Desktop
Solution 2: Open a Sample Company File
Open a sample company file to ensure whether the issue is with QuickBooks or the company file.
- To open the Windows Start menu, tap the Windows icon.
- In the search field, type QuickBooks.
- Press the Ctrl key on the keyboard and select QuickBooks. Don’t release the Ctrl key until QuickBooks opens.
- Now, choose Open a Sample file.
- If you can’t open QuickBooks or the sample file or see an error, the issues are with the QB program. In that case, move to the solution below to fix the QuickBooks issues.
Move to the next solution if QuickBooks error C=153 isn’t fixed.
Solution 3: Manually Repair QuickBooks Desktop
If the QB program prevents you from working in the company file, you must repair the program quickly. Follow the steps below to fix QuickBooks manually.
- Open the Windows Start menu by pressing the Windows icon.
- Type Control Panel In the search field and press Enter. The Control Panel window will open.
- Select Uninstall a Program. Then, choose the version of QuickBooks you want to remove from the list of programs and click Uninstall/Change.
- Select Continue/Next and click Repair.
- Finally, click Next and hit Finish to conclude the process.
If error C=153 isn’t fixed, move to the next solution.
Solution 4: Give a New Name to QBUSER.INI File
The QBUSER.INI file holds the list of all the previously opened company files in QuickBooks. Renaming this file will replace the old one with the new one and erase all the data, which will help you fix the issues. Learn how to rename the file:
- Open the folder that contains the QBUSER.INI file: Users[Your user name]AppDataLocalIntuitQuickBooks [year].
Note: In case you can’t find the folder, look for the same file in hidden files and folders and enable them.
- Right-click the QBUSER.INI file and select the Rename option.
- Add .OLD extension at the end of this file name (QBUSER.INI.OLD) and save it. Also, rename the EntitleDataStore.ecml file.
- Once it’s done, reopen QuickBooks and try to perform the same interrupted operations.
If the QBUSER.INI file isn’t causing any issues, move to the next solution to fix error code C=153.
Read More :Instant Hacks to Resolve QuickBooks Error C=272
Solution 5: Clean Install QuickBooks to Fix the Issues
A clean install is reinstalling QuickBooks Desktop on a computer where the hard drive is formatted and erased completely. After a clean install, you restart with the fresh Windows OS.
- Remove QuickBooks from the system. Then, follow the steps below to display hidden files.
- Go to the Windows Start menu to look for File Explorer. When you see the File Explorer icon, open it.
- Find the QuickBooks folder and open it. QuickBooks folder contains the company files and is usually found in one of these locations:
C:\ProgramData\Intuit\QuickBooks (year)
C:\Users(current user)\AppData\Local\Intuit\QuickBooks (year)
C:\Program Files\Intuit\QuickBooks (year)
64-bit version C:\Program Files (x86)\Intuit\QuickBooks (year)
- Right-click the folder, select Rename, and add the word “old” at the end of the folder name.
- Lastly, reinstall QuickBooks to proceed further.
Now, the next step is reinstalling QuickBooks. It comprises two steps: downloading QuickBooks and installing it on the system.
Step 1. Downloading QuickBooks
- Go to the Downloads & Updates page and choose an appropriate option for the question, “Will you be using QuickBooks Desktop on multiple computers at the same time (multi-user mode)?”
- Hit Next to proceed further.
- Choose the QuickBooks product and version from the drop-down list and hit the Search button below.
- Hit the Download button to download QuickBooks.
Step 2. Installing QuickBooks
- Open the QuickBooks.exe. file that you have just downloaded.
- Follow the on-screen instructions to install QuickBooks, accept the software license agreement, and select Next.
- Enter the product and license numbers and then hit Next.
Note: You must have an active internet connection to install the software. Another key point is that when you install QuickBooks, you get two options to choose from. One is Express install, and the other one is Custom and Network. We recommend you go for Express install if you are reinstalling QuickBooks.
- Choose Express and then hit Next.
- Select Install and then select Open Quicks once it finishes.
After the installation, QuickBooks will prompt you to activate and update it.
If the error still persists, you need to run the QuickBooks Auto Data Recovery Tool to get rid of the error. See the solution below in the next troubleshooting solution.
Solution 6: Run QuickBooks Auto Data Recovery Tool
The QuickBooks Auto Data Recovery tool is a built-in feature of QuickBooks that helps to recover corrupted data from the company file. It uses the current Transaction Log file and a copy of the Company file to restore lost transactions. Overall, it helps keep your data secure and recover the damaged one. To learn how to run this tool, follow the steps mentioned below.
- Go to the home screen of your computer and create a new folder; name it QBTest.
- Open the folder using the same location as your company file.
Note: You can check the location of your company file on the Product
Information window. Press the F2 or Ctrl key to open this window.
- Find the company file in the folder but with the .tlg extension at the end. In case you didn’t see the .tlg file, here’s what you can do:
- Press the Windows + E keys on your keyboard.
- Select the Organize option and then choose Folder and Search Options.
- Further, select Hide Extensions for Known File Types.
- Select Apply to save these changes and click OK.
- Now, copy the .TLG file and paste it into the QBTest folder on your desktop.
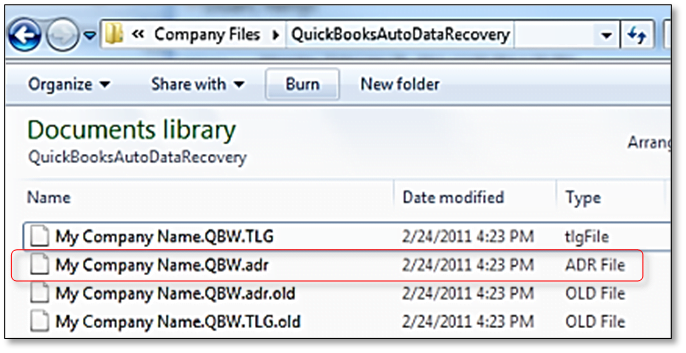
- Go to the QuickBooksAutoDataRecovery folder, which is located in the same folder as the company file.
- Copy the .QBW.adr file and paste it to the QBTest folder you just created. Now, you have both the .TLG and .QBW.adr file in the test folder.
- In the QBTest folder, right-click on the .QBW.adr file and select Rename.
- Delete the .adr extension at the end of the file name.
- Launch QuickBooks Desktop and open the company file in the QBTest folder. Use the account register to verify all the transactions are there.
- Once done, go to the File menu and select Utilities.
- Further, select Verify Data to check the Auto Data Recovery tool has fixed the issues.
- If the company file works fine, move the damaged file to the test folder or another location and transfer the files from the text folder to the original ones.
If error C=153 persists, moving to the next solution might help you.
Recommended To Read: How to Fix QuickBooks Connection has been lost Error Message
Summary
The troubleshooting solutions mentioned in this blog effectively fix QuickBooks error C=153, as multiple users have benefited from this guide. However, if the error persists or you have further queries, you must get in touch with the Asquare Cloud Hosting Helpline number. Dial +1(855)-510-6487 to communicate with the team of experts who are highly qualified and experienced. They will help you get past the error easily.

Alastor Moody is an Author at Asquare Cloud Hosting with experience in technical and functional writing. He loves travelling for adventure and fun.