Last Updated on January 8, 2025
Often, as a QuickBooks user, you may struggle with certain issues, such as runtime errors, payroll issues, or company file issues that are difficult to deal with. Sometimes, while accessing company files in QB, you might come across a 6000 series error, such as QuickBooks Error Code 6210.
Error 6210 falls under a broader category of company file issues that can occur in both local and network setups. However, QuickBooks error 6210 is a multi-user problem and can get triggered for multiple reasons. Error 6210, 0 generally occurs when you try to open a company file on a system that is not the host computer but is hosting the file.
If you are looking for a guide to help you tackle this error, you are at the right place. In this blog, we will explore all the possible reasons in detail and walk you through in-depth troubleshooting to resolve the company file error 6210 in QB Desktop.
An Overview on QuickBooks Error Code -6210 0
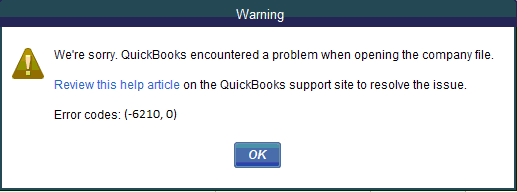
The QuickBooks error code 6210 is a company file issue that appears when you try to open the company file on a workstation that is not set as the server computer but is hosting the company file. The error does not let you open the file and may sometimes crash the QuickBooks application unexpectedly. It generally pops up on the screen with a warning message saying.
| “We’re Sorry. QuickBooks encountered a problem when opening the company file. Review this help article on the QuickBooks support site to resolve the issue. Error codes: (-6210, 0)” |
Once you have understood what the QuickBooks error 6210 means, let us go through the reasons that might trigger this error.
What Leads to QuickBooks Desktop Error 6210
Let us explore the reasons behind this error 6210 in QuickBooks 2024 or other QB versions. QuickBooks Desktop Error 6210 can occur for many reasons. Below are the listed possible causes behind error 6210 while opening the company file in multi-user mode.
- Improper installation of QuickBooks Desktop.
- Misconfigured hosting settings on the system can also lead to error 6210.
- Damage of QuickBooks Company (.QBW) data file.
- Computer infections may infect or delete the QuickBooks installation files.
- Corruption in the Windows Registry.
- The Windows firewall can be the reason why the host computer cannot communicate with the workstations.
- Incorrect folder access permission can also lead to this error.
- Change in the QuickBooks-related software.
- When there is damage, infection, or malware in the transaction log files (.TLG) and Network Data files (.ND).
Also Read: Fix QuickBooks Error Code 6150 1006 (company file issues)
Before You Begin Troubleshooting the QuickBooks Error Code 6210 0
Well, we will proceed with the troubleshooting, but before that, let’s look at some points that you must consider.
- You should update to the latest release for QuickBooks Desktop.
- Scan your computer for viruses and malware and remove them.
- Ensure QuickBooks has access through the Windows firewall before accessing the company file in multi-user mode.
Once you have ensured the above-mentioned key points, let’s proceed to the troubleshooting part.
Expert Recommended Ways to Fix QuickBooks Error 6210
In this section, we will list several ways to resolve QuickBooks error code 6120. Follow the given instructions step by step to get rid of the company file error.
Utilize QuickBooks File Doctor
QuickBooks File Doctor plays an essential role in fixing error code 6210. When running the file doctor, make sure to choose the option to check both the company file and network.
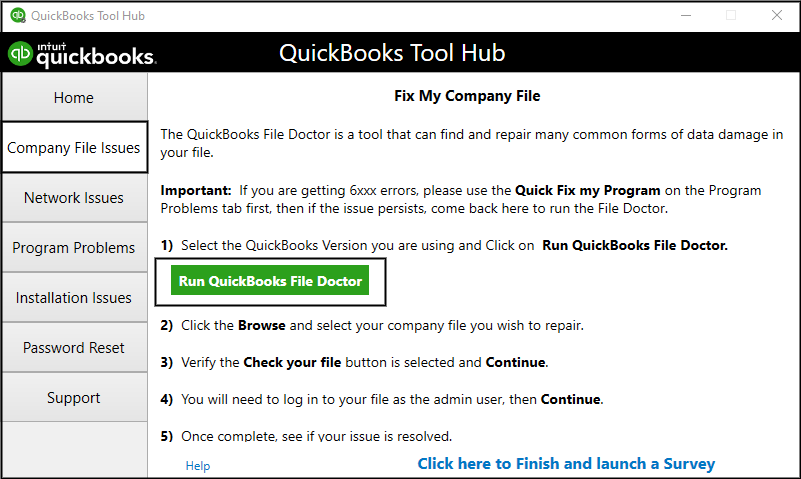
It can quickly resolve issues with the company file and also improve network issues. QB File Doctor is best known for fixing the problems related to the 6000 error series.
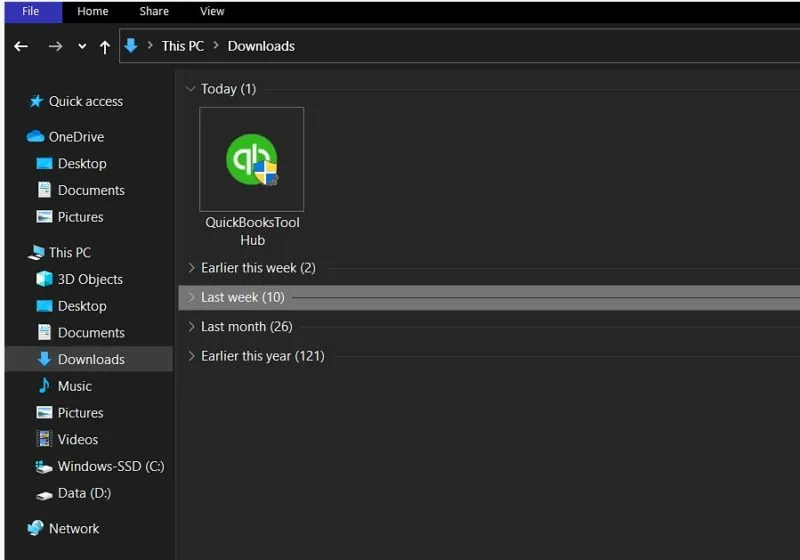
The File Doctor and other tools are found in the QuickBooks Tool Hub. So, you need to download the Tool Hub application on the system and then run the File Doctor tool from the Company File Issues tab.
2. Rename .ND & .TLG File & Run the Database Server Manager
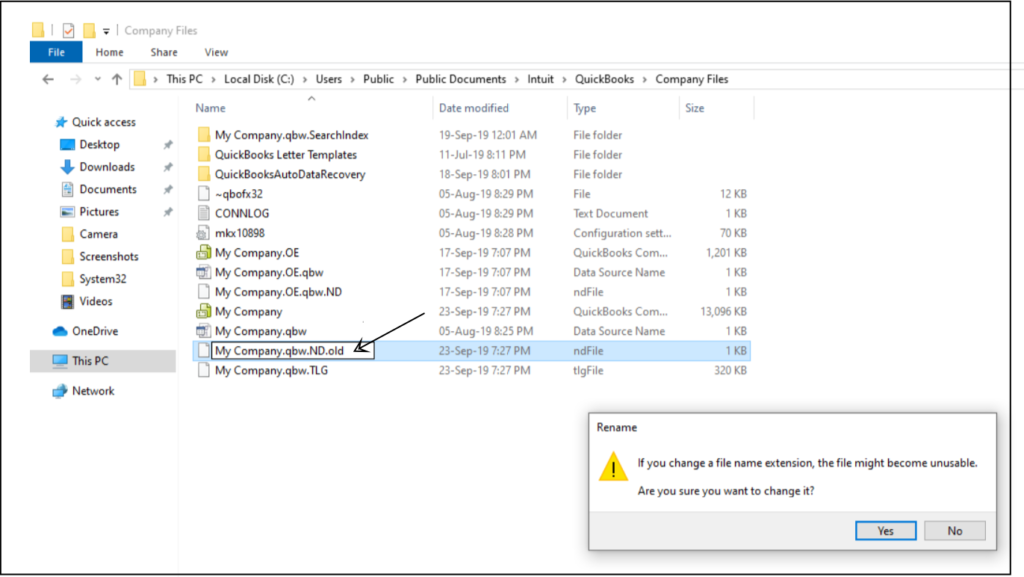
The Network Data and Transaction Log files are configuration files for QuickBooks that allow it to access a company file over a network in a multi-user environment. When these files are damaged, you can get error 6210 while opening the company file. So, you need to rename these files and then run the QBDBMgrN when you open the company file. This will allow QB to recreate these files.
Step 1: Rename .ND and .TLG Files for QuickBooks
- Firstly, open File Manager and navigate to the QuickBooks installation Directly.
- Then, locate the corresponding company files with the .ND and .TLG extensions.
- Now, one by one, right-click on the files and choose rename.
- Here, add.OLD at the end of the extensions ( so that new file becomes with this extension: .TLG.OLD and .ND.OLD).
- After renaming, create a new folder on the system’s desktop and then move the QuickBooks file from the installation folder to the newly created folder.
- Now, launch QuickBooks and access the company file from the newly created folder.
Read more:- How to Fix QuickBooks Payroll Update Error PS077?
Step 2: Run QuickBooks Database Server Manager From Tool Hub
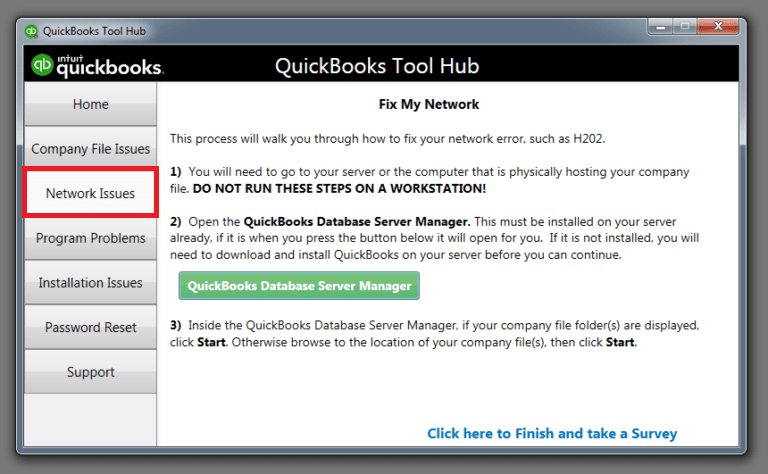
- Navigate to the Tool Hub icon and double-click on it to launch it.
- Among the other tabs present there, click the Network Issues tab, followed by clicking the QuickBooks Database Server Manager option
Note: This will open a prompt message that will ask you to download the manager- if you already don’t have it on your system.
- When you open the server manager, look for the option Start Scan.
- Then, locate your company files in the window that opens on the screen. If you do not find them, click the Browse button and locate them; afterward, click the Start Scan button.
- After the scan is completed, try opening the QuickBooks Desktop and the company file to check if the error 6210 is resolved. If not, try the following troubleshooting method.
3. Open a Sample Company File On the Workstation
This is a quick way to check if the problem is with the company file or QuickBooks. If the sample company file doesn’t open and you get the error 6210 in QuickBooks, the issue is with the software, which you need to repair. However, if the sample file does open, the problem might lie with the company file or the file path.
- Go to the “no company open” window on your desktop and then choose “open a sample file.”
- Then, choose a sample company file from the list of sample company files. If the sample file opens locally, then move to the next solution. However, if the sample file returns the error message 6210, then the QuickBooks installation is damaged and needs repair.
How to Repair QuickBooks Desktop
To repair the QuickBooks Desktop, you need to run the Quick Fix My Program from the Tool Hub application. The steps to run the Quick Fix My Program utility are as follows:
Note: If you don’t have Tool Hub installed on your computer or it is outdated, you will need to install it.
- Open the QuickBooks Tool hub and go to the Program Problems tab.
- Then, select the Quick Fix My Program Utility and let it repair the QB installation.
- Afterward, start the QB Desktop and open the data file.
4. Try to Open Your Company File Locally
This solution helps to rectify error 6210 if it occurs due to a problem with the location of the company file. You need to copy the file to the desktop and open it; here is how to do it:
- First, you need to open the folder containing your company files and look for the file that has . QBW extension.
- Then, right-click the file and choose “Copy” from the list of options.
- After this, head to the desktop, right-click anywhere on it, and then select the Paste option.
- Ensure you keep holding the control key while opening the QuickBooks Desktop so that you get directly to the No Company Open window.
- Here, you must click Open or restore an existing company, navigate to the desktop, find the company file that you copied, and open it.
Once done, you might not get the error on your screen from now on. If you continue to face an error 6210, then move to the next solution.
5. Close QuickBooks Processes On the Desktop
By simply closing all the QB-related tasks on the desktop, you can free up the RAM and eliminate this issue. Here’s how you can close all the QB processes running in the background:
- Start the process by logging into the server computer using the Admin credentials
- Click the Ctrl + Shift + Esc keys to get the task manager on the screen.
- When it opens, click the Users option to get the processes for all users.
- Next, look for all the QB-related processes like QBDBMgr.exe and QBW32.exe in the window.
- Just click or select each one of them and then select “end task.”
Now, try opening your company file again in the multi-user mode.
6. Reinstall QuickBooks using the Clean Install Tool
The damaged QB Desktop functions can be the primary reason for access errors in the QuickBooks company file. QuickBooks Clean Install Tool helps resolve the damaged or corrupt parts of the utility and eliminate the error 6210 in QuickBooks.
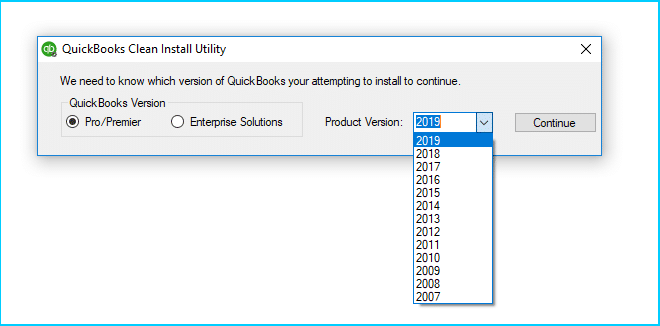
Clean install QuickBooks and resolve the damaged functions of the software. Now try to access the company file again and check if the issue is resolved.
Also read:- How to Fix QuickBooks Error 6177? (Open Company File Issue)
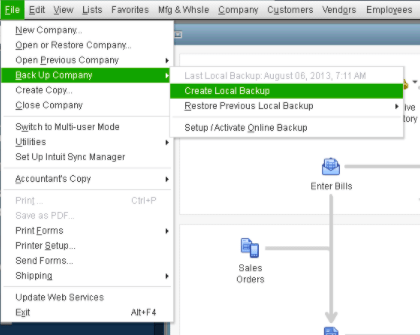
7. Restore QuickBooks Backup File
If you’re still facing error code 6210 in QuickBooks 2016, then there are some issues with the Company files(.QBW). So, it’s better to restore the latest backup to resolve this issue.
- Close QuickBooks Desktop.
- Then, press and hold the CTRL key until No Company opens the Window display on the screen.
- Now, press on Open or restore an existing company.
- Select Restore a backup copy and click Next.
- In the end, follow the on-screen instructions for restoring the latest backup.
Now, check if this resolves the company file issue. If it didn’t, continue to the next step.
8. Check the Folder Permission Manually & Set It Correctly
You can also get the QuickBooks error 6210 if the folder where you have saved the company file does not have the proper access permissions. So, follow the steps below to check the folder permissions for sharing the company files.

Step 1: Check If the Folder Permissions Are Set Correctly
- Open the Windows Start menu, then the File Explorer.
- Then, you need to right-click the folder that has your company file and select the Properties option.
- Now, on the Security tab, you need to select the Advanced option.
- Then, select the QBDataServiceUserXX option and hit Edit.
- You need to set the permissions for the following settings as Allowed:
- Traverse Folder/Execute File
- List Folder/Read Data
- Read Attributes
- Read Extended Attributes
- Create Files/Write Data
- Create Folders/Append Data
- Write Attributes
- Write Extended Attributes
- Read Permissions
However, if the permissions are not set correctly, then fix them in the following manner:
- Right-click the folder containing your company files and select the Properties option.
- Then, select the Security option, hit Edit, and choose the QBDataServiceUserXX option.
Select the Full Control option for the permission and hit Allow, followed by Apply and OK.
Step 2: Adjust the Folder Permissions For Everyone
Do the following steps to adjust the folder permissions for your folders:
- To start the process, open the Windows Start menu and open File Explorer on the screen.
- Then, find the folders listed below and right-click on them:
- C:\Program Data\Intuit\Entitlement Client\v8
- C:\Program Data\Intuit\Entitlement Client\v6.0
- C:\Program Data\Intuit\Entitlement Client\v5
- C:\Program Data\Intuit\Entitlement Client\v3
- C:\Program Data\Intuit\Entitlement Client
- C:\Program Data\Intuit\QuickBooks Enterprise Solutions X.0 (X = version) or C:\Program Data\Intuit\QuickBooks 20XX (XX = year)
- C:\Program Data\COMMON FILES\INTUIT
- C:\Program Data\COMMON FILES\INTUIT\QUICKBOOKS
- C:\Users\Public\Public Documents\Intuit\QuickBooks\FAMXX (XX = year)
- C:\Users\Public\Public Documents\Intuit\QuickBooks\Company Files
- C:\Users\Public\Public Documents\Intuit\QuickBooks\Sample Company Files\QuickBooks Enterprise Solutions X.0 (X = version) or C:\Users\Public\Public Documents\Intuit\QuickBooks\Sample Company Files\QuickBooks 20XX (XX = year)
- Now, you need to perform the steps listed below for these folders.
Note: You may not have all these folders mentioned above. Some of the folders are exclusive to specific versions of QuickBooks Desktop. So, perform the steps for the folder you find on your system.
- Right-click the folder you have on the system and select Properties.
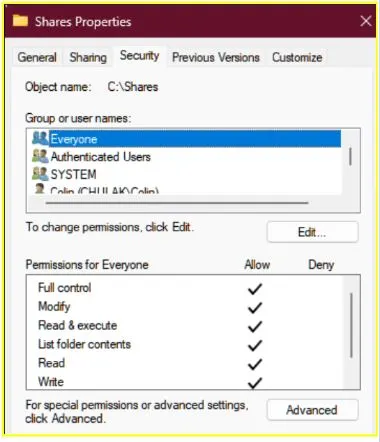
- Now, navigate to the Security tab and select Everyone.
Note: If you do not find the Everyone option listed in the Group or User Name checkbox, hit the Add button, manually type in Everyone, and hit OK.
Step 3: Set Windows Access Permissions to Share the Company Files
This step will help you ensure that the QB Desktop has the right Windows access permissions to share the files over the network.
For Windows 10
- Open the Windows Start menu and open the File Explorer on the screen.
- Then locate and right-click the folder that contains your company files.
- After this, choose the Properties option, followed by the Sharing and Share Add options.
- Now, select the corresponding QBDataServiceUserXX for your version of QuickBooks.
Then, set the permissions for both the users as Full Control and hit the Share button.
For Windows Server 2012
Before you perform the steps below, ensure you have installed the File and Storage Services on the system.
- Open the Windows Start menu and type in the command Run in the search to open the Run Command window.
- Now, type the command ServerManager in the run window and hit OK.
- Select the File and Storage Services option and the Shares option.
- Now, a Task drop-down will open; choose the New Share button on it. It will show a list of File Share Profiles. You can check the difference between the different profiles by clicking on them one by one and reading the description.
After this, select the SMB Share – Quick option.
Note: The SMB Share – Quick option given here is a default profile; this selection is subjective and can vary.
- Now, select the Type a custom path option from the Share location section and Browse to the folder you want to share.
- Then, choose the appropriate folder and hit Select a folder, followed by Next.
Note: Here, you can leave the default selections under the Configure Share settings section as it is and hit the Next button again.
After this, try opening the file and check if the error 6210 is resolved.
Configure Firewall Ports and Anti-Virus Software For QuickBooks
Sometimes, your firewall or antivirus application blocks access to specific QuickBooks files and folders; in that case, you may face issues opening the files on the system. So, you need to configure the firewall ports and set up exceptions for QuickBooks such that they don’t scan QB files. You can also use the QB File Doctor to manage the firewall in the system. However, the steps to manually configure them are given below.
Step 1: Manually Add Firewall Port Exception For QuickBooks Desktop
You need to perform the steps given below for all the QuickBooks versions (years) if you use multiple versions on the same computer.
- Open the Start menu on the system, type Windows Firewall in the search box, and hit Enter.
- When the Windows Firewall opens, select the Advanced Settings option.
- Then, right-click the Inbound Rules option and click the New Rule button. Later on, you will also need to repeat the steps for Outbound Rules.
- Select the Port option and hit Next. Also, make sure the TCP option is selected.
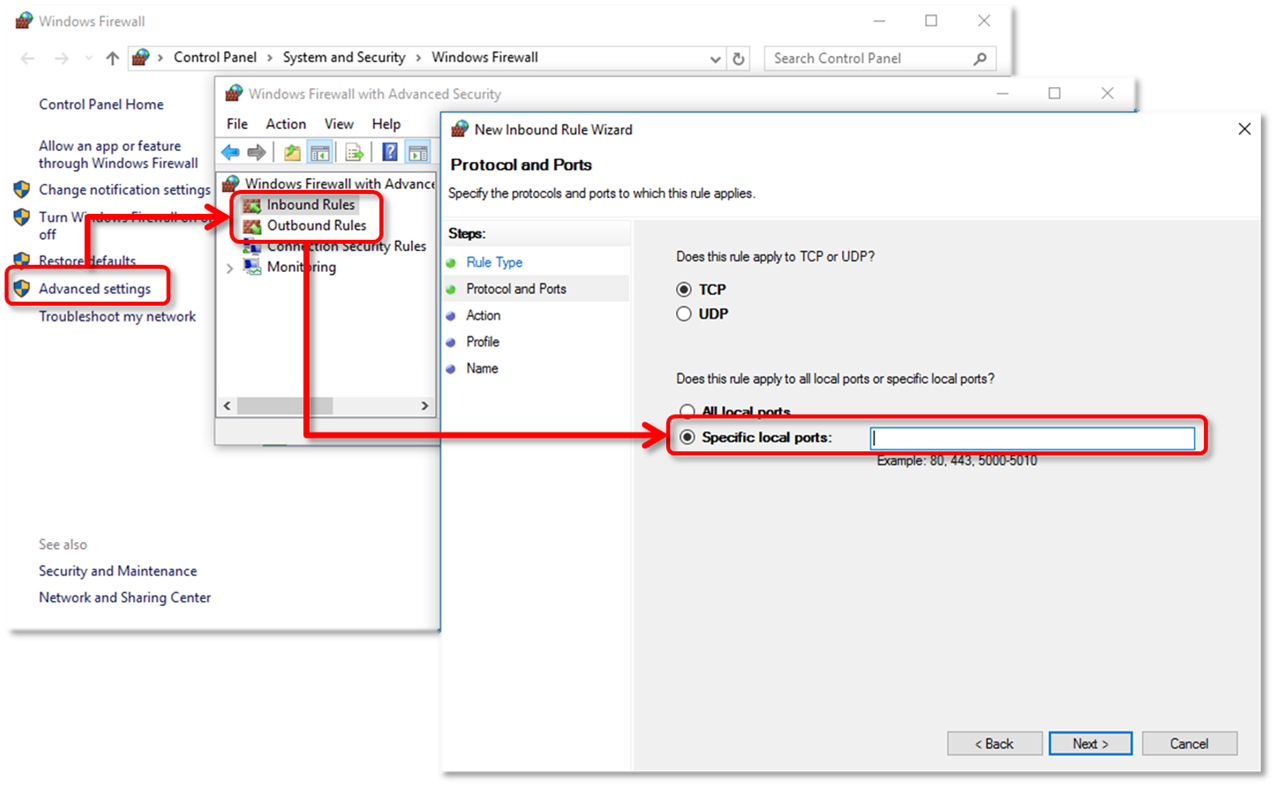
- Now, in the Specific local ports field, you need to enter the ports that are required for your QuickBooks version. The port details for different versions are listed below:
- QuickBooks Desktop 2020 and later: 8019, XXXXX.
- QuickBooks Desktop 2019: 8019, XXXXX.
- QuickBooks Desktop 2018: 8019, 56728, 55378-55382.
- QuickBooks Desktop 2017: 8019, 56727, 55373-55377.
Note: QuickBooks Desktop 2019, 2020, and future versions of QB use dynamic ports, which are the specific firewall ports and not a range that is assigned during installation. It makes sure that the QB Desktop gets exclusive use of the given ports.
How to Get the Dynamic Port Number for QuickBooks
- Go to the Windows Start menu, search for the QuickBooks Database Server Manager in the search space, and open QBDMgrN.
- In QBDBMgrN, go to the Port Monitor tab.
- Now, find your version of QB and make note of the Port number. You’ll use this port number for your firewall port exceptions.
Note: You can also change the assigned port number by selecting the Renew option given there. After you do so, you need to go to the Scan Folders tab and click the Scan Now button to reset the firewall permissions. However, remember you can only renew the ports for QB Desktop 2019 and later versions, not for the older versions of QuickBooks.
- Afterward, when you enter the port number, hit Next, then select the Allow the Connection option and hit Next again.
- If prompted, make sure all the profiles are marked and then hit Next.
- Lastly, create a rule and give it a name like QBPorts(year), and once done, click Finish.
After completing all these steps for the inbound rules, you also need to create Outbound Rules. For this, you must repeat the same steps and select the Outbound Rules instead of Inbound in the above steps.
Step 2: Create Windows Firewall Exceptions for QuickBooks Desktop Application
QuickBooks Desktop uses various .exe files (executable files) to perform different tasks. So, to run it smoothly, you need to create exceptions for each executable file that it uses. Take the reference from the list in the table below and follow the steps given below:
- Open the Windows Start menu, search for Windows Firewall, and hit Enter to open it.
- Now, navigate to the Advanced Settings option.
- Then, right-click the Inbound Rules and choose the New Rule option. (Later, perform the same steps for the Outbound Rules as well).
- After this, select the Program option followed by Next.
- Now, select the This Program Path option and hit Browse.
- After this, find and select one of the executable files mentioned in the table below and select the Next button.
- Select the Allow the Connection option and Next.
- Then, if it prompts you, then make sure all the profiles given there are marked and hit Next.
- Now, create a rule and name it as QBFirewallException(name.exe).
- Repeat the steps as mentioned above and create Outbounds Rules.
- The different executable files for QuickBooks and their location are mentioned in the table below.
| Executable files | Location |
| AutoBackupExe.exe | C:\Program Files\Intuit\QUICKBOOKS YEAR |
| Dbmlsync.exe | C:\Program Files\Intuit\QUICKBOOKS YEAR |
| DBManagerExe.exe | C:\Program Files\Intuit\QUICKBOOKS YEAR |
| FileManagement.exe | C:\Program Files\Intuit\QUICKBOOKS YEAR |
| FileMovementExe.exe | C:\Program Files\Intuit\QUICKBOOKS YEAR |
| QuickBooksMessaging.exe | C:\Program Files\Intuit\QUICKBOOKS YEAR |
| QBW32.exe | C:\Program Files\Intuit\QUICKBOOKS YEAR |
| QBDBMgrN.exe | C:\Program Files\Intuit\QUICKBOOKS YEAR |
| QBServerUtilityMgr.exe | C:\Program Files\Common Files\Intuit\QuickBooks |
| QBCFMonitorService.exe | C:\Program Files\Common Files\Intuit\QuickBooks |
| QBLaunch.exe | C:\Program Files\Common Files\Intuit\QuickBooks |
| QBUpdate.exe | C:\Program Files\Common Files\Intuit\QuickBooks\QBUpdate |
| IntuitSyncManager.exe | C:\Program Files\Common Files\Intuit\Sync |
| OnlineBackup.exe | C:\Program Files\QuickBooks Online Backup |
Note: If you see the Program field as x86, it just means you are using a 64-bit Operating system, and it does not change the steps.
After you have created both Inbound and Outbound rules, switch to the multi-user mode and check if you still get the QuickBooks error message 6210. If it still appears, then configure your antivirus software settings.
You need to check with the anti-virus developer to set up these exceptions in your antivirus application. Each of them has different steps to make exceptions.
Conclusion
The steps above give you a brief idea of how to fix the QuickBooks error 6210. We hope the instructions were easy to understand and follow. However, if self-troubleshooting is challenging or the error persists, we recommend that you contact the experts at the QuickBooks Data Repair Service for immediate assistance.
Frequently Asked Questions:
QuickBooks Enterprise error 6210 messages typically occur when there is an issue with the company file or the network connection. The most common cause of this error is a damaged or corrupted company file, or a network connection issue. It can also occur if the user does not have sufficient permissions to access the company file or the QuickBooks program.
Error 6210 in QuickBooks 2017 can be caused by a variety of different issues. These can include problems with a company file, software compatibility issues, or a damaged or missing QuickBooks component.
Yes, By following the above-mentioned troubleshooting steps, you can fix error 6210 0 in QB Desktop Pro, Premier, or Enterprise versions.
QuickBooks ND (No Data) and TLG (Transaction Log) files are data files used by QuickBooks to store financial information. The ND file contains information about customers, vendors, and other financial data, while the TLG file stores a log of all changes made to the QuickBooks data. Together, these files ensure that QuickBooks data is accurate and secure.
QuickBooks File Doctor is a tool developed by Intuit to help diagnose and resolve errors and networking issues when using QuickBooks Desktop. It can detect and fix data corruption, network issues, and file/folder permissions. It can also be used to repair company files and reset user passwords.
Yes, the antivirus applications can sometimes detect QuickBooks files as threats and restrict you from accessing them, so you can disable these apps to fix the error code 6210. Alternatively, you can also set up exceptions for QB files in the antivirus software and stop them from scanning the QB files.

Kate is a certified public accountant (CPA) with expertise in various accounting software. She is technically inclined and finds passion in helping businesses and self-employed people carry out bookkeeping, payroll, and taxation without worrying about errors. Every once in a while, Kate loves to travel to far-off places and relax in the lap of nature.